Samsung SGH-T779 User Manual Ver.uvlj4_f8 (English(north America)) - Page 21
Read the on-screen System Manager Application, Google Services, Setup Complete - tablet
 |
View all Samsung SGH-T779 manuals
Add to My Manuals
Save this manual to your list of manuals |
Page 21 highlights
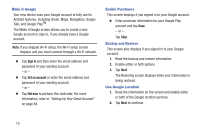
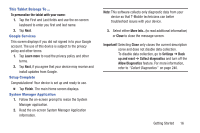
This Tablet Belongs To ... To personalize the tablet with your name: 1. Tap the First and Last fields and use the on-screen keyboard to enter you first and last name. 2. Tap Next. Google Services This screen displays if you did not signed in to your Google account. The use of this device is subject to the privacy policy and other terms. 1. Tap Learn more to read the privacy policy and other terms. 2. Tap Next, if you agree that your device may receive and install updates from Google. Setup Complete Congratulations! Your device is set up and ready to use. Ⅲ Tap Finish. The main Home screen displays. System Manager Application 1. Follow the on-screen prompt to resize the System Manager application. 2. Read the on-screen System Manager Application information. Note: This software collects only diagnostic data from your device so that T-Mobile technicians can better troubleshoot issues with your device. 3. Select either More Info.. (to read additional information) or Close to close the message screen. Important! Selecting Close only closes the current description scree and does not disable data collection. To disable data collection, go to Settings ➔ Back up and reset ➔ Collect diagnostics and turn off the Allow Diagnostics feature. For more information, refer to "Collect Diagnostics" on page 240. Getting Started 16
-
 1
1 -
2
-
3
-
4
-
5
-
6
-
7
-
8
-
9
-
10
-
11
-
12
-
13
-
14
-
15
-
 16
16 -
 17
17 -
 18
18 -
 19
19 -
 20
20 -
 21
21 -
 22
22 -
 23
23 -
 24
24 -
 25
25 -
 26
26 -
27
-
28
-
29
-
30
-
31
-
32
-
33
-
34
-
35
-
36
-
37
-
38
-
39
-
40
-
41
-
42
-
43
-
44
-
45
-
46
-
47
-
48
-
49
-
50
-
51
-
52
-
53
-
54
-
55
-
56
-
57
-
58
-
59
-
60
-
61
-
62
-
63
-
64
-
65
-
66
-
67
-
68
-
69
-
70
-
71
-
72
-
73
-
74
-
75
-
76
-
77
-
78
-
79
-
80
-
81
-
82
-
83
-
84
-
85
-
86
-
87
-
88
-
89
-
90
-
91
-
92
-
93
-
94
-
95
-
96
-
97
-
98
-
99
-
100
-
101
-
102
-
103
-
104
-
105
-
106
-
107
-
108
-
109
-
110
-
111
-
112
-
113
-
114
-
115
-
116
-
117
-
118
-
119
-
120
-
121
-
122
-
123
-
124
-
125
-
126
-
127
-
128
-
129
-
130
-
131
-
132
-
133
-
134
-
135
-
136
-
137
-
138
-
139
-
140
-
141
-
142
-
143
-
144
-
145
-
146
-
147
-
148
-
149
-
150
-
151
-
152
-
153
-
154
-
155
-
156
-
157
-
158
-
159
-
160
-
161
-
162
-
163
-
164
-
165
-
166
-
167
-
168
-
169
-
170
-
171
-
172
-
173
-
174
-
175
-
176
-
177
-
178
-
179
-
180
-
181
-
182
-
183
-
184
-
185
-
186
-
187
-
188
-
189
-
190
-
191
-
192
-
193
-
194
-
195
-
196
-
197
-
198
-
199
-
200
-
201
-
202
-
203
-
204
-
205
-
206
-
207
-
208
-
209
-
210
-
211
-
212
-
213
-
214
-
215
-
216
-
217
-
218
-
219
-
220
-
221
-
222
-
223
-
224
-
225
-
226
-
227
-
228
-
229
-
230
-
231
-
232
-
233
-
234
-
235
-
236
-
237
-
238
-
239
-
240
-
241
-
242
-
243
-
244
-
245
-
246
-
247
-
248
-
249
-
250
-
251
-
252
-
253
-
254
-
255
-
256
-
257
-
258
-
259
-
260
-
261
-
262
-
263
-
264
-
265
-
266
-
267
-
268
-
269
-
270
-
271
-
272
-
273
-
274
-
275
-
276
-
277
-
278
-
279
-
280
-
281
-
282
-
283
-
284
-
285
-
286
-
287
-
288
-
289
-
290
-
291
-
292
-
293
-
294
 |
 |