Adobe 22011292 User Guide - Page 116
Channel Mixer
 |
UPC - 883919139081
View all Adobe 22011292 manuals
Add to My Manuals
Save this manual to your list of manuals |
Page 116 highlights
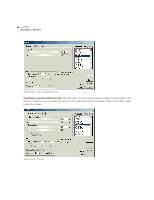
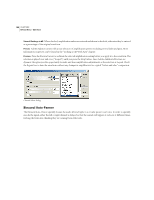
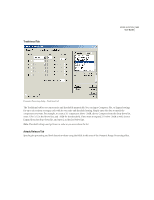
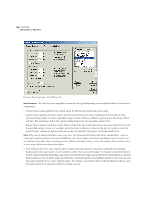
102 CHAPTER 8 Effects Menu - Edit View Flat Pressing the Flat button will reset the graph to its default state, removing all control points. Low/High Settings There are two sets of settings for control of binaural frequencies. Low Settings all correspond to the lower part of the graph (points dragged near the bottom), and High Settings affect the top. • Frequency: This is the binaural frequency that will be encoded into the final process. For special spatial panning effects, choose wave frequencies of 1Hz or less. A mono source (left and right the same) will appear to move from left to right and back at period of 1/frequency. For example, a frequency of 0.1Hz will pan the audio in a "full circle" over the period of 10 seconds. • Intensity: This controls the intensity of the binaural encoding. Higher intensities work well with lower binaural frequencies. • Centering: You can trick the brain into thinking the binaural signal is coming from the left or right. Mixing a file that has been binaurally processed to the left with one that has been binaurally processed to the right (in the same frequency range within 2 Hz) has interesting effects. Channel Mixer The Channel Mixer enables you to alter the left/right balance of a stereo waveform. This lets you create new stereo mixes using the existing right and left channels as input sources. By recombining and inverting the channels, you can create some interesting stereo imaging effects. The default values are automatically set so that the waveform's original gain values will be unchanged. (In other words, the Channel Mixer can't make the waveform any louder than it already is.) New Left Channel Adjust the slide bars to determine the percentage of the current left and right channels that will be mixed into the new left channel. For example, choose an L value of 50 and an R value of 50 to sum equally the current L and R channels to the new left channel after mixing. Enter an L value of 0 and a R value of 100 to make the new left channel contain the material of the original right channel. New Right Channel Adjust the slide bars to determine the percentage of the current left and right channels that will be mixed into the new right channel. For instance, select an L value of 50 and a R value of 50 to sum equally the current L and R channels to the new right channel after mixing. Enter an L value of 100 and a R value of 0 to make the new right channel contain the material of the original left channel. Invert Check the Invert box for either channel to invert that channel's phase polarity (i.e., the peaks will become valleys, and valleys will become peaks). Whenever both channels are inverted, there will be no perceived difference in sound. However, inverting only one channel places the channels out-of-phase and greatly changes the sound when played back (whereby the previously in-phase information is canceled out). Presets Adobe Audition comes several Channel Mixer presets. More information on presets can be found in the "Looking at the Work Area" chapter.
-
 1
1 -
2
-
3
-
4
-
5
-
6
-
7
-
8
-
9
-
10
-
11
-
12
-
13
-
14
-
15
-
16
-
17
-
18
-
19
-
20
-
21
-
22
-
23
-
24
-
25
-
26
-
27
-
28
-
29
-
30
-
31
-
32
-
33
-
34
-
35
-
36
-
37
-
38
-
39
-
40
-
41
-
42
-
43
-
44
-
45
-
46
-
47
-
48
-
49
-
50
-
51
-
52
-
53
-
54
-
55
-
56
-
57
-
58
-
59
-
60
-
61
-
62
-
63
-
64
-
65
-
66
-
67
-
68
-
69
-
70
-
71
-
72
-
73
-
74
-
75
-
76
-
77
-
78
-
79
-
80
-
81
-
82
-
83
-
84
-
85
-
86
-
87
-
88
-
89
-
90
-
91
-
92
-
93
-
94
-
95
-
96
-
97
-
98
-
99
-
100
-
101
-
102
-
103
-
104
-
105
-
106
-
107
-
108
-
109
-
110
-
 111
111 -
 112
112 -
 113
113 -
 114
114 -
 115
115 -
 116
116 -
 117
117 -
 118
118 -
 119
119 -
 120
120 -
 121
121 -
122
-
123
-
124
-
125
-
126
-
127
-
128
-
129
-
130
-
131
-
132
-
133
-
134
-
135
-
136
-
137
-
138
-
139
-
140
-
141
-
142
-
143
-
144
-
145
-
146
-
147
-
148
-
149
-
150
-
151
-
152
-
153
-
154
-
155
-
156
-
157
-
158
-
159
-
160
-
161
-
162
-
163
-
164
-
165
-
166
-
167
-
168
-
169
-
170
-
171
-
172
-
173
-
174
-
175
-
176
-
177
-
178
-
179
-
180
-
181
-
182
-
183
-
184
-
185
-
186
-
187
-
188
-
189
-
190
-
191
-
192
-
193
-
194
-
195
-
196
-
197
-
198
-
199
-
200
-
201
-
202
-
203
-
204
-
205
-
206
-
207
-
208
-
209
-
210
-
211
-
212
-
213
-
214
-
215
-
216
-
217
-
218
-
219
-
220
-
221
-
222
-
223
-
224
-
225
-
226
-
227
-
228
-
229
-
230
-
231
-
232
-
233
-
234
-
235
-
236
-
237
-
238
-
239
-
240
-
241
-
242
-
243
-
244
-
245
-
246
-
247
-
248
-
249
-
250
-
251
-
252
-
253
-
254
-
255
-
256
-
257
-
258
-
259
-
260
-
261
-
262
-
263
-
264
-
265
-
266
-
267
-
268
-
269
-
270
-
271
-
272
-
273
-
274
-
275
-
276
-
277
-
278
-
279
-
280
-
281
-
282
-
283
-
284
-
285
-
286
-
287
-
288
-
289
-
290
-
291
-
292
-
293
-
294
-
295
-
296
-
297
-
298
-
299
-
300
-
301
-
302
-
303
-
304
-
305
-
306
-
307
-
308
-
309
-
310
-
311
-
312
-
313
-
314
-
315
-
316
-
317
-
318
-
319
-
320
-
321
-
322
-
323
-
324
-
325
-
326
-
327
-
328
-
329
-
330
-
331
-
332
-
333
-
334
-
335
-
336
-
337
-
338
-
339
-
340
-
341
-
342
-
343
-
344
-
345
-
346
-
347
-
348
-
349
-
350
-
351
-
352
-
353
-
354
-
355
-
356
-
357
-
358
-
359
-
360
-
361
-
362
-
363
-
364
-
365
-
366
-
367
-
368
-
369
-
370
-
371
-
372
-
373
-
374
-
375
-
376
-
377
-
378
-
379
-
380
-
381
-
382
-
383
-
384
-
385
-
386
-
387
-
388
-
389
-
390
 |
 |
