Adobe 22011292 User Guide - Page 269

Band Buttons: By default, only the Mid Q in the Track EQ window is active, but by pushing one or

Page 269 highlights

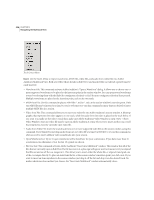
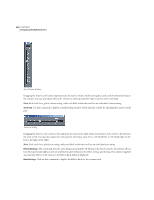
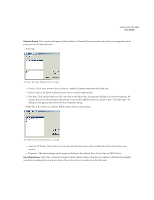
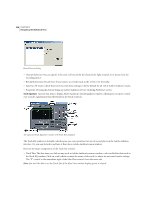
ADOBE AUDITION 255 User Guide • EQ Presets: Press the "P" in the upper right-hand row of icons to access the EQ Presets dialog, which allows you to save favorite equalization settings, as well as delete EQ presets you no longer want. To add the current EQ settings as a preset, click on the "P", and then click Add New to display the New Preset Name dialog. Enter the name for the new preset, and press OK. Choose an EQ preset by clicking the "P" and clicking on the preset's name. To delete a preset, press the "P" icon and then click the Delete button. Keep in mind that since clicking on any item chooses it, to delete you must first press Delete, which initiates the delete mode (notice that the button lights up when delete mode is active). Then, you can click on whichever entry you wish to zap. Note: EQ Presets are also accessible from the EQ section of the Track Controls area by right-clicking on the EQ / A or EQ / B button. The EQ Presets dialog is a "go away" dialog that disappears if you click outside it. • Max View: When you press this control - which looks like a small arrow pointing upward - you switch to Max View. All of the tabs disappear and the controls for the selected track expand to fill the Track Equalizers window. To return to the Track Tabs view, press the Restore control - the small arrow pointing downward. • Expand/Collapse: Use the Expand and Collapse arrows (which point to either the right or the left) to show or hide the equalization frequency and amplitude faders and their associated text entry boxes, as well as the Band buttons. • Graph: The graph shows the track's current equalization curve. The graph's x-axis (horizontal) ruler measures frequency, while the y-axis (vertical) ruler represents amplitude. You can drag the three control points (which look like balls) around the graph to adjust the EQ curve. If the Track EQ window is in expanded view, you'll notice that the two sets of sliders move accordingly when the graph's control points are manipulated. The left-most control point initially represents the EQ curve's low frequency, while the middle and right-most control points correspond to the EQ curves' middle and high frequencies respectively. • Q Values: The low, middle and high frequency Q values of the equalization curve are displayed in these boxes. (Q is the sharpness of the equalization circuit's peak response.) If a Q box isn't "grayed out", you can adjust the Q number by left-clicking on the box and dragging. Dragging to the right increases the Q number, while dragging to the left reduces it. • Band Buttons: By default, only the Mid Q in the Track EQ window is active, but by pushing one or both Band buttons, you can activate the Low Q and/or Hi Q settings. This in effect gives you the control of a parametric equalizer. • Frequency Sliders: Use the vertical Lo, Mid, and Hi Frequency Sliders to adjust the EQ curve's low, middle, and high frequencies respectively. Drag a slider to the right (or click on the arrow on the right of the slider) to increase the slider's frequency, while moving it to the left (or clicking on the arrow to the left of the slider) reduces the frequency. You may also specify the slider's frequency by directly entering the desired Hz value in the text box to the right of the frequency slider. • Amplitude Sliders: The horizontal Lo, Mid, and Hi Amplitude Sliders to are used to increase or attenuate the EQ curve's low, middle, and high frequencies respectively. Move a slider upwards (or click on the arrow at the top of the slider) to raise the frequency's amplitude, while bringing it down (or clicking on the arrow to the bottom of the slider) decreases the amplification of the frequency. You may also specify the slider's amplitude by directly entering the desired dB value in the text box at the bottom of the amplitude slider.

  • 1
  • 2
  • 3
  • 4
  • 5
  • 6
  • 7
  • 8
  • 9
  • 10
  • 11
  • 12
  • 13
  • 14
  • 15
  • 16
  • 17
  • 18
  • 19
  • 20
  • 21
  • 22
  • 23
  • 24
  • 25
  • 26
  • 27
  • 28
  • 29
  • 30
  • 31
  • 32
  • 33
  • 34
  • 35
  • 36
  • 37
  • 38
  • 39
  • 40
  • 41
  • 42
  • 43
  • 44
  • 45
  • 46
  • 47
  • 48
  • 49
  • 50
  • 51
  • 52
  • 53
  • 54
  • 55
  • 56
  • 57
  • 58
  • 59
  • 60
  • 61
  • 62
  • 63
  • 64
  • 65
  • 66
  • 67
  • 68
  • 69
  • 70
  • 71
  • 72
  • 73
  • 74
  • 75
  • 76
  • 77
  • 78
  • 79
  • 80
  • 81
  • 82
  • 83
  • 84
  • 85
  • 86
  • 87
  • 88
  • 89
  • 90
  • 91
  • 92
  • 93
  • 94
  • 95
  • 96
  • 97
  • 98
  • 99
  • 100
  • 101
  • 102
  • 103
  • 104
  • 105
  • 106
  • 107
  • 108
  • 109
  • 110
  • 111
  • 112
  • 113
  • 114
  • 115
  • 116
  • 117
  • 118
  • 119
  • 120
  • 121
  • 122
  • 123
  • 124
  • 125
  • 126
  • 127
  • 128
  • 129
  • 130
  • 131
  • 132
  • 133
  • 134
  • 135
  • 136
  • 137
  • 138
  • 139
  • 140
  • 141
  • 142
  • 143
  • 144
  • 145
  • 146
  • 147
  • 148
  • 149
  • 150
  • 151
  • 152
  • 153
  • 154
  • 155
  • 156
  • 157
  • 158
  • 159
  • 160
  • 161
  • 162
  • 163
  • 164
  • 165
  • 166
  • 167
  • 168
  • 169
  • 170
  • 171
  • 172
  • 173
  • 174
  • 175
  • 176
  • 177
  • 178
  • 179
  • 180
  • 181
  • 182
  • 183
  • 184
  • 185
  • 186
  • 187
  • 188
  • 189
  • 190
  • 191
  • 192
  • 193
  • 194
  • 195
  • 196
  • 197
  • 198
  • 199
  • 200
  • 201
  • 202
  • 203
  • 204
  • 205
  • 206
  • 207
  • 208
  • 209
  • 210
  • 211
  • 212
  • 213
  • 214
  • 215
  • 216
  • 217
  • 218
  • 219
  • 220
  • 221
  • 222
  • 223
  • 224
  • 225
  • 226
  • 227
  • 228
  • 229
  • 230
  • 231
  • 232
  • 233
  • 234
  • 235
  • 236
  • 237
  • 238
  • 239
  • 240
  • 241
  • 242
  • 243
  • 244
  • 245
  • 246
  • 247
  • 248
  • 249
  • 250
  • 251
  • 252
  • 253
  • 254
  • 255
  • 256
  • 257
  • 258
  • 259
  • 260
  • 261
  • 262
  • 263
  • 264
  • 265
  • 266
  • 267
  • 268
  • 269
  • 270
  • 271
  • 272
  • 273
  • 274
  • 275
  • 276
  • 277
  • 278
  • 279
  • 280
  • 281
  • 282
  • 283
  • 284
  • 285
  • 286
  • 287
  • 288
  • 289
  • 290
  • 291
  • 292
  • 293
  • 294
  • 295
  • 296
  • 297
  • 298
  • 299
  • 300
  • 301
  • 302
  • 303
  • 304
  • 305
  • 306
  • 307
  • 308
  • 309
  • 310
  • 311
  • 312
  • 313
  • 314
  • 315
  • 316
  • 317
  • 318
  • 319
  • 320
  • 321
  • 322
  • 323
  • 324
  • 325
  • 326
  • 327
  • 328
  • 329
  • 330
  • 331
  • 332
  • 333
  • 334
  • 335
  • 336
  • 337
  • 338
  • 339
  • 340
  • 341
  • 342
  • 343
  • 344
  • 345
  • 346
  • 347
  • 348
  • 349
  • 350
  • 351
  • 352
  • 353
  • 354
  • 355
  • 356
  • 357
  • 358
  • 359
  • 360
  • 361
  • 362
  • 363
  • 364
  • 365
  • 366
  • 367
  • 368
  • 369
  • 370
  • 371
  • 372
  • 373
  • 374
  • 375
  • 376
  • 377
  • 378
  • 379
  • 380
  • 381
  • 382
  • 383
  • 384
  • 385
  • 386
  • 387
  • 388
  • 389
  • 390

255
ADOBE AUDITION
User Guide
EQ Presets: Press the “P” in the upper right-hand row of icons to access the EQ Presets dialog, which allows you to
save favorite equalization settings, as well as delete EQ presets you no longer want. To add the current EQ settings as
a preset, click on the “P”, and then click Add New to display the New Preset Name dialog. Enter the name for the new
preset, and press OK. Choose an EQ preset by clicking the “P” and clicking on the preset’s name. To delete a preset,
press the “P” icon and then click the Delete button. Keep in mind that since clicking on any item chooses it, to delete
you must first press Delete, which initiates the delete mode (notice that the button lights up when delete mode is
active). Then, you can click on whichever entry you wish to zap.
Note:
EQ Presets are also accessible from the EQ section of the Track Controls area by right-clicking on the EQ / A or EQ / B
button. The EQ Presets dialog is a “go away” dialog that disappears if you click outside it.
Max View: When you press this control – which looks like a small arrow pointing upward – you switch to Max View.
All of the tabs disappear and the controls for the selected track expand to fill the Track Equalizers window. To return
to the Track Tabs view, press the Restore control – the small arrow pointing downward.
Expand/Collapse: Use the Expand and Collapse arrows (which point to either the right or the left) to show or hide the
equalization frequency and amplitude faders and their associated text entry boxes, as well as the Band buttons.
Graph: The graph shows the track’s current equalization curve. The graph’s x-axis (horizontal) ruler measures
frequency, while the y-axis (vertical) ruler represents amplitude. You can drag the three control points (which look
like balls) around the graph to adjust the EQ curve. If the Track EQ window is in expanded view, you’ll notice that the
two sets of sliders move accordingly when the graph’s control points are manipulated. The left-most control point
initially represents the EQ curve’s low frequency, while the middle and right-most control points correspond to the
EQ curves’ middle and high frequencies respectively.
Q Values: The low, middle and high frequency Q values of the equalization curve are displayed in these boxes. (Q is
the sharpness of the equalization circuit’s peak response.) If a Q box isn’t “grayed out”, you can adjust the Q number
by left-clicking on the box and dragging. Dragging to the right increases the Q number, while dragging to the left
reduces it.
Band Buttons: By default, only the Mid Q in the Track EQ window is active, but by pushing one or both Band buttons,
you can activate the Low Q and/or Hi Q settings. This in effect gives you the control of a parametric equalizer.
Frequency Sliders: Use the vertical Lo, Mid, and Hi Frequency Sliders to adjust the EQ curve’s low, middle, and high
frequencies respectively. Drag a slider to the right (or click on the arrow on the right of the slider) to increase the
slider’s frequency, while moving it to the left (or clicking on the arrow to the left of the slider) reduces the frequency.
You may also specify the slider’s frequency by directly entering the desired Hz value in the text box to the right of the
frequency slider.
Amplitude Sliders: The horizontal Lo, Mid, and Hi Amplitude Sliders to are used to increase or attenuate the EQ
curve’s low, middle, and high frequencies respectively. Move a slider upwards (or click on the arrow at the top of the
slider) to raise the frequency’s amplitude, while bringing it down (or clicking on the arrow to the bottom of the slider)
decreases the amplification of the frequency. You may also specify the slider’s amplitude by directly entering the
desired dB value in the text box at the bottom of the amplitude slider.