Adobe 22011292 User Guide - Page 155
Sweeping Phaser
 |
UPC - 883919139081
View all Adobe 22011292 manuals
Add to My Manuals
Save this manual to your list of manuals |
Page 155 highlights
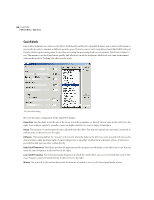
ADOBE AUDITION 141 User Guide A setting of 100 and a reverb length of 2000 milliseconds or more creates interesting canyon effects. Mixing The Mixing section provides the following options: Original Signal (dry) This setting determines how much of the unprocessed (dry) signal is mixed into the final output. In general, the more reverb you add, the lower the original signal volume should be. In most cases, a value of 90% or so should work well. To add spaciousness to an instrument, keep the dry signal higher, or at 100%. If you're trying to achieve a special effect with reverb, you might want to reduce the volume of the original signal. If the reverb is so great that audio begins to clip, try reducing both the dry and the reverberated signal strength. Reverb (wet) This setting determines how much of the reverberated (wet) signal is mixed into the final effect output. In modern production, the wet amount should ordinarily be lower than the dry signal to add spaciousness to a track. However, you may want to increase this amount to simulate physical distance from the audio source (where reverb is heard in greater proportions to the original signal). Combine Source Left and Right When working with stereo audio, there are actually two source signals (left and right), that can be placed independently. This does, however, require twice as many calculations as a single audio source, so you can check this option for faster processing. • When this box is checked, Adobe Audition sums the left and right channels of a stereo source file before routing to the effects processor. • When unchecked, the original signal and its respective reverberated signal remain in its own channel. If you know that both channels are identical (that is, if they originated from a monophonic sample), you should definitely check this option to minimize processing time. Presets Adobe Audition comes with several Reverb presets. More information on presets can be found in the "Looking at the Work Area" chapter. Preview Press the Preview button to audition the current Reverb setting before you apply it to the waveform. The selection is looped until you press the Stop button. Since Adobe Audition's Previews are dynamic, this gives you the opportunity to make and hear processing adjustments as the selection is continuously played. Make sure that there is enough silence at the end of the waveform for the reverb trails to complete. If the reverb abruptly cuts off before it fully decays, undo the Reverb effect, add several seconds of silence using Adobe Audition's Generate > Silence command, and then rerun the Reverb effect. Sweeping Phaser Like the Flanger effect, a Phaser introduces a variable phase-shift to a split signal and recombines it, creating special effects popularized by guitarists of the 1960s. The Sweeping Phaser sweeps a notch or boost type filter back and forth about a center frequency.
-
 1
1 -
2
-
3
-
4
-
5
-
6
-
7
-
8
-
9
-
10
-
11
-
12
-
13
-
14
-
15
-
16
-
17
-
18
-
19
-
20
-
21
-
22
-
23
-
24
-
25
-
26
-
27
-
28
-
29
-
30
-
31
-
32
-
33
-
34
-
35
-
36
-
37
-
38
-
39
-
40
-
41
-
42
-
43
-
44
-
45
-
46
-
47
-
48
-
49
-
50
-
51
-
52
-
53
-
54
-
55
-
56
-
57
-
58
-
59
-
60
-
61
-
62
-
63
-
64
-
65
-
66
-
67
-
68
-
69
-
70
-
71
-
72
-
73
-
74
-
75
-
76
-
77
-
78
-
79
-
80
-
81
-
82
-
83
-
84
-
85
-
86
-
87
-
88
-
89
-
90
-
91
-
92
-
93
-
94
-
95
-
96
-
97
-
98
-
99
-
100
-
101
-
102
-
103
-
104
-
105
-
106
-
107
-
108
-
109
-
110
-
111
-
112
-
113
-
114
-
115
-
116
-
117
-
118
-
119
-
120
-
121
-
122
-
123
-
124
-
125
-
126
-
127
-
128
-
129
-
130
-
131
-
132
-
133
-
134
-
135
-
136
-
137
-
138
-
139
-
140
-
141
-
142
-
143
-
144
-
145
-
146
-
147
-
148
-
149
-
 150
150 -
 151
151 -
 152
152 -
 153
153 -
 154
154 -
 155
155 -
 156
156 -
 157
157 -
 158
158 -
 159
159 -
 160
160 -
161
-
162
-
163
-
164
-
165
-
166
-
167
-
168
-
169
-
170
-
171
-
172
-
173
-
174
-
175
-
176
-
177
-
178
-
179
-
180
-
181
-
182
-
183
-
184
-
185
-
186
-
187
-
188
-
189
-
190
-
191
-
192
-
193
-
194
-
195
-
196
-
197
-
198
-
199
-
200
-
201
-
202
-
203
-
204
-
205
-
206
-
207
-
208
-
209
-
210
-
211
-
212
-
213
-
214
-
215
-
216
-
217
-
218
-
219
-
220
-
221
-
222
-
223
-
224
-
225
-
226
-
227
-
228
-
229
-
230
-
231
-
232
-
233
-
234
-
235
-
236
-
237
-
238
-
239
-
240
-
241
-
242
-
243
-
244
-
245
-
246
-
247
-
248
-
249
-
250
-
251
-
252
-
253
-
254
-
255
-
256
-
257
-
258
-
259
-
260
-
261
-
262
-
263
-
264
-
265
-
266
-
267
-
268
-
269
-
270
-
271
-
272
-
273
-
274
-
275
-
276
-
277
-
278
-
279
-
280
-
281
-
282
-
283
-
284
-
285
-
286
-
287
-
288
-
289
-
290
-
291
-
292
-
293
-
294
-
295
-
296
-
297
-
298
-
299
-
300
-
301
-
302
-
303
-
304
-
305
-
306
-
307
-
308
-
309
-
310
-
311
-
312
-
313
-
314
-
315
-
316
-
317
-
318
-
319
-
320
-
321
-
322
-
323
-
324
-
325
-
326
-
327
-
328
-
329
-
330
-
331
-
332
-
333
-
334
-
335
-
336
-
337
-
338
-
339
-
340
-
341
-
342
-
343
-
344
-
345
-
346
-
347
-
348
-
349
-
350
-
351
-
352
-
353
-
354
-
355
-
356
-
357
-
358
-
359
-
360
-
361
-
362
-
363
-
364
-
365
-
366
-
367
-
368
-
369
-
370
-
371
-
372
-
373
-
374
-
375
-
376
-
377
-
378
-
379
-
380
-
381
-
382
-
383
-
384
-
385
-
386
-
387
-
388
-
389
-
390
 |
 |
