Adobe 22011292 User Guide - Page 81
Find Beats
 |
UPC - 883919139081
View all Adobe 22011292 manuals
Add to My Manuals
Save this manual to your list of manuals |
Page 81 highlights
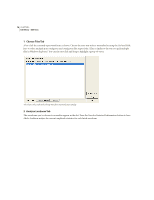
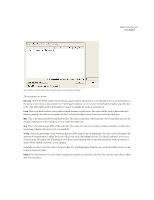
ADOBE AUDITION 67 User Guide Having a selection start and end on a Zero Crossing is useful in deleting or inserting a selection in the middle of a waveform. If you don't line up the amplitudes (at zero, in this case) on both sides of the selection, the end points drawn together when the highlighted selection is removed are at different amplitudes, which often results in an audible pop or click. You might want to use this feature when you wish to delete a portion of a waveform, or insert a portion from the middle of the waveform. To use Zero Crossings: 1 Select the portion you want to delete (or position the cursor where you want to insert). 2 Choose Edit > Zero Crossings and the appropriate submenu entry: • Adjust Selection Inward: Adjusts both region boundaries inward to the next available zero crossing • Adjust Selection Outward: Adjusts both region boundaries outward to the next available zero crossing • Adjust Left Side to Left: Adjusts the left region boundary leftward to the next available zero crossing • Adjust Left Side to Right: Adjusts the left region boundary rightward to the next available zero crossing • Adjust Right Side to Left: Adjusts the right region boundary leftward to the next available zero crossing • Adjust Right Side to Right: Adjusts the right region boundary rightward to the next available zero crossing Find Beats Use this function to have Adobe Audition locate the boundaries that make up musical beats in an existing music audio file. This lets you easily find the starting and ending loop points when you want to construct drum loops and similar musical phrases. To use Find Beats: 1 Place the play cursor in the Wave Display to the left of your targeted loop starting point. 2 Select Edit > Find Beats > Find Next Beat (Left) to locate the beginning of the current beat. 3 Press Shift+[ until you arrive at the desired loop starting point. 4 Choose Edit > Find Beats > Find Next Beat (Right) to select from the current cursor position (now the loop start) to the next beat. 5 Press Shift+] until you arrive at the desired ending for your loop. 6 Press the Play Looped button in the Transport Controls to audition your loop. 7 After any necessary tweaking, you can then save, paste, or add the loop to the Cue List. Note: If the waveform levels don't match up at the loop point, you may hear audible clicking as the loop repeats. To adjust for this, you can revert to the original source file and use the Zero Crossings feature to match initial and ending levels.
-
 1
1 -
2
-
3
-
4
-
5
-
6
-
7
-
8
-
9
-
10
-
11
-
12
-
13
-
14
-
15
-
16
-
17
-
18
-
19
-
20
-
21
-
22
-
23
-
24
-
25
-
26
-
27
-
28
-
29
-
30
-
31
-
32
-
33
-
34
-
35
-
36
-
37
-
38
-
39
-
40
-
41
-
42
-
43
-
44
-
45
-
46
-
47
-
48
-
49
-
50
-
51
-
52
-
53
-
54
-
55
-
56
-
57
-
58
-
59
-
60
-
61
-
62
-
63
-
64
-
65
-
66
-
67
-
68
-
69
-
70
-
71
-
72
-
73
-
74
-
75
-
 76
76 -
 77
77 -
 78
78 -
 79
79 -
 80
80 -
 81
81 -
 82
82 -
 83
83 -
 84
84 -
 85
85 -
 86
86 -
87
-
88
-
89
-
90
-
91
-
92
-
93
-
94
-
95
-
96
-
97
-
98
-
99
-
100
-
101
-
102
-
103
-
104
-
105
-
106
-
107
-
108
-
109
-
110
-
111
-
112
-
113
-
114
-
115
-
116
-
117
-
118
-
119
-
120
-
121
-
122
-
123
-
124
-
125
-
126
-
127
-
128
-
129
-
130
-
131
-
132
-
133
-
134
-
135
-
136
-
137
-
138
-
139
-
140
-
141
-
142
-
143
-
144
-
145
-
146
-
147
-
148
-
149
-
150
-
151
-
152
-
153
-
154
-
155
-
156
-
157
-
158
-
159
-
160
-
161
-
162
-
163
-
164
-
165
-
166
-
167
-
168
-
169
-
170
-
171
-
172
-
173
-
174
-
175
-
176
-
177
-
178
-
179
-
180
-
181
-
182
-
183
-
184
-
185
-
186
-
187
-
188
-
189
-
190
-
191
-
192
-
193
-
194
-
195
-
196
-
197
-
198
-
199
-
200
-
201
-
202
-
203
-
204
-
205
-
206
-
207
-
208
-
209
-
210
-
211
-
212
-
213
-
214
-
215
-
216
-
217
-
218
-
219
-
220
-
221
-
222
-
223
-
224
-
225
-
226
-
227
-
228
-
229
-
230
-
231
-
232
-
233
-
234
-
235
-
236
-
237
-
238
-
239
-
240
-
241
-
242
-
243
-
244
-
245
-
246
-
247
-
248
-
249
-
250
-
251
-
252
-
253
-
254
-
255
-
256
-
257
-
258
-
259
-
260
-
261
-
262
-
263
-
264
-
265
-
266
-
267
-
268
-
269
-
270
-
271
-
272
-
273
-
274
-
275
-
276
-
277
-
278
-
279
-
280
-
281
-
282
-
283
-
284
-
285
-
286
-
287
-
288
-
289
-
290
-
291
-
292
-
293
-
294
-
295
-
296
-
297
-
298
-
299
-
300
-
301
-
302
-
303
-
304
-
305
-
306
-
307
-
308
-
309
-
310
-
311
-
312
-
313
-
314
-
315
-
316
-
317
-
318
-
319
-
320
-
321
-
322
-
323
-
324
-
325
-
326
-
327
-
328
-
329
-
330
-
331
-
332
-
333
-
334
-
335
-
336
-
337
-
338
-
339
-
340
-
341
-
342
-
343
-
344
-
345
-
346
-
347
-
348
-
349
-
350
-
351
-
352
-
353
-
354
-
355
-
356
-
357
-
358
-
359
-
360
-
361
-
362
-
363
-
364
-
365
-
366
-
367
-
368
-
369
-
370
-
371
-
372
-
373
-
374
-
375
-
376
-
377
-
378
-
379
-
380
-
381
-
382
-
383
-
384
-
385
-
386
-
387
-
388
-
389
-
390
 |
 |
