Adobe 22011292 User Guide - Page 82
Auto-Cue
 |
UPC - 883919139081
View all Adobe 22011292 manuals
Add to My Manuals
Save this manual to your list of manuals |
Page 82 highlights
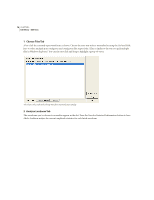
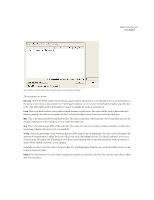
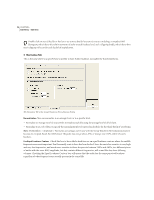
68 CHAPTER 6 Edit Menu - Edit View Auto-Cue The Auto-Cue feature is used to define spoken/music phrases or beats, and automatically add them to the Cue List. To use Auto-Cue, first highlight the general region in which you wish to find phrases or beats. Then, select Edit > AutoCue and the appropriate submenu choice from the following options: • Adjust Selection to Phrase: Selects a phrase within the highlighted region by adjusting the highlight inward, ignoring any silence before and after the audio. Nothing is added to the Cue List. • Find Phrases and Mark: Scans the highlighted area, marking non-silent regions as Basic cues in the Cue List. • Find Beats and Mark: Scans the highlighted area, marking beats as Beat cues in the Cue List. Auto-Cue Settings Dialog • Auto-Cue Settings: Choose this option to customize the way the Auto-Cue function works. Here are the major components of the Auto-Cue Settings window: • Audio will be considered "silence" when: Enter the amplitude value (in decibels) you wish Adobe Audition to consider as the maximum level for Silence in the Signal is below box. The duration (in milliseconds) of this maximum amplitude value should be entered in the For more than box. Note: For very quiet, high-quality audio, the dB value will be lower (like -60 dB). For noisier audio, the value may be much higher (such as -30 dB). Use higher values in the seconds box to keep groups of words together, for example. • Audio will be considered as valid when: Enter the amplitude value (in decibels) you wish Adobe Audition to consider as the minimum level for Audio in the Signal is above box. The duration (in milliseconds) of this minimum amplitude value should be entered in the For more than box. Use higher values for the second box to ignore short periods of undesired audio (like clicks, static, or other noise). However, if the value is too high (above 200 ms), short words may be skipped. • Find Levels: Press this button to scan the waveform (or a highlighted section) to have Adobe Audition automatically determine a good starting point for signal levels. After completing the scan, suggested values are automatically placed in the appropriate boxes. If these values aren't doing the job - say, words or phrases are being chopped off - try lowering the signal level values. Increase the signal level values if not enough silence is being removed.
-
 1
1 -
2
-
3
-
4
-
5
-
6
-
7
-
8
-
9
-
10
-
11
-
12
-
13
-
14
-
15
-
16
-
17
-
18
-
19
-
20
-
21
-
22
-
23
-
24
-
25
-
26
-
27
-
28
-
29
-
30
-
31
-
32
-
33
-
34
-
35
-
36
-
37
-
38
-
39
-
40
-
41
-
42
-
43
-
44
-
45
-
46
-
47
-
48
-
49
-
50
-
51
-
52
-
53
-
54
-
55
-
56
-
57
-
58
-
59
-
60
-
61
-
62
-
63
-
64
-
65
-
66
-
67
-
68
-
69
-
70
-
71
-
72
-
73
-
74
-
75
-
76
-
 77
77 -
 78
78 -
 79
79 -
 80
80 -
 81
81 -
 82
82 -
 83
83 -
 84
84 -
 85
85 -
 86
86 -
 87
87 -
88
-
89
-
90
-
91
-
92
-
93
-
94
-
95
-
96
-
97
-
98
-
99
-
100
-
101
-
102
-
103
-
104
-
105
-
106
-
107
-
108
-
109
-
110
-
111
-
112
-
113
-
114
-
115
-
116
-
117
-
118
-
119
-
120
-
121
-
122
-
123
-
124
-
125
-
126
-
127
-
128
-
129
-
130
-
131
-
132
-
133
-
134
-
135
-
136
-
137
-
138
-
139
-
140
-
141
-
142
-
143
-
144
-
145
-
146
-
147
-
148
-
149
-
150
-
151
-
152
-
153
-
154
-
155
-
156
-
157
-
158
-
159
-
160
-
161
-
162
-
163
-
164
-
165
-
166
-
167
-
168
-
169
-
170
-
171
-
172
-
173
-
174
-
175
-
176
-
177
-
178
-
179
-
180
-
181
-
182
-
183
-
184
-
185
-
186
-
187
-
188
-
189
-
190
-
191
-
192
-
193
-
194
-
195
-
196
-
197
-
198
-
199
-
200
-
201
-
202
-
203
-
204
-
205
-
206
-
207
-
208
-
209
-
210
-
211
-
212
-
213
-
214
-
215
-
216
-
217
-
218
-
219
-
220
-
221
-
222
-
223
-
224
-
225
-
226
-
227
-
228
-
229
-
230
-
231
-
232
-
233
-
234
-
235
-
236
-
237
-
238
-
239
-
240
-
241
-
242
-
243
-
244
-
245
-
246
-
247
-
248
-
249
-
250
-
251
-
252
-
253
-
254
-
255
-
256
-
257
-
258
-
259
-
260
-
261
-
262
-
263
-
264
-
265
-
266
-
267
-
268
-
269
-
270
-
271
-
272
-
273
-
274
-
275
-
276
-
277
-
278
-
279
-
280
-
281
-
282
-
283
-
284
-
285
-
286
-
287
-
288
-
289
-
290
-
291
-
292
-
293
-
294
-
295
-
296
-
297
-
298
-
299
-
300
-
301
-
302
-
303
-
304
-
305
-
306
-
307
-
308
-
309
-
310
-
311
-
312
-
313
-
314
-
315
-
316
-
317
-
318
-
319
-
320
-
321
-
322
-
323
-
324
-
325
-
326
-
327
-
328
-
329
-
330
-
331
-
332
-
333
-
334
-
335
-
336
-
337
-
338
-
339
-
340
-
341
-
342
-
343
-
344
-
345
-
346
-
347
-
348
-
349
-
350
-
351
-
352
-
353
-
354
-
355
-
356
-
357
-
358
-
359
-
360
-
361
-
362
-
363
-
364
-
365
-
366
-
367
-
368
-
369
-
370
-
371
-
372
-
373
-
374
-
375
-
376
-
377
-
378
-
379
-
380
-
381
-
382
-
383
-
384
-
385
-
386
-
387
-
388
-
389
-
390
 |
 |
