Adobe 22011292 User Guide - Page 83
Snapping, Group Waveform Normalize
 |
UPC - 883919139081
View all Adobe 22011292 manuals
Add to My Manuals
Save this manual to your list of manuals |
Page 83 highlights
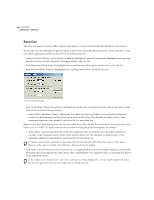
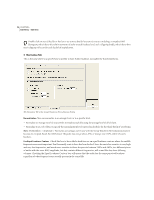
ADOBE AUDITION 69 User Guide • Trim Digital Silence: This command removes pure digital silence from the beginning and ending of a file. However, if you highlight the middle of a waveform, Trim Digital Silence will act as a normal Trim command, trimming out everything else, in addition to any digital silence in the highlighted region at the endpoints. Snapping In this case, the term "snapping" means that whenever a waveform cursor is placed within a certain distance of a defined location point timeline or cue location point, that cursor automatically "jumps" or "snaps" to that precise boundary point. Keep in mind that snapping only occurs if you're close to the ruler tick. Four options are available, all accessed from the Edit > Snapping submenu. Highlight and check one to select it. (Only one of the Snap to Ruler commands can be checked at a time.) Snap to Cues Use this option to allow a selected waveform to snap to a defined Cue point. (See the View > Cue List section of this guide for information on how to define Cue points.) Snap to Ruler (Coarse) This option allows the selected waveform to only snap to the major numeric divisions (decimal, SMPTE, samples, etc.) in the timeline window. If you need more precise snapping, check Snap to Ruler (Fine), which is described below. Snap to Ruler (Fine) Select this option to allow the selected waveform to snap to each of the subdivisions (decimal, SMPTE, samples, etc.) within the timeline window. Zooming in on the timeline - which is done by right-clicking and dragging within the timeline across the desired waveform area - will generally break the display down into more accurate subdivisions. This lets you place a waveform more accurately within the timeline. Snap to Zero Crossings Choose this option to have the waveform snap to the nearest place where the waveform crosses the center line (in other words, the zero amplitude point). Snap to Frames (Always) When Snap to Frames (Always) is chosen, the selection or your cursor is always right on a frame boundary in whatever time format you're in - as long as the time format selected is measured in frames (such as Compact Disc and SMPTE). This option is especially handy for working on audio for CD. Snapping settings may be easily accessed by right-clicking on the timeline. Group Waveform Normalize Group Waveform Normalize allows you to normalize the volume of multiple open waveforms using a three-screen batch process. (When you normalize a waveform, the loudest part of the waveform is set to a specified amplitude, thereby raising or lowering all other parts of the same waveform by the same amount.) If the volume is raised as part of the normalization process, Adobe Audition can apply limiting to prevent clipping. If you're getting ready to master an audio CD, using Group Waveform Normalize is a great way to make sure that all tracks on the CD have a consistent volume.
-
 1
1 -
2
-
3
-
4
-
5
-
6
-
7
-
8
-
9
-
10
-
11
-
12
-
13
-
14
-
15
-
16
-
17
-
18
-
19
-
20
-
21
-
22
-
23
-
24
-
25
-
26
-
27
-
28
-
29
-
30
-
31
-
32
-
33
-
34
-
35
-
36
-
37
-
38
-
39
-
40
-
41
-
42
-
43
-
44
-
45
-
46
-
47
-
48
-
49
-
50
-
51
-
52
-
53
-
54
-
55
-
56
-
57
-
58
-
59
-
60
-
61
-
62
-
63
-
64
-
65
-
66
-
67
-
68
-
69
-
70
-
71
-
72
-
73
-
74
-
75
-
76
-
77
-
 78
78 -
 79
79 -
 80
80 -
 81
81 -
 82
82 -
 83
83 -
 84
84 -
 85
85 -
 86
86 -
 87
87 -
 88
88 -
89
-
90
-
91
-
92
-
93
-
94
-
95
-
96
-
97
-
98
-
99
-
100
-
101
-
102
-
103
-
104
-
105
-
106
-
107
-
108
-
109
-
110
-
111
-
112
-
113
-
114
-
115
-
116
-
117
-
118
-
119
-
120
-
121
-
122
-
123
-
124
-
125
-
126
-
127
-
128
-
129
-
130
-
131
-
132
-
133
-
134
-
135
-
136
-
137
-
138
-
139
-
140
-
141
-
142
-
143
-
144
-
145
-
146
-
147
-
148
-
149
-
150
-
151
-
152
-
153
-
154
-
155
-
156
-
157
-
158
-
159
-
160
-
161
-
162
-
163
-
164
-
165
-
166
-
167
-
168
-
169
-
170
-
171
-
172
-
173
-
174
-
175
-
176
-
177
-
178
-
179
-
180
-
181
-
182
-
183
-
184
-
185
-
186
-
187
-
188
-
189
-
190
-
191
-
192
-
193
-
194
-
195
-
196
-
197
-
198
-
199
-
200
-
201
-
202
-
203
-
204
-
205
-
206
-
207
-
208
-
209
-
210
-
211
-
212
-
213
-
214
-
215
-
216
-
217
-
218
-
219
-
220
-
221
-
222
-
223
-
224
-
225
-
226
-
227
-
228
-
229
-
230
-
231
-
232
-
233
-
234
-
235
-
236
-
237
-
238
-
239
-
240
-
241
-
242
-
243
-
244
-
245
-
246
-
247
-
248
-
249
-
250
-
251
-
252
-
253
-
254
-
255
-
256
-
257
-
258
-
259
-
260
-
261
-
262
-
263
-
264
-
265
-
266
-
267
-
268
-
269
-
270
-
271
-
272
-
273
-
274
-
275
-
276
-
277
-
278
-
279
-
280
-
281
-
282
-
283
-
284
-
285
-
286
-
287
-
288
-
289
-
290
-
291
-
292
-
293
-
294
-
295
-
296
-
297
-
298
-
299
-
300
-
301
-
302
-
303
-
304
-
305
-
306
-
307
-
308
-
309
-
310
-
311
-
312
-
313
-
314
-
315
-
316
-
317
-
318
-
319
-
320
-
321
-
322
-
323
-
324
-
325
-
326
-
327
-
328
-
329
-
330
-
331
-
332
-
333
-
334
-
335
-
336
-
337
-
338
-
339
-
340
-
341
-
342
-
343
-
344
-
345
-
346
-
347
-
348
-
349
-
350
-
351
-
352
-
353
-
354
-
355
-
356
-
357
-
358
-
359
-
360
-
361
-
362
-
363
-
364
-
365
-
366
-
367
-
368
-
369
-
370
-
371
-
372
-
373
-
374
-
375
-
376
-
377
-
378
-
379
-
380
-
381
-
382
-
383
-
384
-
385
-
386
-
387
-
388
-
389
-
390
 |
 |
