Adobe 22011292 User Guide - Page 142
Flanger
 |
UPC - 883919139081
View all Adobe 22011292 manuals
Add to My Manuals
Save this manual to your list of manuals |
Page 142 highlights
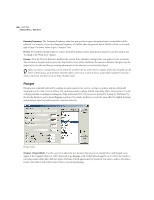
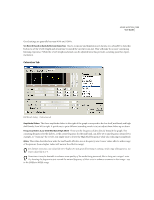
128 CHAPTER 8 Effects Menu - Edit View Damping Frequency The Damping Frequency value lets you specify an upper frequency limit of sound that will be reflected. For instance, if you set a damping frequency of 7000Hz, then frequencies above 7000Hz will be cut for each unit of time. Use lower values to get a "warmer" feel. Presets Several Echo Chamber presets come with Adobe Audition. More information on presets can be found in the "Looking at the Work Area" chapter. Preview Press the Preview button to audition the current Echo Chamber setting before you apply it to the waveform. The selection is looped until you press the Stop button. Since Adobe Audition's Previews are dynamic, this gives you the opportunity to make and hear processing adjustments as the selection is continuously played. Make sure there is enough silence at the end of the waveform for the echo trails to complete. If the echo abruptly cuts off before it fully decays, undo the Echo Chamber effect, add several seconds of silence using Adobe Audition's Generate > Silence command, and then rerun the Echo Chamber effect. Flanger Flanging was originally achieved by sending an audio signal to two reel-to-reel tape recorders, and then physically slowing down the reels of one machine. The resulting sound is a phase-shifted, time delay effect, characteristic of some of the psychedelic sounding recordings in of the 1960s and 1970s. (If you've ever listened to "Listen To The Music" by the Doobie Brothers, you've heard flanging in action.) Use Adobe Audition to create the same effect by slightly delaying and phasing a signal at predetermined or random intervals. Flanger dialog Original - Delayed Slider Use this control to adjust the mix between the amount of original (dry) and flanged (wet) signal. If the Original value is at 100%, the result is no flanging at all. If the Delayed signal is set to 100%, the result is a wavering sound, rather like a bad tape player. Portions of both signals must be present if you want to achieve the characteristic cancellation and reinforcement that occurs during flanging.
-
 1
1 -
2
-
3
-
4
-
5
-
6
-
7
-
8
-
9
-
10
-
11
-
12
-
13
-
14
-
15
-
16
-
17
-
18
-
19
-
20
-
21
-
22
-
23
-
24
-
25
-
26
-
27
-
28
-
29
-
30
-
31
-
32
-
33
-
34
-
35
-
36
-
37
-
38
-
39
-
40
-
41
-
42
-
43
-
44
-
45
-
46
-
47
-
48
-
49
-
50
-
51
-
52
-
53
-
54
-
55
-
56
-
57
-
58
-
59
-
60
-
61
-
62
-
63
-
64
-
65
-
66
-
67
-
68
-
69
-
70
-
71
-
72
-
73
-
74
-
75
-
76
-
77
-
78
-
79
-
80
-
81
-
82
-
83
-
84
-
85
-
86
-
87
-
88
-
89
-
90
-
91
-
92
-
93
-
94
-
95
-
96
-
97
-
98
-
99
-
100
-
101
-
102
-
103
-
104
-
105
-
106
-
107
-
108
-
109
-
110
-
111
-
112
-
113
-
114
-
115
-
116
-
117
-
118
-
119
-
120
-
121
-
122
-
123
-
124
-
125
-
126
-
127
-
128
-
129
-
130
-
131
-
132
-
133
-
134
-
135
-
136
-
 137
137 -
 138
138 -
 139
139 -
 140
140 -
 141
141 -
 142
142 -
 143
143 -
 144
144 -
 145
145 -
 146
146 -
 147
147 -
148
-
149
-
150
-
151
-
152
-
153
-
154
-
155
-
156
-
157
-
158
-
159
-
160
-
161
-
162
-
163
-
164
-
165
-
166
-
167
-
168
-
169
-
170
-
171
-
172
-
173
-
174
-
175
-
176
-
177
-
178
-
179
-
180
-
181
-
182
-
183
-
184
-
185
-
186
-
187
-
188
-
189
-
190
-
191
-
192
-
193
-
194
-
195
-
196
-
197
-
198
-
199
-
200
-
201
-
202
-
203
-
204
-
205
-
206
-
207
-
208
-
209
-
210
-
211
-
212
-
213
-
214
-
215
-
216
-
217
-
218
-
219
-
220
-
221
-
222
-
223
-
224
-
225
-
226
-
227
-
228
-
229
-
230
-
231
-
232
-
233
-
234
-
235
-
236
-
237
-
238
-
239
-
240
-
241
-
242
-
243
-
244
-
245
-
246
-
247
-
248
-
249
-
250
-
251
-
252
-
253
-
254
-
255
-
256
-
257
-
258
-
259
-
260
-
261
-
262
-
263
-
264
-
265
-
266
-
267
-
268
-
269
-
270
-
271
-
272
-
273
-
274
-
275
-
276
-
277
-
278
-
279
-
280
-
281
-
282
-
283
-
284
-
285
-
286
-
287
-
288
-
289
-
290
-
291
-
292
-
293
-
294
-
295
-
296
-
297
-
298
-
299
-
300
-
301
-
302
-
303
-
304
-
305
-
306
-
307
-
308
-
309
-
310
-
311
-
312
-
313
-
314
-
315
-
316
-
317
-
318
-
319
-
320
-
321
-
322
-
323
-
324
-
325
-
326
-
327
-
328
-
329
-
330
-
331
-
332
-
333
-
334
-
335
-
336
-
337
-
338
-
339
-
340
-
341
-
342
-
343
-
344
-
345
-
346
-
347
-
348
-
349
-
350
-
351
-
352
-
353
-
354
-
355
-
356
-
357
-
358
-
359
-
360
-
361
-
362
-
363
-
364
-
365
-
366
-
367
-
368
-
369
-
370
-
371
-
372
-
373
-
374
-
375
-
376
-
377
-
378
-
379
-
380
-
381
-
382
-
383
-
384
-
385
-
386
-
387
-
388
-
389
-
390
 |
 |
