Adobe 22011292 User Guide - Page 148
Mixing Presets
 |
UPC - 883919139081
View all Adobe 22011292 manuals
Add to My Manuals
Save this manual to your list of manuals |
Page 148 highlights
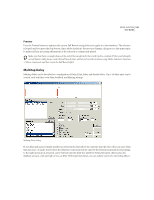
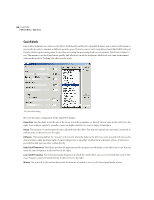
134 CHAPTER 8 Effects Menu - Edit View ms Box This is the time, specified in milliseconds, that it will take for the reverb to decay at each frequency following the coloration curve. For more colored reverbs, use lower settings (like 100 to 250). Values up to 700 work fine. Basically, the lower the value, the more the graph affects the resultant reverberation. Mixing Section Original Signal (dry) This slider adjusts the amount of Original Signal with respect to the other levels to give the feeling of distance between the listener and the source. • Use a low signal level to sound far away. • Use a high level (near 100%) along with low levels for the other sliders to give the feeling of being close to the source. Early Reflections Since these are the echoes that first reach the ear, they give the listener a feeling for the overall room size and dimension. • If the mixing for this is set too high though, the result will sound somewhat artificial. • If the mixing for this is set too low the audio cues for room size will be lost. Generally about half the volume of the original signal is a good starting point. Reverb (wet) This controls the volume of the dense layer of sound usually associated with reverb. Like the Early Reflections volume, this slider should be fine-tuned to give a pleasing mix that gives the impression you are after. If it's too loud, the reverb sounds very unnatural. The balance between the reverb and the original signal gives the impression of distance, so increase the reverb volume with respect to the original signal to make the source sound further away. Include Direct With a stereo waveform, checking this box will cause the original signal's left and right channels to be phase shifted (delayed) slightly to match the direction of the incoming early reflections. The Left/Right Location slider in Early Reflections determines the direction the audio will sound like it's coming from when listened to with stereo headphones. Combine Source Left and Right When working with stereo audio, there are actually two source signals (left and right), that can be placed independently. However, this requires twice as many calculations as a single audio source. If you're after faster processing time, check the Combine Source Left and Right box. Adobe Audition then sums the left and right channels of a stereo source file before routing it to the effects processor. When unchecked, the original signal and its respective reverberated signal remain in its own channel. If you know that both channels are identical (that is, if they originated from a monophonic sample), you should definitely check this option to minimize processing time. Presets Adobe Audition comes with several Full Reverb presets. More information on presets can be found in the "Looking at the Work Area" chapter.
-
 1
1 -
2
-
3
-
4
-
5
-
6
-
7
-
8
-
9
-
10
-
11
-
12
-
13
-
14
-
15
-
16
-
17
-
18
-
19
-
20
-
21
-
22
-
23
-
24
-
25
-
26
-
27
-
28
-
29
-
30
-
31
-
32
-
33
-
34
-
35
-
36
-
37
-
38
-
39
-
40
-
41
-
42
-
43
-
44
-
45
-
46
-
47
-
48
-
49
-
50
-
51
-
52
-
53
-
54
-
55
-
56
-
57
-
58
-
59
-
60
-
61
-
62
-
63
-
64
-
65
-
66
-
67
-
68
-
69
-
70
-
71
-
72
-
73
-
74
-
75
-
76
-
77
-
78
-
79
-
80
-
81
-
82
-
83
-
84
-
85
-
86
-
87
-
88
-
89
-
90
-
91
-
92
-
93
-
94
-
95
-
96
-
97
-
98
-
99
-
100
-
101
-
102
-
103
-
104
-
105
-
106
-
107
-
108
-
109
-
110
-
111
-
112
-
113
-
114
-
115
-
116
-
117
-
118
-
119
-
120
-
121
-
122
-
123
-
124
-
125
-
126
-
127
-
128
-
129
-
130
-
131
-
132
-
133
-
134
-
135
-
136
-
137
-
138
-
139
-
140
-
141
-
142
-
 143
143 -
 144
144 -
 145
145 -
 146
146 -
 147
147 -
 148
148 -
 149
149 -
 150
150 -
 151
151 -
 152
152 -
 153
153 -
154
-
155
-
156
-
157
-
158
-
159
-
160
-
161
-
162
-
163
-
164
-
165
-
166
-
167
-
168
-
169
-
170
-
171
-
172
-
173
-
174
-
175
-
176
-
177
-
178
-
179
-
180
-
181
-
182
-
183
-
184
-
185
-
186
-
187
-
188
-
189
-
190
-
191
-
192
-
193
-
194
-
195
-
196
-
197
-
198
-
199
-
200
-
201
-
202
-
203
-
204
-
205
-
206
-
207
-
208
-
209
-
210
-
211
-
212
-
213
-
214
-
215
-
216
-
217
-
218
-
219
-
220
-
221
-
222
-
223
-
224
-
225
-
226
-
227
-
228
-
229
-
230
-
231
-
232
-
233
-
234
-
235
-
236
-
237
-
238
-
239
-
240
-
241
-
242
-
243
-
244
-
245
-
246
-
247
-
248
-
249
-
250
-
251
-
252
-
253
-
254
-
255
-
256
-
257
-
258
-
259
-
260
-
261
-
262
-
263
-
264
-
265
-
266
-
267
-
268
-
269
-
270
-
271
-
272
-
273
-
274
-
275
-
276
-
277
-
278
-
279
-
280
-
281
-
282
-
283
-
284
-
285
-
286
-
287
-
288
-
289
-
290
-
291
-
292
-
293
-
294
-
295
-
296
-
297
-
298
-
299
-
300
-
301
-
302
-
303
-
304
-
305
-
306
-
307
-
308
-
309
-
310
-
311
-
312
-
313
-
314
-
315
-
316
-
317
-
318
-
319
-
320
-
321
-
322
-
323
-
324
-
325
-
326
-
327
-
328
-
329
-
330
-
331
-
332
-
333
-
334
-
335
-
336
-
337
-
338
-
339
-
340
-
341
-
342
-
343
-
344
-
345
-
346
-
347
-
348
-
349
-
350
-
351
-
352
-
353
-
354
-
355
-
356
-
357
-
358
-
359
-
360
-
361
-
362
-
363
-
364
-
365
-
366
-
367
-
368
-
369
-
370
-
371
-
372
-
373
-
374
-
375
-
376
-
377
-
378
-
379
-
380
-
381
-
382
-
383
-
384
-
385
-
386
-
387
-
388
-
389
-
390
 |
 |
