Adobe 22011292 User Guide - Page 151
Channel Buttons, Presets, Preview
 |
UPC - 883919139081
View all Adobe 22011292 manuals
Add to My Manuals
Save this manual to your list of manuals |
Page 151 highlights
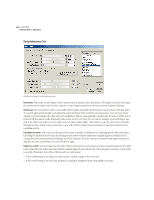
ADOBE AUDITION 137 User Guide When designing a reverb, it helps to cut some of the high frequencies to simulate absorption of the high frequencies by the surrounding walls. • Cutoff: Frequencies below this setting are affected by the Low-Cut filter. Frequencies above this setting are affected by the High-Cut filter. Changes in the cutoff value affect the tone of the echoes, as more or less of the frequencies are affected by the filter. • Boost is the amount of filtering to perform. Boost settings are usually negative, which means the audio is being cut or reduced in the affected frequency range. • Lower negative values result in more audio being cut. • Positive values result in boosted frequencies. When echoing, frequencies are generally not boosted. However, you can create interesting effects by entering positive values. Boosting a low-cut filter while reducing the feedback setting is identical to reducing a high cut filter and increasing the feedback setting. Channel Buttons Several options are provided for use with stereo source audio: • Left Only: The delay effect appears only on the left channel of stereo audio. • Right Only: The delay effect appears only on the right channel of stereo audio. • Discrete Stereo: The delay effect appears on both channels of stereo audio. • Stereo Swap: The delay effect for the left channel is mapped to the right channel and vice-versa • From Left to Right: The audio from the left channel is delayed and put onto the right channel • From Right to Left: The audio from the right channel is delayed and placed onto the left channel. • From Center to Surround: The audio from the center channel (the audio common to both left and right channels) is delayed and placed into the surround channel (the left channel inversed with respect to the right channel). To spread out the effect in the stereo domain, at least one delay unit in the group should be cross-channel or singlechannel only. Presets Adobe Audition comes with several Multitap Delay presets. More information on presets can be found in the "Looking at the Work Area" chapter. Preview Press the Preview button to audition the current Multitap Delay setting before you apply it to the waveform. The selection is looped until you press the Stop button. Since Adobe Audition's Previews are dynamic, this gives you the opportunity to make and hear processing adjustments as the selection is continuously played.
-
 1
1 -
2
-
3
-
4
-
5
-
6
-
7
-
8
-
9
-
10
-
11
-
12
-
13
-
14
-
15
-
16
-
17
-
18
-
19
-
20
-
21
-
22
-
23
-
24
-
25
-
26
-
27
-
28
-
29
-
30
-
31
-
32
-
33
-
34
-
35
-
36
-
37
-
38
-
39
-
40
-
41
-
42
-
43
-
44
-
45
-
46
-
47
-
48
-
49
-
50
-
51
-
52
-
53
-
54
-
55
-
56
-
57
-
58
-
59
-
60
-
61
-
62
-
63
-
64
-
65
-
66
-
67
-
68
-
69
-
70
-
71
-
72
-
73
-
74
-
75
-
76
-
77
-
78
-
79
-
80
-
81
-
82
-
83
-
84
-
85
-
86
-
87
-
88
-
89
-
90
-
91
-
92
-
93
-
94
-
95
-
96
-
97
-
98
-
99
-
100
-
101
-
102
-
103
-
104
-
105
-
106
-
107
-
108
-
109
-
110
-
111
-
112
-
113
-
114
-
115
-
116
-
117
-
118
-
119
-
120
-
121
-
122
-
123
-
124
-
125
-
126
-
127
-
128
-
129
-
130
-
131
-
132
-
133
-
134
-
135
-
136
-
137
-
138
-
139
-
140
-
141
-
142
-
143
-
144
-
145
-
 146
146 -
 147
147 -
 148
148 -
 149
149 -
 150
150 -
 151
151 -
 152
152 -
 153
153 -
 154
154 -
 155
155 -
 156
156 -
157
-
158
-
159
-
160
-
161
-
162
-
163
-
164
-
165
-
166
-
167
-
168
-
169
-
170
-
171
-
172
-
173
-
174
-
175
-
176
-
177
-
178
-
179
-
180
-
181
-
182
-
183
-
184
-
185
-
186
-
187
-
188
-
189
-
190
-
191
-
192
-
193
-
194
-
195
-
196
-
197
-
198
-
199
-
200
-
201
-
202
-
203
-
204
-
205
-
206
-
207
-
208
-
209
-
210
-
211
-
212
-
213
-
214
-
215
-
216
-
217
-
218
-
219
-
220
-
221
-
222
-
223
-
224
-
225
-
226
-
227
-
228
-
229
-
230
-
231
-
232
-
233
-
234
-
235
-
236
-
237
-
238
-
239
-
240
-
241
-
242
-
243
-
244
-
245
-
246
-
247
-
248
-
249
-
250
-
251
-
252
-
253
-
254
-
255
-
256
-
257
-
258
-
259
-
260
-
261
-
262
-
263
-
264
-
265
-
266
-
267
-
268
-
269
-
270
-
271
-
272
-
273
-
274
-
275
-
276
-
277
-
278
-
279
-
280
-
281
-
282
-
283
-
284
-
285
-
286
-
287
-
288
-
289
-
290
-
291
-
292
-
293
-
294
-
295
-
296
-
297
-
298
-
299
-
300
-
301
-
302
-
303
-
304
-
305
-
306
-
307
-
308
-
309
-
310
-
311
-
312
-
313
-
314
-
315
-
316
-
317
-
318
-
319
-
320
-
321
-
322
-
323
-
324
-
325
-
326
-
327
-
328
-
329
-
330
-
331
-
332
-
333
-
334
-
335
-
336
-
337
-
338
-
339
-
340
-
341
-
342
-
343
-
344
-
345
-
346
-
347
-
348
-
349
-
350
-
351
-
352
-
353
-
354
-
355
-
356
-
357
-
358
-
359
-
360
-
361
-
362
-
363
-
364
-
365
-
366
-
367
-
368
-
369
-
370
-
371
-
372
-
373
-
374
-
375
-
376
-
377
-
378
-
379
-
380
-
381
-
382
-
383
-
384
-
385
-
386
-
387
-
388
-
389
-
390
 |
 |
