Adobe 22011292 User Guide - Page 61
Open As, Open Append
 |
UPC - 883919139081
View all Adobe 22011292 manuals
Add to My Manuals
Save this manual to your list of manuals |
Page 61 highlights
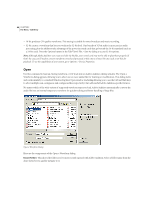
ADOBE AUDITION 47 User Guide Look in Use this control to navigate through all available drives and folders. File Name Here's where you may specify the name of the file you desire to open, if it resides in the current folder. Entering *.extension (such as *.wav or *.mp3) displays all files with that extension in the open folder. Files of type Use this control to filter the display of files in the current folder to a specific type of supported waveform, such as Windows PCM (*.wav) or Next/Sun (*.au;*.snd). As you'd expect, selecting the All files (*.*) listing displays all files in the current folder. Don't ask for further details If you check this box, you won't be prompted for more information about the waveform format after you choose a file to open. For instance, if you double-click on a raw, headerless PCM file, Adobe Audition won't ask you for the sample rate, bit resolution, A-law/mu-law compression, or any other details. Instead, the program uses the last settings specified when you opened a headerless file. Show File Information With this box checked, Adobe Audition displays useful details about the selected waveform such as format type, full size, sample rate, and running time. Auto Play Check this box to have Adobe Audition automatically play a sound file when you highlight it in the Open a Waveform window. This handy feature lets you quickly audition files before you load them into an editing window. (Keep in mind that you can only play file types that are supported by your system.) You can also play individual files when Auto Play is unchecked. Just select a waveform and click on the Play button in the Open a Waveform window. Terminate playback by clicking on the Stop button, which replaces the Play button when a sound is playing. Note: When multiple files are open in the Edit View, you can easily select between them holding down the Ctrl+Tab keys simultaneously, which shifts between open files in the forward direction. Use the Ctrl+Shift+Tab key combination to move between open waveforms in the reverse direction. Open As The File > Open As command is similar to File > Open, except that it lets you specify the sample format before opening a file. Think of it as a quick way to make changes to one or more existing waveforms' sample rate, bit rate, and/or channel type. Since this function doesn't pre-filter or post-filter the samples, you'll get better-sounding results when changing sample rates by opening the file(s) normally and using the Edit > Convert Sample Type function. Open Append Use this command to add one or more waveforms to the end of the currently shown waveform in the editing window. If the waveform being added is of a different type, Adobe Audition automatically converts it as it's opened. However, better results are achieved if you only append files of the same sample rate, since no number-crunching is required to change between rates.
-
 1
1 -
2
-
3
-
4
-
5
-
6
-
7
-
8
-
9
-
10
-
11
-
12
-
13
-
14
-
15
-
16
-
17
-
18
-
19
-
20
-
21
-
22
-
23
-
24
-
25
-
26
-
27
-
28
-
29
-
30
-
31
-
32
-
33
-
34
-
35
-
36
-
37
-
38
-
39
-
40
-
41
-
42
-
43
-
44
-
45
-
46
-
47
-
48
-
49
-
50
-
51
-
52
-
53
-
54
-
55
-
 56
56 -
 57
57 -
 58
58 -
 59
59 -
 60
60 -
 61
61 -
 62
62 -
 63
63 -
 64
64 -
 65
65 -
 66
66 -
67
-
68
-
69
-
70
-
71
-
72
-
73
-
74
-
75
-
76
-
77
-
78
-
79
-
80
-
81
-
82
-
83
-
84
-
85
-
86
-
87
-
88
-
89
-
90
-
91
-
92
-
93
-
94
-
95
-
96
-
97
-
98
-
99
-
100
-
101
-
102
-
103
-
104
-
105
-
106
-
107
-
108
-
109
-
110
-
111
-
112
-
113
-
114
-
115
-
116
-
117
-
118
-
119
-
120
-
121
-
122
-
123
-
124
-
125
-
126
-
127
-
128
-
129
-
130
-
131
-
132
-
133
-
134
-
135
-
136
-
137
-
138
-
139
-
140
-
141
-
142
-
143
-
144
-
145
-
146
-
147
-
148
-
149
-
150
-
151
-
152
-
153
-
154
-
155
-
156
-
157
-
158
-
159
-
160
-
161
-
162
-
163
-
164
-
165
-
166
-
167
-
168
-
169
-
170
-
171
-
172
-
173
-
174
-
175
-
176
-
177
-
178
-
179
-
180
-
181
-
182
-
183
-
184
-
185
-
186
-
187
-
188
-
189
-
190
-
191
-
192
-
193
-
194
-
195
-
196
-
197
-
198
-
199
-
200
-
201
-
202
-
203
-
204
-
205
-
206
-
207
-
208
-
209
-
210
-
211
-
212
-
213
-
214
-
215
-
216
-
217
-
218
-
219
-
220
-
221
-
222
-
223
-
224
-
225
-
226
-
227
-
228
-
229
-
230
-
231
-
232
-
233
-
234
-
235
-
236
-
237
-
238
-
239
-
240
-
241
-
242
-
243
-
244
-
245
-
246
-
247
-
248
-
249
-
250
-
251
-
252
-
253
-
254
-
255
-
256
-
257
-
258
-
259
-
260
-
261
-
262
-
263
-
264
-
265
-
266
-
267
-
268
-
269
-
270
-
271
-
272
-
273
-
274
-
275
-
276
-
277
-
278
-
279
-
280
-
281
-
282
-
283
-
284
-
285
-
286
-
287
-
288
-
289
-
290
-
291
-
292
-
293
-
294
-
295
-
296
-
297
-
298
-
299
-
300
-
301
-
302
-
303
-
304
-
305
-
306
-
307
-
308
-
309
-
310
-
311
-
312
-
313
-
314
-
315
-
316
-
317
-
318
-
319
-
320
-
321
-
322
-
323
-
324
-
325
-
326
-
327
-
328
-
329
-
330
-
331
-
332
-
333
-
334
-
335
-
336
-
337
-
338
-
339
-
340
-
341
-
342
-
343
-
344
-
345
-
346
-
347
-
348
-
349
-
350
-
351
-
352
-
353
-
354
-
355
-
356
-
357
-
358
-
359
-
360
-
361
-
362
-
363
-
364
-
365
-
366
-
367
-
368
-
369
-
370
-
371
-
372
-
373
-
374
-
375
-
376
-
377
-
378
-
379
-
380
-
381
-
382
-
383
-
384
-
385
-
386
-
387
-
388
-
389
-
390
 |
 |
