Samsung SPH-L900 User Manual Ver.lj1_f5 (English(north America)) - Page 137
Add Entries to Your Favorites, Add Facebook Content to Your Contacts, Add Your Facebook Friends
 |
View all Samsung SPH-L900 manuals
Add to My Manuals
Save this manual to your list of manuals |
Page 137 highlights
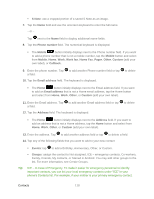
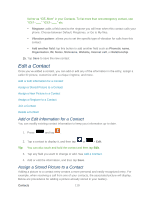
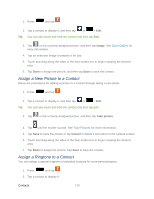
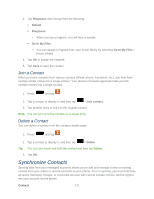
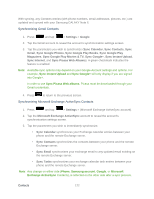
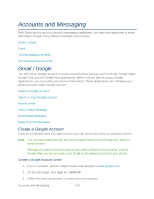
The process of updating your Contacts tab can take several minutes. If after 10-20 minutes, your list has not been updated, repeat steps 2-3. Your Contacts tab then reflects any updated Contact information. This update process works both ways. For example, any changes on the phone are updated to your Gmail Contacts list after sync. Syncing of contacts requires you are logged into your Samsung, Gmail, and Corporate accounts via the phone. Add Entries to Your Favorites The Favorites tab is a listing that can help you quickly access your most used or preferred Contacts entries. 1. Press and tap . 2. Touch and hold the entry name from the Contacts tab listing. 3. From the Contacts Entry context menu, tap Add to favorites. Note: Another method to add or remove an entry from your favorites is to toggle the state of the star icon on the Contact's details page (upper-right). Tap to add the entry to your favorites (star is lit), tap again to remove. Add Facebook Content to Your Contacts You can add your Facebook contacts' information, such as pictures, email, and phone numbers directly to your Contacts list. All of the current contacts' information is then migrated over to your phone. Note: You must first have an active Facebook page populated with friends sharing their contact information. If a Contacts entry already exists in with a slightly different name, separate entries are created and can later be linked (joined) together into a single entry. See Join a Contact. Add Your Facebook Friends to Your Contacts Before you can add your friends, you must add your Facebook account to the list of managed and synchronized accounts. This process is similar to synchronizing your email accounts. This process not only synchronizes your contact information but also your status, events, and more. 1. Press and tap > Settings > (Facebook account). 2. Tap the Facebook account to reveal the account's synchronization settings screen. Contacts 123
-
 1
1 -
2
-
3
-
4
-
5
-
6
-
7
-
8
-
9
-
10
-
11
-
12
-
13
-
14
-
15
-
16
-
17
-
18
-
19
-
20
-
21
-
22
-
23
-
24
-
25
-
26
-
27
-
28
-
29
-
30
-
31
-
32
-
33
-
34
-
35
-
36
-
37
-
38
-
39
-
40
-
41
-
42
-
43
-
44
-
45
-
46
-
47
-
48
-
49
-
50
-
51
-
52
-
53
-
54
-
55
-
56
-
57
-
58
-
59
-
60
-
61
-
62
-
63
-
64
-
65
-
66
-
67
-
68
-
69
-
70
-
71
-
72
-
73
-
74
-
75
-
76
-
77
-
78
-
79
-
80
-
81
-
82
-
83
-
84
-
85
-
86
-
87
-
88
-
89
-
90
-
91
-
92
-
93
-
94
-
95
-
96
-
97
-
98
-
99
-
100
-
101
-
102
-
103
-
104
-
105
-
106
-
107
-
108
-
109
-
110
-
111
-
112
-
113
-
114
-
115
-
116
-
117
-
118
-
119
-
120
-
121
-
122
-
123
-
124
-
125
-
126
-
127
-
128
-
129
-
130
-
131
-
 132
132 -
 133
133 -
 134
134 -
 135
135 -
 136
136 -
 137
137 -
 138
138 -
 139
139 -
 140
140 -
 141
141 -
 142
142 -
143
-
144
-
145
-
146
-
147
-
148
-
149
-
150
-
151
-
152
-
153
-
154
-
155
-
156
-
157
-
158
-
159
-
160
-
161
-
162
-
163
-
164
-
165
-
166
-
167
-
168
-
169
-
170
-
171
-
172
-
173
-
174
-
175
-
176
-
177
-
178
-
179
-
180
-
181
-
182
-
183
-
184
-
185
-
186
-
187
-
188
-
189
-
190
-
191
-
192
-
193
-
194
-
195
-
196
-
197
-
198
-
199
-
200
-
201
-
202
-
203
-
204
-
205
-
206
-
207
-
208
-
209
-
210
-
211
-
212
-
213
-
214
-
215
-
216
-
217
-
218
-
219
-
220
-
221
-
222
-
223
-
224
-
225
-
226
-
227
-
228
-
229
-
230
-
231
-
232
-
233
-
234
-
235
-
236
-
237
-
238
-
239
-
240
-
241
-
242
-
243
-
244
-
245
-
246
-
247
-
248
-
249
-
250
-
251
-
252
-
253
-
254
-
255
-
256
-
257
-
258
-
259
-
260
-
261
-
262
-
263
-
264
-
265
-
266
-
267
 |
 |
