HP 3100 HP LaserJet 3100 - Product User's Guide, C3948-90970 - Page 125
Starting a scan, Start Scan, to Text, Scan to Text
 |
UPC - 886111573592
View all HP 3100 manuals
Add to My Manuals
Save this manual to your list of manuals |
Page 125 highlights
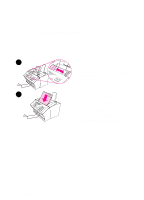
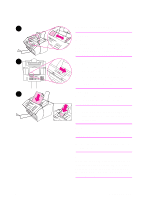
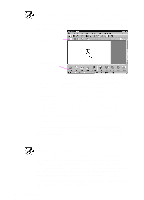
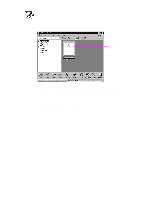
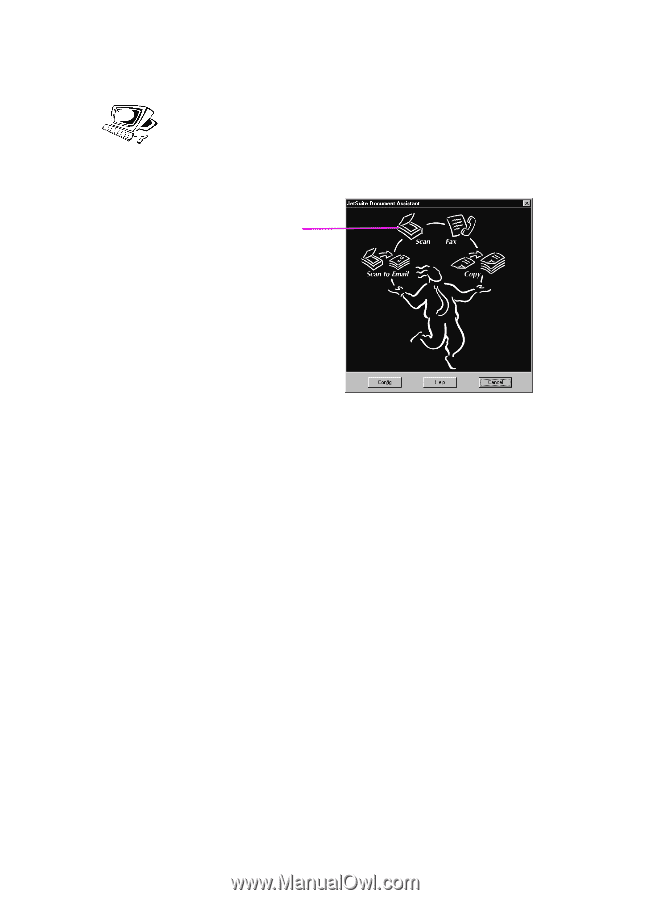
Starting a scan After you have loaded a document into the document feeder tray, the Document Assistant appears on the computer screen. Clicking anywhere on the Document Assistant activates it and displays the names of the functions. Click here to initiate a scan From here, click Scan. Then, you can click Start Scan or select Scan to Text. q Click Start Scan if you want the item to be scanned to the JetSuite Pro software. From there, you can add annotations, save and store a document, and clean up the document and send it to print, fax, and more. q Select Scan to Text for documents containing text you want to edit in a word processing program. If the item contains graphics you want to use, click Start Scan instead. 124 6 Scanning EN
-
 1
1 -
2
-
3
-
4
-
5
-
6
-
7
-
8
-
9
-
10
-
11
-
12
-
13
-
14
-
15
-
16
-
17
-
18
-
19
-
20
-
21
-
22
-
23
-
24
-
25
-
26
-
27
-
28
-
29
-
30
-
31
-
32
-
33
-
34
-
35
-
36
-
37
-
38
-
39
-
40
-
41
-
42
-
43
-
44
-
45
-
46
-
47
-
48
-
49
-
50
-
51
-
52
-
53
-
54
-
55
-
56
-
57
-
58
-
59
-
60
-
61
-
62
-
63
-
64
-
65
-
66
-
67
-
68
-
69
-
70
-
71
-
72
-
73
-
74
-
75
-
76
-
77
-
78
-
79
-
80
-
81
-
82
-
83
-
84
-
85
-
86
-
87
-
88
-
89
-
90
-
91
-
92
-
93
-
94
-
95
-
96
-
97
-
98
-
99
-
100
-
101
-
102
-
103
-
104
-
105
-
106
-
107
-
108
-
109
-
110
-
111
-
112
-
113
-
114
-
115
-
116
-
117
-
118
-
119
-
 120
120 -
 121
121 -
 122
122 -
 123
123 -
 124
124 -
 125
125 -
 126
126 -
 127
127 -
 128
128 -
 129
129 -
 130
130 -
131
-
132
-
133
-
134
-
135
-
136
-
137
-
138
-
139
-
140
-
141
-
142
-
143
-
144
-
145
-
146
-
147
-
148
-
149
-
150
-
151
-
152
-
153
-
154
-
155
-
156
-
157
-
158
-
159
-
160
-
161
-
162
-
163
-
164
-
165
-
166
-
167
-
168
-
169
-
170
-
171
-
172
-
173
-
174
-
175
-
176
-
177
-
178
-
179
-
180
-
181
-
182
-
183
-
184
-
185
-
186
-
187
-
188
-
189
-
190
-
191
-
192
-
193
-
194
-
195
-
196
-
197
-
198
-
199
-
200
-
201
-
202
-
203
-
204
-
205
-
206
-
207
-
208
-
209
-
210
-
211
-
212
-
213
-
214
-
215
-
216
-
217
-
218
-
219
-
220
-
221
-
222
-
223
-
224
-
225
-
226
-
227
-
228
-
229
-
230
-
231
-
232
-
233
-
234
-
235
-
236
-
237
-
238
-
239
-
240
-
241
-
242
-
243
-
244
-
245
-
246
-
247
-
248
-
249
-
250
-
251
-
252
-
253
-
254
-
255
-
256
-
257
-
258
-
259
-
260
-
261
-
262
-
263
-
264
-
265
-
266
-
267
-
268
-
269
-
270
-
271
-
272
-
273
-
274
-
275
-
276
-
277
-
278
-
279
-
280
-
281
-
282
-
283
-
284
-
285
-
286
 |
 |
124
6
Scanning
EN
Starting a scan
After you have loaded a document into the document feeder tray, the
Document Assistant appears on the computer screen. Clicking
anywhere on the Document Assistant activates it and displays the
names of the functions.
From here, click
Scan
. Then, you can click
Start Scan
or select
Scan
to Text
.
●
Click
Start Scan
if you want the item to be scanned to the
JetSuite Pro software. From there, you can add annotations,
save and store a document, and clean up the document and send
it to print, fax, and more.
●
Select
Scan to Text
for documents containing text you want to
edit in a word processing program. If the item contains graphics
you want to use, click
Start Scan
instead.
Click here
to initiate a
scan