Brother International WP1700MDS Owners Manual - English - Page 179
model
 |
View all Brother International WP1700MDS manuals
Add to My Manuals
Save this manual to your list of manuals |
Page 179 highlights
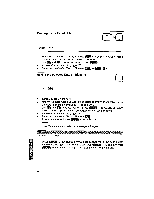
14-line model > rs - 1! acb D. NAMt 'c. FIRST NAME d. TELEPHONE ijk e. FAX NO. f. TITLE g. COMPANY 'h. ADDRESS i . CITY r ,inie p k. RE- URA On this screen, you can specify which Address Book data will be printed in label format and the position of each data item. The data items are represented by the letters a through k (default), as shown on the left side of the screen (the items marked with an asterisk will be printed). The position of these letters in the label area on the right of the screen determine the position of the items when they are printed in label format. The illustration above shows the default positions. For example, "ba" on the first line indicates that the FIRST NAME (b) will be printed first, followed by the LAST NAME (a). A space is automatically inserted between each item. To print punctuation marks, such as a comma between city and state, you must include the punctuation mark when you enter the data on the DATA INPUT screen. If you do not want to change the default label printing position, press NM to start printing. To change the default label printing positions: 1. On the left side of the screen, move the block cursor to the data item you want to move or add. Press E. . A second cursor appears in the label area on the right side of the screen. 2. Move the cursor to the position where you want the data item and press PENA. The letter that represents the data item appears in the position you have selected in the label area, and the second cursor disappears from the right side of the screen. 3. Repeat steps 1 and 2 to reposition other data items. 4. To remove an item from the label area, move the cursor to that item on the left side of the screen and press ;I 5. When you have completed the position changes, press (FIETeRi!4j to start print- ing. The leftmost label on the first line of the label area is printed from posi- tion "0" on paper scale. en NOTE: The total number of lines and maximum number of characters that you can print on a single line of a label are shown in the following table.
-
 1
1 -
2
-
3
-
4
-
5
-
6
-
7
-
8
-
9
-
10
-
11
-
12
-
13
-
14
-
15
-
16
-
17
-
18
-
19
-
20
-
21
-
22
-
23
-
24
-
25
-
26
-
27
-
28
-
29
-
30
-
31
-
32
-
33
-
34
-
35
-
36
-
37
-
38
-
39
-
40
-
41
-
42
-
43
-
44
-
45
-
46
-
47
-
48
-
49
-
50
-
51
-
52
-
53
-
54
-
55
-
56
-
57
-
58
-
59
-
60
-
61
-
62
-
63
-
64
-
65
-
66
-
67
-
68
-
69
-
70
-
71
-
72
-
73
-
74
-
75
-
76
-
77
-
78
-
79
-
80
-
81
-
82
-
83
-
84
-
85
-
86
-
87
-
88
-
89
-
90
-
91
-
92
-
93
-
94
-
95
-
96
-
97
-
98
-
99
-
100
-
101
-
102
-
103
-
104
-
105
-
106
-
107
-
108
-
109
-
110
-
111
-
112
-
113
-
114
-
115
-
116
-
117
-
118
-
119
-
120
-
121
-
122
-
123
-
124
-
125
-
126
-
127
-
128
-
129
-
130
-
131
-
132
-
133
-
134
-
135
-
136
-
137
-
138
-
139
-
140
-
141
-
142
-
143
-
144
-
145
-
146
-
147
-
148
-
149
-
150
-
151
-
152
-
153
-
154
-
155
-
156
-
157
-
158
-
159
-
160
-
161
-
162
-
163
-
164
-
165
-
166
-
167
-
168
-
169
-
170
-
171
-
172
-
173
-
 174
174 -
 175
175 -
 176
176 -
 177
177 -
 178
178 -
 179
179 -
 180
180 -
 181
181 -
 182
182 -
 183
183 -
 184
184 -
185
-
186
-
187
-
188
-
189
-
190
-
191
-
192
-
193
-
194
-
195
-
196
-
197
-
198
-
199
-
200
-
201
-
202
-
203
-
204
-
205
-
206
-
207
-
208
-
209
-
210
-
211
-
212
-
213
-
214
-
215
-
216
-
217
-
218
-
219
-
220
-
221
-
222
-
223
-
224
-
225
-
226
-
227
-
228
-
229
-
230
-
231
-
232
-
233
-
234
-
235
-
236
-
237
-
238
-
239
-
240
-
241
-
242
-
243
-
244
-
245
-
246
-
247
-
248
-
249
-
250
-
251
-
252
-
253
-
254
-
255
-
256
-
257
-
258
-
259
-
260
-
261
-
262
-
263
-
264
-
265
-
266
-
267
-
268
-
269
-
270
-
271
-
272
-
273
-
274
-
275
-
276
-
277
-
278
-
279
-
280
-
281
-
282
-
283
-
284
-
285
-
286
-
287
-
288
-
289
-
290
-
291
-
292
-
293
-
294
-
295
-
296
-
297
-
298
-
299
-
300
-
301
-
302
-
303
-
304
-
305
-
306
-
307
-
308
-
309
-
310
-
311
-
312
-
313
-
314
-
315
-
316
 |
 |
