Cisco IPS-4255-K9 Installation Guide - Page 164
Installing and Using Cisco Intrusion Prevention System Manager Express 7.0
 |
UPC - 746320951096
View all Cisco IPS-4255-K9 manuals
Add to My Manuals
Save this manual to your list of manuals |
Page 164 highlights
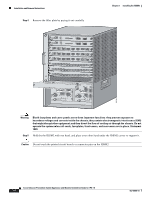
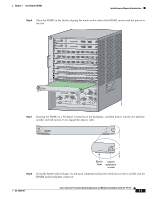
Installation and Removal Instructions Chapter 7 Installing the IDSM2 Caution Always use the ejector levers when installing or removing the IDSM2. A module that is partially seated in the backplane causes the system to halt and subsequently crash. Caution If you perform a hot swap, the console displays the message Module x has been inserted. This message does not appear, however, if you are connected to the Catalyst 6500 series switch through a Telnet session. Step 9 Step 10 Step 11 Step 12 Step 13 Step 14 Use a screwdriver to tighten the installation screws on the left and right ends of the IDSM2. Verify that you have correctly installed the IDSM2 and can bring it online. Initialize the IDSM2. Configure the switch for command and control access to the IDSM2. Upgrade the IDSM2 to the most recent Cisco IDS software. Set up the IDSM2 to capture IPS traffic. You are now ready to configure the IDSM2 for intrusion prevention. For More Information • For more information on ESD-controlled environments, see Working in an ESD Environment, page 1-32. • For the procedure for verifying the IDSM2 installation, see Verifying Installation, page 7-9. • For the procedure for using the setup command to initialize the IDSM2, see Initializing the Sensor, page 10-1. • For the procedure for configuring the switch for command and control access to the IDSM2, refer to Configuring the Catalyst 6500 Series Switch for Command and Control Access to the IDSM2. • For the procedure for obtaining and installing the most recent IPS software, see Obtaining Cisco IPS Software, page 11-1. • For the procedure for configuring the IDSM2 to capture IPS traffic, refer to Configuring the IDSM2. • For the procedure for using HTTPS to log in to IDM, refer to Logging In to IDM. • For the procedures for configuring intrusion prevention on your sensor, refer to the following guides: - Installing and Using Cisco Intrusion Prevention System Device Manager 7.0 - Installing and Using Cisco Intrusion Prevention System Manager Express 7.0 - Configuring the Cisco Intrusion Prevention System Sensor Using the Command Line Interface 7.0 Cisco Intrusion Prevention System Appliance and Module Installation Guide for IPS 7.0 7-8 OL-18504-01
-
 1
1 -
2
-
3
-
4
-
5
-
6
-
7
-
8
-
9
-
10
-
11
-
12
-
13
-
14
-
15
-
16
-
17
-
18
-
19
-
20
-
21
-
22
-
23
-
24
-
25
-
26
-
27
-
28
-
29
-
30
-
31
-
32
-
33
-
34
-
35
-
36
-
37
-
38
-
39
-
40
-
41
-
42
-
43
-
44
-
45
-
46
-
47
-
48
-
49
-
50
-
51
-
52
-
53
-
54
-
55
-
56
-
57
-
58
-
59
-
60
-
61
-
62
-
63
-
64
-
65
-
66
-
67
-
68
-
69
-
70
-
71
-
72
-
73
-
74
-
75
-
76
-
77
-
78
-
79
-
80
-
81
-
82
-
83
-
84
-
85
-
86
-
87
-
88
-
89
-
90
-
91
-
92
-
93
-
94
-
95
-
96
-
97
-
98
-
99
-
100
-
101
-
102
-
103
-
104
-
105
-
106
-
107
-
108
-
109
-
110
-
111
-
112
-
113
-
114
-
115
-
116
-
117
-
118
-
119
-
120
-
121
-
122
-
123
-
124
-
125
-
126
-
127
-
128
-
129
-
130
-
131
-
132
-
133
-
134
-
135
-
136
-
137
-
138
-
139
-
140
-
141
-
142
-
143
-
144
-
145
-
146
-
147
-
148
-
149
-
150
-
151
-
152
-
153
-
154
-
155
-
156
-
157
-
158
-
 159
159 -
 160
160 -
 161
161 -
 162
162 -
 163
163 -
 164
164 -
 165
165 -
 166
166 -
 167
167 -
 168
168 -
 169
169 -
170
-
171
-
172
-
173
-
174
-
175
-
176
-
177
-
178
-
179
-
180
-
181
-
182
-
183
-
184
-
185
-
186
-
187
-
188
-
189
-
190
-
191
-
192
-
193
-
194
-
195
-
196
-
197
-
198
-
199
-
200
-
201
-
202
-
203
-
204
-
205
-
206
-
207
-
208
-
209
-
210
-
211
-
212
-
213
-
214
-
215
-
216
-
217
-
218
-
219
-
220
-
221
-
222
-
223
-
224
-
225
-
226
-
227
-
228
-
229
-
230
-
231
-
232
-
233
-
234
-
235
-
236
-
237
-
238
-
239
-
240
-
241
-
242
-
243
-
244
-
245
-
246
-
247
-
248
-
249
-
250
-
251
-
252
-
253
-
254
-
255
-
256
-
257
-
258
-
259
-
260
-
261
-
262
-
263
-
264
-
265
-
266
-
267
-
268
-
269
-
270
-
271
-
272
-
273
-
274
-
275
-
276
-
277
-
278
-
279
-
280
-
281
-
282
-
283
-
284
-
285
-
286
-
287
-
288
-
289
-
290
-
291
-
292
-
293
-
294
-
295
-
296
-
297
-
298
-
299
-
300
-
301
-
302
-
303
-
304
-
305
-
306
-
307
-
308
-
309
-
310
-
311
-
312
-
313
-
314
-
315
-
316
-
317
-
318
-
319
-
320
-
321
-
322
-
323
-
324
-
325
-
326
-
327
-
328
-
329
-
330
-
331
-
332
-
333
-
334
-
335
-
336
-
337
-
338
-
339
-
340
-
341
-
342
-
343
-
344
-
345
-
346
-
347
-
348
-
349
-
350
-
351
-
352
-
353
-
354
-
355
-
356
-
357
-
358
-
359
-
360
-
361
-
362
-
363
-
364
-
365
-
366
-
367
-
368
-
369
-
370
-
371
-
372
-
373
-
374
-
375
-
376
-
377
-
378
-
379
-
380
-
381
-
382
-
383
-
384
-
385
-
386
-
387
-
388
-
389
-
390
-
391
-
392
-
393
-
394
-
395
-
396
-
397
-
398
-
399
-
400
-
401
-
402
-
403
-
404
-
405
-
406
-
407
-
408
-
409
-
410
-
411
-
412
 |
 |