Cisco IPS-4255-K9 Installation Guide - Page 265
Installing the IDSM2 System Image for Cisco IOS Software, Step 3
 |
UPC - 746320951096
View all Cisco IPS-4255-K9 manuals
Add to My Manuals
Save this manual to your list of manuals |
Page 265 highlights
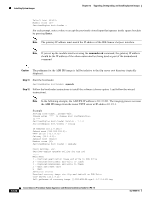
Chapter 12 Upgrading, Downgrading, and Installing System Images Installing System Images Step 3 Step 4 Boot the IDSM2 to the maintenance partition. console> (enable) reset module_number cf:1 Log in to the maintenance partition CLI. login: guest Password: cisco Note You must configure the maintenance partition on the IDSM2. Step 5 Install the system image. [email protected]# upgrade ftp://user@ftp server IP/directory path/IPS-IDSM2-K9-sys-1.1-a-7.0-1-E3.bin.gz Step 6 Specify the FTP server password. After the application partition file has been downloaded, you are asked if you want to proceed: Upgrading will wipe out the contents on the hard disk. Do you want to proceed installing it [y|n]: Step 7 Step 8 Step 9 Enter y to continue. When the application partition file has been installed, you are returned to the maintenance partition CLI. Exit the maintenance partition CLI and return to the switch CLI. Reboot the IDSM2 to the application partition. console> (enable) reset module_number hdd:1 Step 10 When the IDSM2 has rebooted, check the software version. Step 11 Log in to the application partition CLI and initialize the IDSM2 using the setup command. For More Information • For a list of supported FTP and HTTP/HTTPS servers, see Supported FTP and HTTP/HTTPS Servers, page 12-2. • For the procedure for locating software on Cisco.com, see Obtaining Cisco IPS Software, page 11-1. • For the procedure for configuration the maintenance partition on IDMS-2, see Configuring the IDSM2 Maintenance Partition for Catalyst Software, page 12-31 and Configuring the IDSM2 Maintenance Partition for Cisco IOS Software, page 12-35. • For the procedure for initializing the IDSM2, see Advanced Setup for the IDSM2, page 10-20. Installing the IDSM2 System Image for Cisco IOS Software To install the system image, follow these steps: Step 1 Step 2 Download the IDSM2 system image file (IPS-IDSM2-K9-sys-1.1-a-7.0-1-E3.bin.gz) to the FTP root directory of an FTP server that is accessible from your IDSM2. Log in to the switch CLI. OL-18504-01 Cisco Intrusion Prevention System Appliance and Module Installation Guide for IPS 7.0 12-29
-
 1
1 -
2
-
3
-
4
-
5
-
6
-
7
-
8
-
9
-
10
-
11
-
12
-
13
-
14
-
15
-
16
-
17
-
18
-
19
-
20
-
21
-
22
-
23
-
24
-
25
-
26
-
27
-
28
-
29
-
30
-
31
-
32
-
33
-
34
-
35
-
36
-
37
-
38
-
39
-
40
-
41
-
42
-
43
-
44
-
45
-
46
-
47
-
48
-
49
-
50
-
51
-
52
-
53
-
54
-
55
-
56
-
57
-
58
-
59
-
60
-
61
-
62
-
63
-
64
-
65
-
66
-
67
-
68
-
69
-
70
-
71
-
72
-
73
-
74
-
75
-
76
-
77
-
78
-
79
-
80
-
81
-
82
-
83
-
84
-
85
-
86
-
87
-
88
-
89
-
90
-
91
-
92
-
93
-
94
-
95
-
96
-
97
-
98
-
99
-
100
-
101
-
102
-
103
-
104
-
105
-
106
-
107
-
108
-
109
-
110
-
111
-
112
-
113
-
114
-
115
-
116
-
117
-
118
-
119
-
120
-
121
-
122
-
123
-
124
-
125
-
126
-
127
-
128
-
129
-
130
-
131
-
132
-
133
-
134
-
135
-
136
-
137
-
138
-
139
-
140
-
141
-
142
-
143
-
144
-
145
-
146
-
147
-
148
-
149
-
150
-
151
-
152
-
153
-
154
-
155
-
156
-
157
-
158
-
159
-
160
-
161
-
162
-
163
-
164
-
165
-
166
-
167
-
168
-
169
-
170
-
171
-
172
-
173
-
174
-
175
-
176
-
177
-
178
-
179
-
180
-
181
-
182
-
183
-
184
-
185
-
186
-
187
-
188
-
189
-
190
-
191
-
192
-
193
-
194
-
195
-
196
-
197
-
198
-
199
-
200
-
201
-
202
-
203
-
204
-
205
-
206
-
207
-
208
-
209
-
210
-
211
-
212
-
213
-
214
-
215
-
216
-
217
-
218
-
219
-
220
-
221
-
222
-
223
-
224
-
225
-
226
-
227
-
228
-
229
-
230
-
231
-
232
-
233
-
234
-
235
-
236
-
237
-
238
-
239
-
240
-
241
-
242
-
243
-
244
-
245
-
246
-
247
-
248
-
249
-
250
-
251
-
252
-
253
-
254
-
255
-
256
-
257
-
258
-
259
-
 260
260 -
 261
261 -
 262
262 -
 263
263 -
 264
264 -
 265
265 -
 266
266 -
 267
267 -
 268
268 -
 269
269 -
 270
270 -
271
-
272
-
273
-
274
-
275
-
276
-
277
-
278
-
279
-
280
-
281
-
282
-
283
-
284
-
285
-
286
-
287
-
288
-
289
-
290
-
291
-
292
-
293
-
294
-
295
-
296
-
297
-
298
-
299
-
300
-
301
-
302
-
303
-
304
-
305
-
306
-
307
-
308
-
309
-
310
-
311
-
312
-
313
-
314
-
315
-
316
-
317
-
318
-
319
-
320
-
321
-
322
-
323
-
324
-
325
-
326
-
327
-
328
-
329
-
330
-
331
-
332
-
333
-
334
-
335
-
336
-
337
-
338
-
339
-
340
-
341
-
342
-
343
-
344
-
345
-
346
-
347
-
348
-
349
-
350
-
351
-
352
-
353
-
354
-
355
-
356
-
357
-
358
-
359
-
360
-
361
-
362
-
363
-
364
-
365
-
366
-
367
-
368
-
369
-
370
-
371
-
372
-
373
-
374
-
375
-
376
-
377
-
378
-
379
-
380
-
381
-
382
-
383
-
384
-
385
-
386
-
387
-
388
-
389
-
390
-
391
-
392
-
393
-
394
-
395
-
396
-
397
-
398
-
399
-
400
-
401
-
402
-
403
-
404
-
405
-
406
-
407
-
408
-
409
-
410
-
411
-
412
 |
 |