Cisco IPS-4255-K9 Installation Guide - Page 47
Correcting the Time on the Sensor, Installation Preparation
 |
UPC - 746320951096
View all Cisco IPS-4255-K9 manuals
Add to My Manuals
Save this manual to your list of manuals |
Page 47 highlights
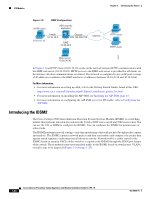
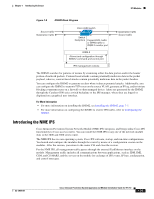
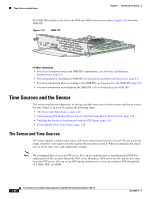
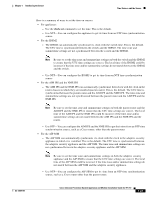
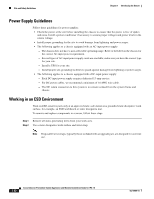
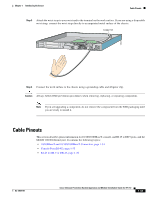
Chapter 1 Introducing the Sensor Installation Preparation Correcting the Time on the Sensor If you set the time incorrectly, your stored events will have the incorrect time because they are stamped with the time the event was created. The Event Store time stamp is always based on UTC time. If during the original sensor setup, you set the time incorrectly by specifying 8:00 p.m. rather than 8:00 a.m., when you do correct the error, the corrected time will be set backwards. New events might have times older than old events. For example, if during the initial setup, you configure the sensor as central time with daylight saving time enabled and the local time is 8:04 p.m., the time is displayed as 20:04:37 CDT and has an offset from UTC of -5 hours (01:04:37 UTC, the next day). A week later at 9:00 a.m., you discover the error: the clock shows 21:00:23 CDT. You then change the time to 9:00 a.m. and now the clock shows 09:01:33 CDT. Because the offset from UTC has not changed, it requires that the UTC time now be 14:01:33 UTC, which creates the time stamp problem. To ensure the integrity of the time stamp on the event records, you must clear the event archive of the older events by using the clear events command. Note You cannot remove individual events. For More Information For the procedure for clearing events, refer to Clearing Events from Event Store. Installation Preparation To prepare for installing sensors, follow these steps: Step 1 Step 2 Step 3 Step 4 Step 5 Step 6 Step 7 Review the safety precautions outlined in Regulatory Compliance and Safety Information for the Cisco Intrusion Prevention System 4200 Series Appliance Sensor. To familiarize yourself with the IPS and related documentation and where to find it on Cisco.com, read Documentation Roadmap for Cisco Intrusion Prevention System 7.0. Before proceeding with sensor installation, read the appropriate Release Notes. Unpack the sensor. Place the sensor in an ESD-controlled environment. Place the sensor on a stable work surface. In this book, Installing and Using Cisco Intrusion Prevention System Sensors and Modules 7.0, see the chapter that pertains to your sensor model. For More Information • For ESD guidelines, see Electrical Safety Guidelines, page 1-31. • For the procedure for working in an ESD environment, see Working in an ESD Environment, page 1-32. OL-18504-01 Cisco Intrusion Prevention System Appliance and Module Installation Guide for IPS 7.0 1-29
-
 1
1 -
2
-
3
-
4
-
5
-
6
-
7
-
8
-
9
-
10
-
11
-
12
-
13
-
14
-
15
-
16
-
17
-
18
-
19
-
20
-
21
-
22
-
23
-
24
-
25
-
26
-
27
-
28
-
29
-
30
-
31
-
32
-
33
-
34
-
35
-
36
-
37
-
38
-
39
-
40
-
41
-
 42
42 -
 43
43 -
 44
44 -
 45
45 -
 46
46 -
 47
47 -
 48
48 -
 49
49 -
 50
50 -
 51
51 -
 52
52 -
53
-
54
-
55
-
56
-
57
-
58
-
59
-
60
-
61
-
62
-
63
-
64
-
65
-
66
-
67
-
68
-
69
-
70
-
71
-
72
-
73
-
74
-
75
-
76
-
77
-
78
-
79
-
80
-
81
-
82
-
83
-
84
-
85
-
86
-
87
-
88
-
89
-
90
-
91
-
92
-
93
-
94
-
95
-
96
-
97
-
98
-
99
-
100
-
101
-
102
-
103
-
104
-
105
-
106
-
107
-
108
-
109
-
110
-
111
-
112
-
113
-
114
-
115
-
116
-
117
-
118
-
119
-
120
-
121
-
122
-
123
-
124
-
125
-
126
-
127
-
128
-
129
-
130
-
131
-
132
-
133
-
134
-
135
-
136
-
137
-
138
-
139
-
140
-
141
-
142
-
143
-
144
-
145
-
146
-
147
-
148
-
149
-
150
-
151
-
152
-
153
-
154
-
155
-
156
-
157
-
158
-
159
-
160
-
161
-
162
-
163
-
164
-
165
-
166
-
167
-
168
-
169
-
170
-
171
-
172
-
173
-
174
-
175
-
176
-
177
-
178
-
179
-
180
-
181
-
182
-
183
-
184
-
185
-
186
-
187
-
188
-
189
-
190
-
191
-
192
-
193
-
194
-
195
-
196
-
197
-
198
-
199
-
200
-
201
-
202
-
203
-
204
-
205
-
206
-
207
-
208
-
209
-
210
-
211
-
212
-
213
-
214
-
215
-
216
-
217
-
218
-
219
-
220
-
221
-
222
-
223
-
224
-
225
-
226
-
227
-
228
-
229
-
230
-
231
-
232
-
233
-
234
-
235
-
236
-
237
-
238
-
239
-
240
-
241
-
242
-
243
-
244
-
245
-
246
-
247
-
248
-
249
-
250
-
251
-
252
-
253
-
254
-
255
-
256
-
257
-
258
-
259
-
260
-
261
-
262
-
263
-
264
-
265
-
266
-
267
-
268
-
269
-
270
-
271
-
272
-
273
-
274
-
275
-
276
-
277
-
278
-
279
-
280
-
281
-
282
-
283
-
284
-
285
-
286
-
287
-
288
-
289
-
290
-
291
-
292
-
293
-
294
-
295
-
296
-
297
-
298
-
299
-
300
-
301
-
302
-
303
-
304
-
305
-
306
-
307
-
308
-
309
-
310
-
311
-
312
-
313
-
314
-
315
-
316
-
317
-
318
-
319
-
320
-
321
-
322
-
323
-
324
-
325
-
326
-
327
-
328
-
329
-
330
-
331
-
332
-
333
-
334
-
335
-
336
-
337
-
338
-
339
-
340
-
341
-
342
-
343
-
344
-
345
-
346
-
347
-
348
-
349
-
350
-
351
-
352
-
353
-
354
-
355
-
356
-
357
-
358
-
359
-
360
-
361
-
362
-
363
-
364
-
365
-
366
-
367
-
368
-
369
-
370
-
371
-
372
-
373
-
374
-
375
-
376
-
377
-
378
-
379
-
380
-
381
-
382
-
383
-
384
-
385
-
386
-
387
-
388
-
389
-
390
-
391
-
392
-
393
-
394
-
395
-
396
-
397
-
398
-
399
-
400
-
401
-
402
-
403
-
404
-
405
-
406
-
407
-
408
-
409
-
410
-
411
-
412
 |
 |