Cisco IPS-4255-K9 Installation Guide - Page 320
Log in to the service account., Telnet or SSH to the network device to verify the configuration.
 |
UPC - 746320951096
View all Cisco IPS-4255-K9 manuals
Add to My Manuals
Save this manual to your list of manuals |
Page 320 highlights
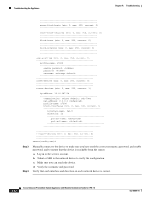
Troubleshooting the Appliance Chapter A Troubleshooting Step 3 Step 4 never-block-hosts (min: 0, max: 250, current: 0 never-block-networks (min: 0, max: 250, current: 0 block-hosts (min: 0, max: 250, current: 0 block-networks (min: 0, max: 250, current: 0 user-profiles (min: 0, max: 250, current: 1 profile-name: r7200 enable-password: password: username: netrangr default cat6k-devices (min: 0, max: 250, current: 0 router-devices (min: 0, max: 250, current: 1 ip-address: 10.89.147.54 communication: telnet default: ssh-3des nat-address: 0.0.0.0 profile-name: r7200 block-interfaces (min: 0, max: 100, current: 1 interface-name: fa0/0 direction: in pre-acl-name: post-acl-name:
-
 1
1 -
2
-
3
-
4
-
5
-
6
-
7
-
8
-
9
-
10
-
11
-
12
-
13
-
14
-
15
-
16
-
17
-
18
-
19
-
20
-
21
-
22
-
23
-
24
-
25
-
26
-
27
-
28
-
29
-
30
-
31
-
32
-
33
-
34
-
35
-
36
-
37
-
38
-
39
-
40
-
41
-
42
-
43
-
44
-
45
-
46
-
47
-
48
-
49
-
50
-
51
-
52
-
53
-
54
-
55
-
56
-
57
-
58
-
59
-
60
-
61
-
62
-
63
-
64
-
65
-
66
-
67
-
68
-
69
-
70
-
71
-
72
-
73
-
74
-
75
-
76
-
77
-
78
-
79
-
80
-
81
-
82
-
83
-
84
-
85
-
86
-
87
-
88
-
89
-
90
-
91
-
92
-
93
-
94
-
95
-
96
-
97
-
98
-
99
-
100
-
101
-
102
-
103
-
104
-
105
-
106
-
107
-
108
-
109
-
110
-
111
-
112
-
113
-
114
-
115
-
116
-
117
-
118
-
119
-
120
-
121
-
122
-
123
-
124
-
125
-
126
-
127
-
128
-
129
-
130
-
131
-
132
-
133
-
134
-
135
-
136
-
137
-
138
-
139
-
140
-
141
-
142
-
143
-
144
-
145
-
146
-
147
-
148
-
149
-
150
-
151
-
152
-
153
-
154
-
155
-
156
-
157
-
158
-
159
-
160
-
161
-
162
-
163
-
164
-
165
-
166
-
167
-
168
-
169
-
170
-
171
-
172
-
173
-
174
-
175
-
176
-
177
-
178
-
179
-
180
-
181
-
182
-
183
-
184
-
185
-
186
-
187
-
188
-
189
-
190
-
191
-
192
-
193
-
194
-
195
-
196
-
197
-
198
-
199
-
200
-
201
-
202
-
203
-
204
-
205
-
206
-
207
-
208
-
209
-
210
-
211
-
212
-
213
-
214
-
215
-
216
-
217
-
218
-
219
-
220
-
221
-
222
-
223
-
224
-
225
-
226
-
227
-
228
-
229
-
230
-
231
-
232
-
233
-
234
-
235
-
236
-
237
-
238
-
239
-
240
-
241
-
242
-
243
-
244
-
245
-
246
-
247
-
248
-
249
-
250
-
251
-
252
-
253
-
254
-
255
-
256
-
257
-
258
-
259
-
260
-
261
-
262
-
263
-
264
-
265
-
266
-
267
-
268
-
269
-
270
-
271
-
272
-
273
-
274
-
275
-
276
-
277
-
278
-
279
-
280
-
281
-
282
-
283
-
284
-
285
-
286
-
287
-
288
-
289
-
290
-
291
-
292
-
293
-
294
-
295
-
296
-
297
-
298
-
299
-
300
-
301
-
302
-
303
-
304
-
305
-
306
-
307
-
308
-
309
-
310
-
311
-
312
-
313
-
314
-
 315
315 -
 316
316 -
 317
317 -
 318
318 -
 319
319 -
 320
320 -
 321
321 -
 322
322 -
 323
323 -
 324
324 -
 325
325 -
326
-
327
-
328
-
329
-
330
-
331
-
332
-
333
-
334
-
335
-
336
-
337
-
338
-
339
-
340
-
341
-
342
-
343
-
344
-
345
-
346
-
347
-
348
-
349
-
350
-
351
-
352
-
353
-
354
-
355
-
356
-
357
-
358
-
359
-
360
-
361
-
362
-
363
-
364
-
365
-
366
-
367
-
368
-
369
-
370
-
371
-
372
-
373
-
374
-
375
-
376
-
377
-
378
-
379
-
380
-
381
-
382
-
383
-
384
-
385
-
386
-
387
-
388
-
389
-
390
-
391
-
392
-
393
-
394
-
395
-
396
-
397
-
398
-
399
-
400
-
401
-
402
-
403
-
404
-
405
-
406
-
407
-
408
-
409
-
410
-
411
-
412
 |
 |

A-42
Cisco Intrusion Prevention System Appliance and Module Installation Guide for IPS 7.0
OL-18504-01
Chapter A
Troubleshooting
Troubleshooting the Appliance
-----------------------------------------------
-----------------------------------------------
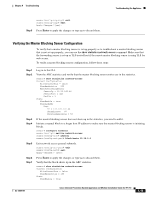
never-block-hosts (min: 0, max: 250, current: 0)
-----------------------------------------------
-----------------------------------------------
never-block-networks (min: 0, max: 250, current: 0)
-----------------------------------------------
-----------------------------------------------
block-hosts (min: 0, max: 250, current: 0)
-----------------------------------------------
-----------------------------------------------
block-networks (min: 0, max: 250, current: 0)
-----------------------------------------------
-----------------------------------------------
-----------------------------------------------
user-profiles (min: 0, max: 250, current: 1)
-----------------------------------------------
profile-name: r7200
-----------------------------------------------
enable-password: <hidden>
password: <hidden>
username: netrangr default:
-----------------------------------------------
-----------------------------------------------
cat6k-devices (min: 0, max: 250, current: 0)
-----------------------------------------------
-----------------------------------------------
router-devices (min: 0, max: 250, current: 1)
-----------------------------------------------
ip-address: 10.89.147.54
-----------------------------------------------
communication: telnet default: ssh-3des
nat-address: 0.0.0.0 <defaulted>
profile-name: r7200
block-interfaces (min: 0, max: 100, current: 1)
-----------------------------------------------
interface-name: fa0/0
direction: in
-----------------------------------------------
pre-acl-name: <defaulted>
post-acl-name: <defaulted>
-----------------------------------------------
-----------------------------------------------
-----------------------------------------------
-----------------------------------------------
firewall-devices (min: 0, max: 250, current: 0)
-----------------------------------------------
-----------------------------------------------
sensor(config-net)#
Step 3
Manually connect to the device to make sure you have used the correct username, password, and enable
password, and to ensure that the device is reachable from the sensor.
a.
Log in to the service account.
b.
Telnet or SSH to the network device to verify the configuration.
c.
Make sure you can reach the device.
d.
Verify the username and password.
Step 4
Verify that each interface and direction on each network device is correct.