Cisco IPS-4255-K9 Installation Guide - Page 344
Using the TCP Reset Interface, Connecting a Serial Cable to the IDSM2, Troubleshooting the AIP SSM
 |
UPC - 746320951096
View all Cisco IPS-4255-K9 manuals
Add to My Manuals
Save this manual to your list of manuals |
Page 344 highlights
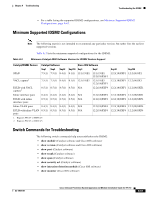
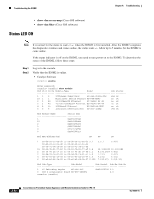
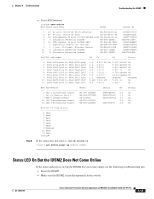
Troubleshooting the AIP SSM Chapter A Troubleshooting Using the TCP Reset Interface The IDSM2 has a TCP reset interface-port 1. The IDSM2 has a specific TCP reset interface because it cannot send TCP resets on its sensing ports. If you have reset problems with the IDSM2, and the switch is running Catalyst software, try the following: • If the sensing ports are access ports (a single VLAN), you need to configure the reset port to be in the same VLAN. • If the sensing ports are dot1q trunk ports (multi-VLAN), the sensing ports and reset port all must have the same native VLAN, and the reset port must trunk all the VLANs being trunked by both the sensing ports. Note In Cisco IOS when the IDSM2 is in promiscuous mode, the IDSM2 ports are always dot1q trunk ports (even when monitoring only 1 VLAN), and the TCP reset port is automatically set to a trunk port and is not configurable. For More Information For more information about the IDSM2 and TCP reset, refer to Configuring the IDSM2. Connecting a Serial Cable to the IDSM2 You can connect a serial cable directly to the serial console port on the IDSM2. This lets you bypass the switch and module network interfaces. To connect a serial cable to the IDSM2, follow these steps: Step 1 Step 2 Step 3 Locate the two RJ-45 ports on the IDSM2. You can find them approximately in the center of the mother board. If you are facing the module faceplate, the RJ-45 port on the right is the serial console port. Connect a straight-through cable to the right port on the IDSM2, and then connect the other end of the cable to a terminal server port. Configure the terminal server port to be 19200 baud, 8 bits, no parity. You can now log directly in to the IDSM2. Note Connecting a serial cable to the IDSM2 works only if there is no module located above the IDSM2 in the switch chassis, because the cable has to come out through the front of the chassis. Troubleshooting the AIP SSM The following section contains information for troubleshooting the AIP SSM, and contains the following topics: • Health and Status Information, page A-67 • The AIP SSM and the Data Plane, page A-69 • A-66 Cisco Intrusion Prevention System Appliance and Module Installation Guide for IPS 7.0 OL-18504-01
-
 1
1 -
2
-
3
-
4
-
5
-
6
-
7
-
8
-
9
-
10
-
11
-
12
-
13
-
14
-
15
-
16
-
17
-
18
-
19
-
20
-
21
-
22
-
23
-
24
-
25
-
26
-
27
-
28
-
29
-
30
-
31
-
32
-
33
-
34
-
35
-
36
-
37
-
38
-
39
-
40
-
41
-
42
-
43
-
44
-
45
-
46
-
47
-
48
-
49
-
50
-
51
-
52
-
53
-
54
-
55
-
56
-
57
-
58
-
59
-
60
-
61
-
62
-
63
-
64
-
65
-
66
-
67
-
68
-
69
-
70
-
71
-
72
-
73
-
74
-
75
-
76
-
77
-
78
-
79
-
80
-
81
-
82
-
83
-
84
-
85
-
86
-
87
-
88
-
89
-
90
-
91
-
92
-
93
-
94
-
95
-
96
-
97
-
98
-
99
-
100
-
101
-
102
-
103
-
104
-
105
-
106
-
107
-
108
-
109
-
110
-
111
-
112
-
113
-
114
-
115
-
116
-
117
-
118
-
119
-
120
-
121
-
122
-
123
-
124
-
125
-
126
-
127
-
128
-
129
-
130
-
131
-
132
-
133
-
134
-
135
-
136
-
137
-
138
-
139
-
140
-
141
-
142
-
143
-
144
-
145
-
146
-
147
-
148
-
149
-
150
-
151
-
152
-
153
-
154
-
155
-
156
-
157
-
158
-
159
-
160
-
161
-
162
-
163
-
164
-
165
-
166
-
167
-
168
-
169
-
170
-
171
-
172
-
173
-
174
-
175
-
176
-
177
-
178
-
179
-
180
-
181
-
182
-
183
-
184
-
185
-
186
-
187
-
188
-
189
-
190
-
191
-
192
-
193
-
194
-
195
-
196
-
197
-
198
-
199
-
200
-
201
-
202
-
203
-
204
-
205
-
206
-
207
-
208
-
209
-
210
-
211
-
212
-
213
-
214
-
215
-
216
-
217
-
218
-
219
-
220
-
221
-
222
-
223
-
224
-
225
-
226
-
227
-
228
-
229
-
230
-
231
-
232
-
233
-
234
-
235
-
236
-
237
-
238
-
239
-
240
-
241
-
242
-
243
-
244
-
245
-
246
-
247
-
248
-
249
-
250
-
251
-
252
-
253
-
254
-
255
-
256
-
257
-
258
-
259
-
260
-
261
-
262
-
263
-
264
-
265
-
266
-
267
-
268
-
269
-
270
-
271
-
272
-
273
-
274
-
275
-
276
-
277
-
278
-
279
-
280
-
281
-
282
-
283
-
284
-
285
-
286
-
287
-
288
-
289
-
290
-
291
-
292
-
293
-
294
-
295
-
296
-
297
-
298
-
299
-
300
-
301
-
302
-
303
-
304
-
305
-
306
-
307
-
308
-
309
-
310
-
311
-
312
-
313
-
314
-
315
-
316
-
317
-
318
-
319
-
320
-
321
-
322
-
323
-
324
-
325
-
326
-
327
-
328
-
329
-
330
-
331
-
332
-
333
-
334
-
335
-
336
-
337
-
338
-
 339
339 -
 340
340 -
 341
341 -
 342
342 -
 343
343 -
 344
344 -
 345
345 -
 346
346 -
 347
347 -
 348
348 -
 349
349 -
350
-
351
-
352
-
353
-
354
-
355
-
356
-
357
-
358
-
359
-
360
-
361
-
362
-
363
-
364
-
365
-
366
-
367
-
368
-
369
-
370
-
371
-
372
-
373
-
374
-
375
-
376
-
377
-
378
-
379
-
380
-
381
-
382
-
383
-
384
-
385
-
386
-
387
-
388
-
389
-
390
-
391
-
392
-
393
-
394
-
395
-
396
-
397
-
398
-
399
-
400
-
401
-
402
-
403
-
404
-
405
-
406
-
407
-
408
-
409
-
410
-
411
-
412
 |
 |