Cisco IPS-4255-K9 Installation Guide - Page 215
Advanced Setup for the NME IPS
 |
UPC - 746320951096
View all Cisco IPS-4255-K9 manuals
Add to My Manuals
Save this manual to your list of manuals |
Page 215 highlights
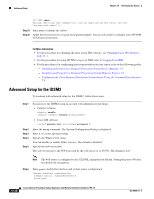
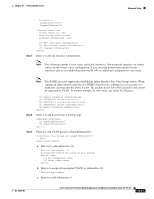
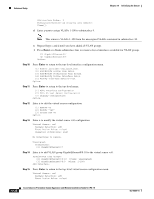
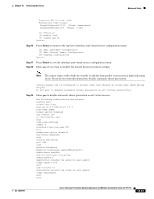
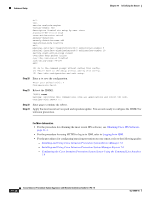
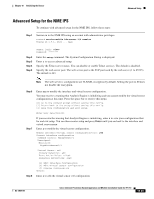
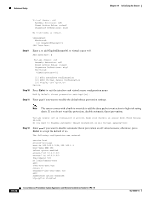
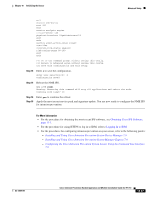
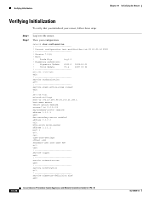
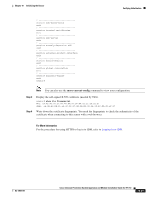
Chapter 10 Initializing the Sensor Advanced Setup Advanced Setup for the NME IPS To continue with advanced setup for the NME IPS, follow these steps: Step 1 Session in to the NME IPS using an account with administrator privileges. router# service-module ids-sensor 1/0 session Trying 10.1.9.1, 2322 ... Open Step 2 Step 3 Step 4 Step 5 sensor login: cisco Password: ******** Enter the setup command. The System Configuration Dialog is displayed. Enter 3 to access advanced setup. Specify the Telnet server status. You can disable or enable Telnet services. The default is disabled. Specify the web server port. The web server port is the TCP port used by the web server (1 to 65535). The default is 443. Note The web server is configured to use TLS/SSL encryption by default. Setting the port to 80 does not disable the encryption. Step 6 Enter yes to modify the interface and virtual sensor configuration. You may receive a warning that Analysis Engine is initializing and you cannot modify the virtual sensor configuration at this time. Press the space bar to receive this menu. [0] Go to the command prompt without saving this config. [1] Return back to the setup without saving this config. [2] Save this configuration and exit setup. Enter your selection[2]: Step 7 If you receive the warning that Analysis Engine is initializing, enter 2 to save your configuration thus far and exit setup. You can then reenter setup and press Enter until you are back to the interface and virtual sensor menu. Enter 2 to modify the virtual sensor configuration. Modify interface/virtual sensor configuration?[no]: yes Current interface configuration Command control: Management0/1 Unassigned: Monitored: GigabitEthernet0/1 Virtual Sensor: vs0 Anomaly Detection: ad0 Event Action Rules: rules0 Signature Definitions: sig0 [1] Edit Interface Configuration [2] Edit Virtual Sensor Configuration [3] Display configuration Option: Step 8 Enter 2 to edit the virtual sensor vs0 configuration. OL-18504-01 Cisco Intrusion Prevention System Appliance and Module Installation Guide for IPS 7.0 10-25
-
 1
1 -
2
-
3
-
4
-
5
-
6
-
7
-
8
-
9
-
10
-
11
-
12
-
13
-
14
-
15
-
16
-
17
-
18
-
19
-
20
-
21
-
22
-
23
-
24
-
25
-
26
-
27
-
28
-
29
-
30
-
31
-
32
-
33
-
34
-
35
-
36
-
37
-
38
-
39
-
40
-
41
-
42
-
43
-
44
-
45
-
46
-
47
-
48
-
49
-
50
-
51
-
52
-
53
-
54
-
55
-
56
-
57
-
58
-
59
-
60
-
61
-
62
-
63
-
64
-
65
-
66
-
67
-
68
-
69
-
70
-
71
-
72
-
73
-
74
-
75
-
76
-
77
-
78
-
79
-
80
-
81
-
82
-
83
-
84
-
85
-
86
-
87
-
88
-
89
-
90
-
91
-
92
-
93
-
94
-
95
-
96
-
97
-
98
-
99
-
100
-
101
-
102
-
103
-
104
-
105
-
106
-
107
-
108
-
109
-
110
-
111
-
112
-
113
-
114
-
115
-
116
-
117
-
118
-
119
-
120
-
121
-
122
-
123
-
124
-
125
-
126
-
127
-
128
-
129
-
130
-
131
-
132
-
133
-
134
-
135
-
136
-
137
-
138
-
139
-
140
-
141
-
142
-
143
-
144
-
145
-
146
-
147
-
148
-
149
-
150
-
151
-
152
-
153
-
154
-
155
-
156
-
157
-
158
-
159
-
160
-
161
-
162
-
163
-
164
-
165
-
166
-
167
-
168
-
169
-
170
-
171
-
172
-
173
-
174
-
175
-
176
-
177
-
178
-
179
-
180
-
181
-
182
-
183
-
184
-
185
-
186
-
187
-
188
-
189
-
190
-
191
-
192
-
193
-
194
-
195
-
196
-
197
-
198
-
199
-
200
-
201
-
202
-
203
-
204
-
205
-
206
-
207
-
208
-
209
-
 210
210 -
 211
211 -
 212
212 -
 213
213 -
 214
214 -
 215
215 -
 216
216 -
 217
217 -
 218
218 -
 219
219 -
 220
220 -
221
-
222
-
223
-
224
-
225
-
226
-
227
-
228
-
229
-
230
-
231
-
232
-
233
-
234
-
235
-
236
-
237
-
238
-
239
-
240
-
241
-
242
-
243
-
244
-
245
-
246
-
247
-
248
-
249
-
250
-
251
-
252
-
253
-
254
-
255
-
256
-
257
-
258
-
259
-
260
-
261
-
262
-
263
-
264
-
265
-
266
-
267
-
268
-
269
-
270
-
271
-
272
-
273
-
274
-
275
-
276
-
277
-
278
-
279
-
280
-
281
-
282
-
283
-
284
-
285
-
286
-
287
-
288
-
289
-
290
-
291
-
292
-
293
-
294
-
295
-
296
-
297
-
298
-
299
-
300
-
301
-
302
-
303
-
304
-
305
-
306
-
307
-
308
-
309
-
310
-
311
-
312
-
313
-
314
-
315
-
316
-
317
-
318
-
319
-
320
-
321
-
322
-
323
-
324
-
325
-
326
-
327
-
328
-
329
-
330
-
331
-
332
-
333
-
334
-
335
-
336
-
337
-
338
-
339
-
340
-
341
-
342
-
343
-
344
-
345
-
346
-
347
-
348
-
349
-
350
-
351
-
352
-
353
-
354
-
355
-
356
-
357
-
358
-
359
-
360
-
361
-
362
-
363
-
364
-
365
-
366
-
367
-
368
-
369
-
370
-
371
-
372
-
373
-
374
-
375
-
376
-
377
-
378
-
379
-
380
-
381
-
382
-
383
-
384
-
385
-
386
-
387
-
388
-
389
-
390
-
391
-
392
-
393
-
394
-
395
-
396
-
397
-
398
-
399
-
400
-
401
-
402
-
403
-
404
-
405
-
406
-
407
-
408
-
409
-
410
-
411
-
412
 |
 |