Samsung SM-N900R4 User Manual Us Cellular Sm-n900r4 Galaxy Note 3 Jb English U - Page 53
Contacts and Accounts, Accounts, Contacts
 |
View all Samsung SM-N900R4 manuals
Add to My Manuals
Save this manual to your list of manuals |
Page 53 highlights
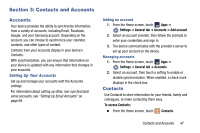
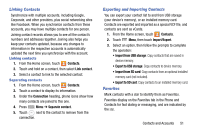
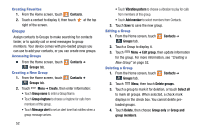
Section 3: Contacts and Accounts Accounts Your device provides the ability to synchronize information, from a variety of accounts, including Email, Facebook, Google, and your Samsung account. Depending on the account, you can choose to synchronize your calendar, contacts, and other types of content. Contacts from your accounts display in your device's Contacts. With synchronization, you can ensure that information on your device is updated with any information that changes in your accounts. Setting Up Your Accounts Set up and manage your accounts with the Accounts settings. For information about setting up other, non-synchronized email accounts, see "Setting Up Email Accounts" on page 69. Adding an account 1. From the Home screen, touch Apps ➔ Settings ➔ General tab ➔ Accounts ➔ Add account. 2. Select an account provider, then follow the prompts to enter your credentials and sign in. 3. The device communicates with the provider's server to set up your account on the device. Managing accounts 1. From the Home screen, touch Apps ➔ Settings ➔ General tab ➔ Accounts. 2. Select an account, then touch a setting to enable or disable synchronization. When enabled, a check mark displays in the check box. Contacts Use Contacts to store information for your friends, family and colleagues, to make contacting them easy. To access Contacts: Ⅲ From the Home screen, touch Contacts. Contacts and Accounts 47
-
 1
1 -
2
-
3
-
4
-
5
-
6
-
7
-
8
-
9
-
10
-
11
-
12
-
13
-
14
-
15
-
16
-
17
-
18
-
19
-
20
-
21
-
22
-
23
-
24
-
25
-
26
-
27
-
28
-
29
-
30
-
31
-
32
-
33
-
34
-
35
-
36
-
37
-
38
-
39
-
40
-
41
-
42
-
43
-
44
-
45
-
46
-
47
-
 48
48 -
 49
49 -
 50
50 -
 51
51 -
 52
52 -
 53
53 -
 54
54 -
 55
55 -
 56
56 -
 57
57 -
 58
58 -
59
-
60
-
61
-
62
-
63
-
64
-
65
-
66
-
67
-
68
-
69
-
70
-
71
-
72
-
73
-
74
-
75
-
76
-
77
-
78
-
79
-
80
-
81
-
82
-
83
-
84
-
85
-
86
-
87
-
88
-
89
-
90
-
91
-
92
-
93
-
94
-
95
-
96
-
97
-
98
-
99
-
100
-
101
-
102
-
103
-
104
-
105
-
106
-
107
-
108
-
109
-
110
-
111
-
112
-
113
-
114
-
115
-
116
-
117
-
118
-
119
-
120
-
121
-
122
-
123
-
124
-
125
-
126
-
127
-
128
-
129
-
130
-
131
-
132
-
133
-
134
-
135
-
136
-
137
-
138
-
139
-
140
-
141
-
142
-
143
-
144
-
145
-
146
-
147
-
148
-
149
-
150
-
151
-
152
-
153
-
154
-
155
-
156
-
157
-
158
-
159
-
160
-
161
-
162
-
163
-
164
-
165
-
166
-
167
-
168
-
169
-
170
-
171
-
172
-
173
-
174
-
175
-
176
-
177
-
178
-
179
-
180
-
181
-
182
-
183
-
184
-
185
-
186
-
187
-
188
-
189
-
190
-
191
-
192
-
193
-
194
-
195
-
196
-
197
-
198
-
199
-
200
-
201
-
202
-
203
-
204
-
205
-
206
-
207
-
208
-
209
-
210
-
211
-
212
-
213
-
214
-
215
-
216
-
217
-
218
-
219
-
220
-
221
-
222
-
223
-
224
-
225
-
226
-
227
-
228
-
229
-
230
-
231
-
232
-
233
-
234
-
235
-
236
-
237
-
238
-
239
-
240
-
241
-
242
-
243
-
244
-
245
-
246
-
247
-
248
-
249
-
250
-
251
-
252
-
253
-
254
-
255
-
256
-
257
-
258
-
259
-
260
-
261
-
262
-
263
-
264
-
265
-
266
-
267
-
268
-
269
-
270
 |
 |