Samsung SM-N900R4 User Manual Us Cellular Sm-n900r4 Galaxy Note 3 Jb English U - Page 98
Deleting an Existing Alarm, Location alarm, Snooze, Interval, Repeat, Smart alarm, Clock, Delete
 |
View all Samsung SM-N900R4 manuals
Add to My Manuals
Save this manual to your list of manuals |
Page 98 highlights
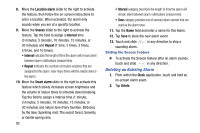
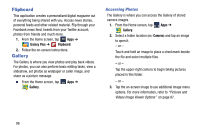
8. Move the Location alarm slider to the right to activate the feature, then follow the on-screen instructions to enter a location. When activated, the alarm only sounds when you are at a specific location. 9. Move the Snooze slider to the right to activate the feature. Tap the field to assign a Interval time (3 minutes, 5 minutes, 10 minutes, 15 minutes, or 30 minutes) and Repeat (1 time, 2 times, 3 times, 5 times, and 10 times). • Interval indicates the length of time the alarm will remain silent between alarm notifications (snooze time). • Repeat indicates the numbers of snooze sessions that are assigned to this alarm. How many times will the snooze silence the alarm. 10. Move the Smart alarm slider to the right to activate this feature which slowly increases screen brightness and the volume of nature tones to simulate dawn breaking. Tap the field to assign a interval time (1 minute, 3 minutes, 5 minutes, 10 minutes, 15 minutes, or 30 minutes) and nature tone (Fairy fountain, Birdsong by the lake, Sparkling mist, The secret forest, Serenity, or Gentle spring rain). 92 • Interval category describes the length of time the alarm will remain silent between alarm notifications (snooze time). • Tone category provides one of several nature sounds that are used as the alarm tone. 11. Tap the Name field and enter a name for this Alarm. 12. Tap Save to store the new alarm event. 13. Touch and slide in any direction to stop a sounding alarm. Setting the Snooze Feature Ⅲ To activate the Snooze feature after an alarm sounds, touch and slide in any direction. Deleting an Existing Alarm 1. From within the Clock application, touch and hold an on-screen alarm event. 2. Tap Delete.
-
 1
1 -
2
-
3
-
4
-
5
-
6
-
7
-
8
-
9
-
10
-
11
-
12
-
13
-
14
-
15
-
16
-
17
-
18
-
19
-
20
-
21
-
22
-
23
-
24
-
25
-
26
-
27
-
28
-
29
-
30
-
31
-
32
-
33
-
34
-
35
-
36
-
37
-
38
-
39
-
40
-
41
-
42
-
43
-
44
-
45
-
46
-
47
-
48
-
49
-
50
-
51
-
52
-
53
-
54
-
55
-
56
-
57
-
58
-
59
-
60
-
61
-
62
-
63
-
64
-
65
-
66
-
67
-
68
-
69
-
70
-
71
-
72
-
73
-
74
-
75
-
76
-
77
-
78
-
79
-
80
-
81
-
82
-
83
-
84
-
85
-
86
-
87
-
88
-
89
-
90
-
91
-
92
-
 93
93 -
 94
94 -
 95
95 -
 96
96 -
 97
97 -
 98
98 -
 99
99 -
 100
100 -
 101
101 -
 102
102 -
 103
103 -
104
-
105
-
106
-
107
-
108
-
109
-
110
-
111
-
112
-
113
-
114
-
115
-
116
-
117
-
118
-
119
-
120
-
121
-
122
-
123
-
124
-
125
-
126
-
127
-
128
-
129
-
130
-
131
-
132
-
133
-
134
-
135
-
136
-
137
-
138
-
139
-
140
-
141
-
142
-
143
-
144
-
145
-
146
-
147
-
148
-
149
-
150
-
151
-
152
-
153
-
154
-
155
-
156
-
157
-
158
-
159
-
160
-
161
-
162
-
163
-
164
-
165
-
166
-
167
-
168
-
169
-
170
-
171
-
172
-
173
-
174
-
175
-
176
-
177
-
178
-
179
-
180
-
181
-
182
-
183
-
184
-
185
-
186
-
187
-
188
-
189
-
190
-
191
-
192
-
193
-
194
-
195
-
196
-
197
-
198
-
199
-
200
-
201
-
202
-
203
-
204
-
205
-
206
-
207
-
208
-
209
-
210
-
211
-
212
-
213
-
214
-
215
-
216
-
217
-
218
-
219
-
220
-
221
-
222
-
223
-
224
-
225
-
226
-
227
-
228
-
229
-
230
-
231
-
232
-
233
-
234
-
235
-
236
-
237
-
238
-
239
-
240
-
241
-
242
-
243
-
244
-
245
-
246
-
247
-
248
-
249
-
250
-
251
-
252
-
253
-
254
-
255
-
256
-
257
-
258
-
259
-
260
-
261
-
262
-
263
-
264
-
265
-
266
-
267
-
268
-
269
-
270
 |
 |
