Brother International PEDESIGN 7.0 Users Manual - English - Page 105
Specifying the Design Size and Color
 |
View all Brother International PEDESIGN 7.0 manuals
Add to My Manuals
Save this manual to your list of manuals |
Page 105 highlights
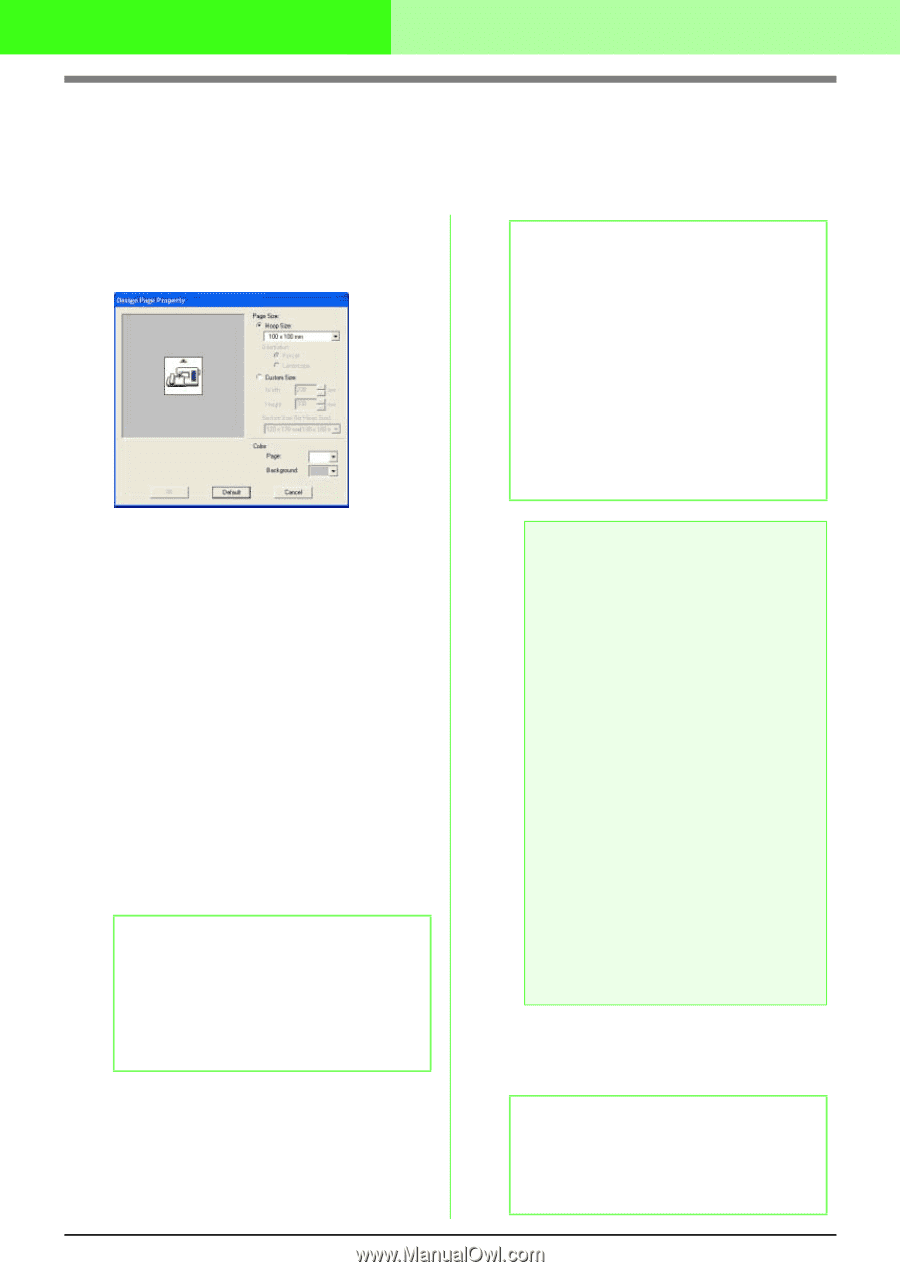
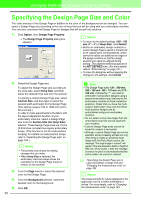
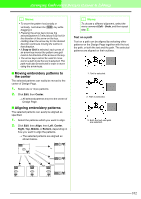
Arranging Embroidery Designs (Layout & Editing) Specifying the Design Page Size and Color The color and size of the Design Page in addition to the color of the background can be changed. You can select a Design Page size according to the size of hoop that you will be using with your embroidery machine. You can also customize the Design Page for designs that will be split into sections. 1. Click Option, then Design Page Property. → The Design Page Property dialog box appears. b Memo: • To return to the default settings (100 × 100 mm (4" × 4") of Hoop Size), click Default. • Before an embroidery design created in a custom Design Page is saved or transferred to an original card, running stitches, which cannot be edited, are added at the edges of the design sections so that the design sections can easily be aligned during sewing. This alignment stitching appears in the NOT DEFINED color. (For more details, refer to "Embroidering" on page 191.) • To close the dialog box without applying the changes to the settings, click Cancel. 2. Select the Design Page size. To adjust the Design Page size according to the hoop size, select Hoop Size, and then select the desired hoop size from the selector. To specify a custom Design Page size, select Custom Size, and then type or select the desired width and height for the Design Page. (The setting range is 100 to 1000 mm (3.9 to 39.4 inches).) In order to make adjustments to the fabric with the layout adjustment function of your embroidery machine, select a Design Page size from the Section Size (for Hoop Size) selector. These Design Page sizes are 10 mm (0.39 inches.) smaller than regular embroidery hoops. (This function is not for multi-position hooping. For details on multi-position hoops, refer to "Selecting the Design Page size" on page 184.) b Memo: • The preview area shows the setting changes that you make. • When Hoop Size is selected, the embroidery machine image shows the orientation of the Design Page (hoop) in relation to the machine. 3. From the Page selector, select the desired color for the Design Page. 4. From the Background selector, select the desired color for the background. 5. Click OK. 99 a Note: • The Design Page sizes 130 × 300 mm, 300 × 130 mm, 100 × 172 mm, and 172 × 100 mm, indicated by "*", are used to embroider multi-position designs using a special embroidery hoop attached to the embroidery machine at three installation positions. Check that you have the multiposition embroidery hoop and that these multi-position designs can be embroidered using your embroidery machine. • Do not select a hoop size larger than the embroidery hoop that can be used with your machine. • Custom Design Page sizes cannot be saved for version 5 and earlier. • Although a custom Design Page size can be specified, since processing will take too long when trying to create an extremely large design with the Photo Stitch function, the message "Too large image to convert" will appear if the size exceeds a width or height of 500 mm (19 3/4 inches.). After the message is closed, the photo is automatically selected, and is ready to be moved or reduced. c "Specifying the Design Page size in Layout & Editing" on page 313 and "Changing the measurement units" on page 183 b Memo: The measurements for values displayed in the application can be in either millimeters or inches. For more details, refer to "Changing the measurement units" on page 183.
-
 1
1 -
2
-
3
-
4
-
5
-
6
-
7
-
8
-
9
-
10
-
11
-
12
-
13
-
14
-
15
-
16
-
17
-
18
-
19
-
20
-
21
-
22
-
23
-
24
-
25
-
26
-
27
-
28
-
29
-
30
-
31
-
32
-
33
-
34
-
35
-
36
-
37
-
38
-
39
-
40
-
41
-
42
-
43
-
44
-
45
-
46
-
47
-
48
-
49
-
50
-
51
-
52
-
53
-
54
-
55
-
56
-
57
-
58
-
59
-
60
-
61
-
62
-
63
-
64
-
65
-
66
-
67
-
68
-
69
-
70
-
71
-
72
-
73
-
74
-
75
-
76
-
77
-
78
-
79
-
80
-
81
-
82
-
83
-
84
-
85
-
86
-
87
-
88
-
89
-
90
-
91
-
92
-
93
-
94
-
95
-
96
-
97
-
98
-
99
-
 100
100 -
 101
101 -
 102
102 -
 103
103 -
 104
104 -
 105
105 -
 106
106 -
 107
107 -
 108
108 -
 109
109 -
 110
110 -
111
-
112
-
113
-
114
-
115
-
116
-
117
-
118
-
119
-
120
-
121
-
122
-
123
-
124
-
125
-
126
-
127
-
128
-
129
-
130
-
131
-
132
-
133
-
134
-
135
-
136
-
137
-
138
-
139
-
140
-
141
-
142
-
143
-
144
-
145
-
146
-
147
-
148
-
149
-
150
-
151
-
152
-
153
-
154
-
155
-
156
-
157
-
158
-
159
-
160
-
161
-
162
-
163
-
164
-
165
-
166
-
167
-
168
-
169
-
170
-
171
-
172
-
173
-
174
-
175
-
176
-
177
-
178
-
179
-
180
-
181
-
182
-
183
-
184
-
185
-
186
-
187
-
188
-
189
-
190
-
191
-
192
-
193
-
194
-
195
-
196
-
197
-
198
-
199
-
200
-
201
-
202
-
203
-
204
-
205
-
206
-
207
-
208
-
209
-
210
-
211
-
212
-
213
-
214
-
215
-
216
-
217
-
218
-
219
-
220
-
221
-
222
-
223
-
224
-
225
-
226
-
227
-
228
-
229
-
230
-
231
-
232
-
233
-
234
-
235
-
236
-
237
-
238
-
239
-
240
-
241
-
242
-
243
-
244
-
245
-
246
-
247
-
248
-
249
-
250
-
251
-
252
-
253
-
254
-
255
-
256
-
257
-
258
-
259
-
260
-
261
-
262
-
263
-
264
-
265
-
266
-
267
-
268
-
269
-
270
-
271
-
272
-
273
-
274
-
275
-
276
-
277
-
278
-
279
-
280
-
281
-
282
-
283
-
284
-
285
-
286
-
287
-
288
-
289
-
290
-
291
-
292
-
293
-
294
-
295
-
296
-
297
-
298
-
299
-
300
-
301
-
302
-
303
-
304
-
305
-
306
-
307
-
308
-
309
-
310
-
311
-
312
-
313
-
314
-
315
-
316
-
317
-
318
-
319
-
320
-
321
-
322
-
323
-
324
-
325
-
326
-
327
-
328
-
329
-
330
-
331
-
332
-
333
-
334
-
335
-
336
-
337
-
338
-
339
-
340
-
341
-
342
-
343
-
344
-
345
-
346
-
347
-
348
-
349
-
350
-
351
-
352
-
353
-
354
-
355
-
356
-
357
-
358
-
359
-
360
-
361
 |
 |