Brother International PEDESIGN 7.0 Users Manual - English - Page 150
Applying and Editing Stamps
 |
View all Brother International PEDESIGN 7.0 manuals
Add to My Manuals
Save this manual to your list of manuals |
Page 150 highlights
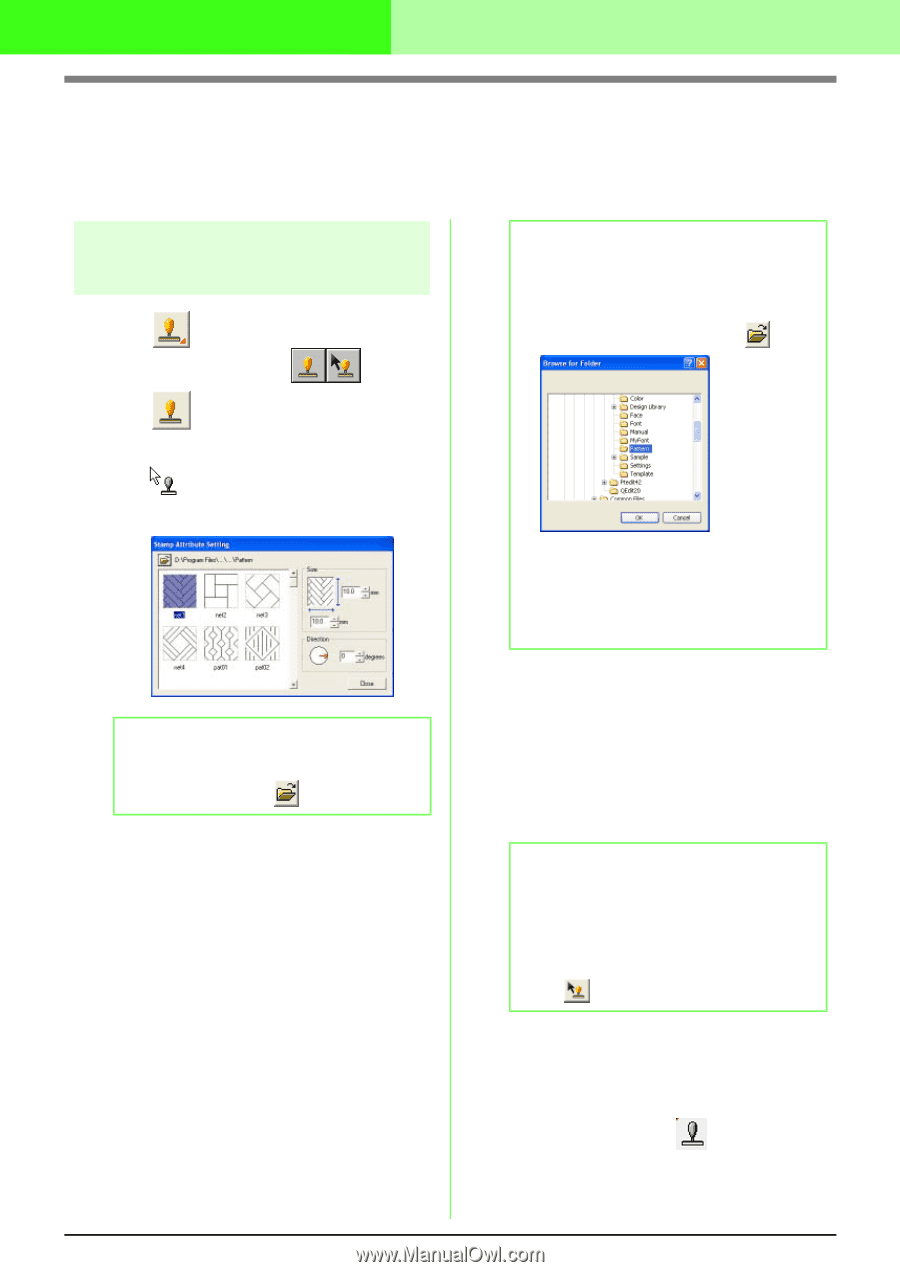
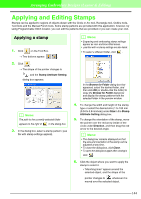
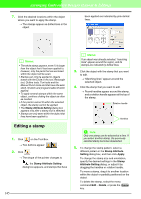
Arranging Embroidery Designs (Layout & Editing) Applying and Editing Stamps Stamps can be applied to regions of objects drawn with the Circle or Arc tool, Rectangle tool, Outline tools, Text tools and the Manual Punch tools. Some stamp patterns are provided with this application; however, by using Programmable Stitch Creator, you can edit the patterns that are provided or you can create your own. Applying a stamp 1. Click on the Tool Box. → Two buttons appear: . 2. Click . → The shape of the pointer changes to , and the Stamp Attribute Setting dialog box appears. b Memo: The path to the currently selected folder appears to the right of in the dialog box. 3. In the dialog box, select a stamp pattern (.pas file with stamp settings applied). b Memo: • Engraving and embossing stamp settings appear as red- and blue-filled areas. • .pas files with no stamp settings are also listed. • To select a different folder, click . In the Browse for Folder dialog box that appeared, select the desired folder, and then click OK (or double-click the folder) to close the Browse for Folder dialog box and display the stamp patterns from the selected folder in the preview window. 4. To change the width and height of the stamp, type or select the desired size (1 to 100 mm (0.04 to 3.94 inches)) under Size in the Stamp Attribute Setting dialog box. 5. To change the orientation of the stamp, move the pointer over the red arrow inside of the circle under Direction, and then drag the red arrow to the desired angle. b Memo: • The dialog box remains displayed so that the size and orientation of the stamp can be adjusted at any time. • To close the dialog box, click Close. • To open the dialog box again after closing it, click . 6. Click the object where you want to apply the stamp to select it. → "Marching lines" appear around the selected object, and the shape of the pointer changes to whenever it is moved over the selected object. 144
-
 1
1 -
2
-
3
-
4
-
5
-
6
-
7
-
8
-
9
-
10
-
11
-
12
-
13
-
14
-
15
-
16
-
17
-
18
-
19
-
20
-
21
-
22
-
23
-
24
-
25
-
26
-
27
-
28
-
29
-
30
-
31
-
32
-
33
-
34
-
35
-
36
-
37
-
38
-
39
-
40
-
41
-
42
-
43
-
44
-
45
-
46
-
47
-
48
-
49
-
50
-
51
-
52
-
53
-
54
-
55
-
56
-
57
-
58
-
59
-
60
-
61
-
62
-
63
-
64
-
65
-
66
-
67
-
68
-
69
-
70
-
71
-
72
-
73
-
74
-
75
-
76
-
77
-
78
-
79
-
80
-
81
-
82
-
83
-
84
-
85
-
86
-
87
-
88
-
89
-
90
-
91
-
92
-
93
-
94
-
95
-
96
-
97
-
98
-
99
-
100
-
101
-
102
-
103
-
104
-
105
-
106
-
107
-
108
-
109
-
110
-
111
-
112
-
113
-
114
-
115
-
116
-
117
-
118
-
119
-
120
-
121
-
122
-
123
-
124
-
125
-
126
-
127
-
128
-
129
-
130
-
131
-
132
-
133
-
134
-
135
-
136
-
137
-
138
-
139
-
140
-
141
-
142
-
143
-
144
-
 145
145 -
 146
146 -
 147
147 -
 148
148 -
 149
149 -
 150
150 -
 151
151 -
 152
152 -
 153
153 -
 154
154 -
 155
155 -
156
-
157
-
158
-
159
-
160
-
161
-
162
-
163
-
164
-
165
-
166
-
167
-
168
-
169
-
170
-
171
-
172
-
173
-
174
-
175
-
176
-
177
-
178
-
179
-
180
-
181
-
182
-
183
-
184
-
185
-
186
-
187
-
188
-
189
-
190
-
191
-
192
-
193
-
194
-
195
-
196
-
197
-
198
-
199
-
200
-
201
-
202
-
203
-
204
-
205
-
206
-
207
-
208
-
209
-
210
-
211
-
212
-
213
-
214
-
215
-
216
-
217
-
218
-
219
-
220
-
221
-
222
-
223
-
224
-
225
-
226
-
227
-
228
-
229
-
230
-
231
-
232
-
233
-
234
-
235
-
236
-
237
-
238
-
239
-
240
-
241
-
242
-
243
-
244
-
245
-
246
-
247
-
248
-
249
-
250
-
251
-
252
-
253
-
254
-
255
-
256
-
257
-
258
-
259
-
260
-
261
-
262
-
263
-
264
-
265
-
266
-
267
-
268
-
269
-
270
-
271
-
272
-
273
-
274
-
275
-
276
-
277
-
278
-
279
-
280
-
281
-
282
-
283
-
284
-
285
-
286
-
287
-
288
-
289
-
290
-
291
-
292
-
293
-
294
-
295
-
296
-
297
-
298
-
299
-
300
-
301
-
302
-
303
-
304
-
305
-
306
-
307
-
308
-
309
-
310
-
311
-
312
-
313
-
314
-
315
-
316
-
317
-
318
-
319
-
320
-
321
-
322
-
323
-
324
-
325
-
326
-
327
-
328
-
329
-
330
-
331
-
332
-
333
-
334
-
335
-
336
-
337
-
338
-
339
-
340
-
341
-
342
-
343
-
344
-
345
-
346
-
347
-
348
-
349
-
350
-
351
-
352
-
353
-
354
-
355
-
356
-
357
-
358
-
359
-
360
-
361
 |
 |