Brother International PEDESIGN 7.0 Users Manual - English - Page 177
Editing the sewing order, Combining patterns of the same color, Editing the color
 |
View all Brother International PEDESIGN 7.0 manuals
Add to My Manuals
Save this manual to your list of manuals |
Page 177 highlights
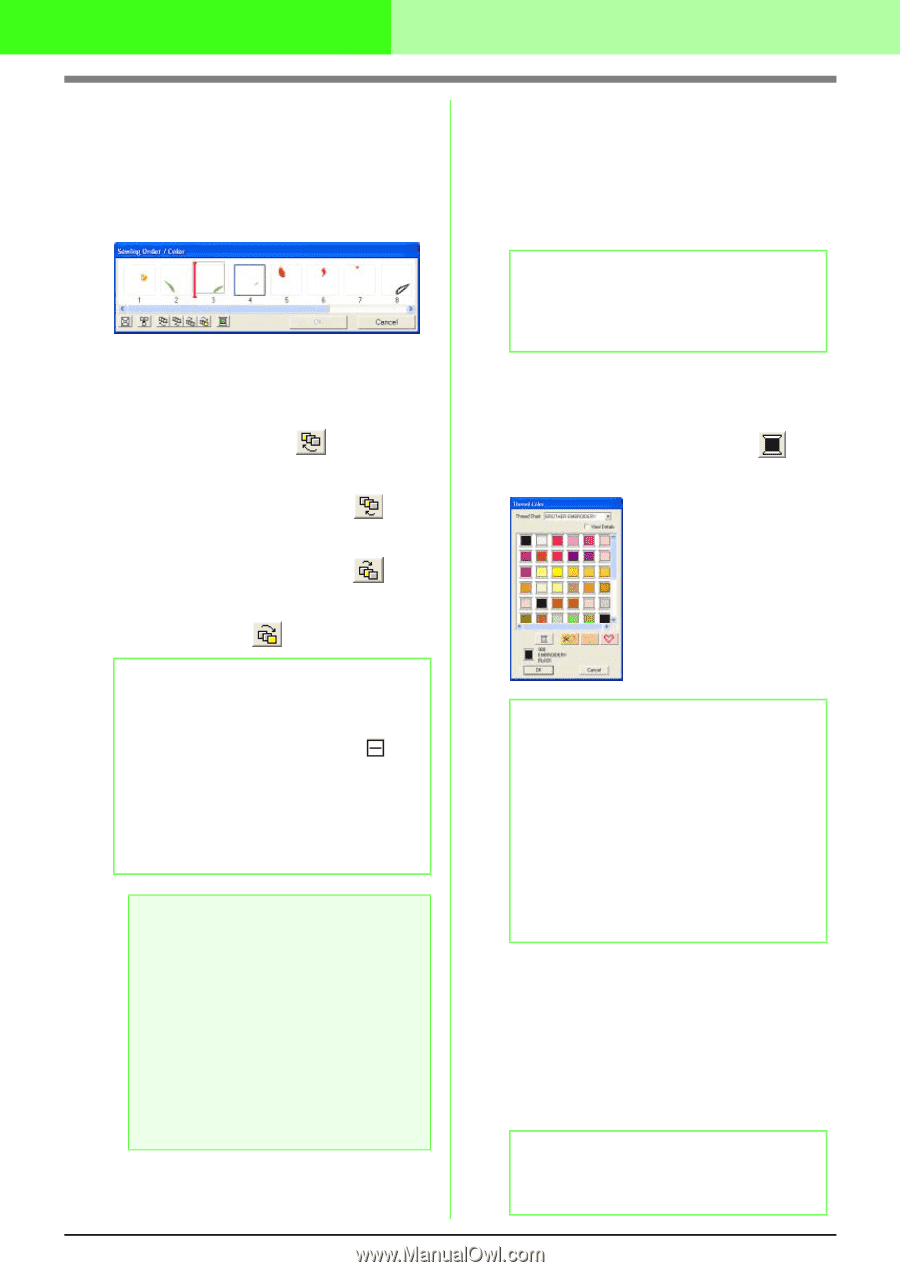
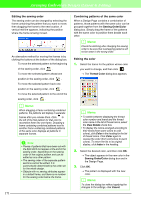
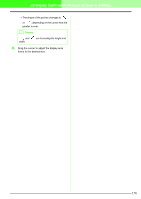
Arranging Embroidery Designs (Layout & Editing) Editing the sewing order The sewing order can be changed by selecting the frame containing the pattern that you want to move, then dragging the frame to the new location. A vertical red line appears, indicating the position where the frame is being moved. An alternative method for moving the frames is by clicking the buttons at the bottom of the dialog box. To move the selected pattern to the beginning of the sewing order, click . To move the selected pattern ahead one position in the sewing order, click . To move the selected pattern back one position in the sewing order, click . To move the selected pattern to the end of the sewing order, click . b Memo: When dragging a frame containing combined patterns, the patterns will display in separate frames after you release them. Click to the left of the first pattern for that color to recombine them into one frame. Dropping a frame containing combined patterns next to another frame containing combined patterns of the same color displays all patterns in separate frames. a Note: • Pieces of patterns that have been cut with the Split stitch tool appear at the end of the sewing order, depending on the sewing order of the original pattern and can be edited as any other pattern. • The sewing order of the separate pattern sections cannot be edited. It is automatically determined by the order set for the whole design. • Objects with no sewing attributes appear in a dotted frame, and there is no number for the sewing order below the frame. 171 Combining patterns of the same color When a Design Page contains a combination of patterns, those patterns with the same color can be grouped together from the Sewing Order/Color dialog box. Simply drag the frame of the patterns with the same color to position them beside each other. b Memo: Check the stitching after changing the sewing order to be sure that overlapping patterns will not be sewn in the wrong order. Editing the color 1. Select the frame for the pattern whose color you want to change, and then click . → The Thread Color dialog box appears. b Memo: • To switch between displaying the thread color number and brand and the thread color name in the list of thread colors, select the View Details check box. • To display the colors arranged according to their tones (from warm colors to cold colors), click Color in the heading for the list of thread colors. Click Color again to reverse the order (from cold colors to warm colors). To return the list to its original display, click Index in the heading. 2. Select the desired color, and then click OK. → The object appears in the new color in the Sewing Order/Color dialog box and in the Design Page. 3. Click OK. → The pattern is displayed with the new color. b Memo: To close the dialog box without applying the changes to the settings, click Cancel.
-
 1
1 -
2
-
3
-
4
-
5
-
6
-
7
-
8
-
9
-
10
-
11
-
12
-
13
-
14
-
15
-
16
-
17
-
18
-
19
-
20
-
21
-
22
-
23
-
24
-
25
-
26
-
27
-
28
-
29
-
30
-
31
-
32
-
33
-
34
-
35
-
36
-
37
-
38
-
39
-
40
-
41
-
42
-
43
-
44
-
45
-
46
-
47
-
48
-
49
-
50
-
51
-
52
-
53
-
54
-
55
-
56
-
57
-
58
-
59
-
60
-
61
-
62
-
63
-
64
-
65
-
66
-
67
-
68
-
69
-
70
-
71
-
72
-
73
-
74
-
75
-
76
-
77
-
78
-
79
-
80
-
81
-
82
-
83
-
84
-
85
-
86
-
87
-
88
-
89
-
90
-
91
-
92
-
93
-
94
-
95
-
96
-
97
-
98
-
99
-
100
-
101
-
102
-
103
-
104
-
105
-
106
-
107
-
108
-
109
-
110
-
111
-
112
-
113
-
114
-
115
-
116
-
117
-
118
-
119
-
120
-
121
-
122
-
123
-
124
-
125
-
126
-
127
-
128
-
129
-
130
-
131
-
132
-
133
-
134
-
135
-
136
-
137
-
138
-
139
-
140
-
141
-
142
-
143
-
144
-
145
-
146
-
147
-
148
-
149
-
150
-
151
-
152
-
153
-
154
-
155
-
156
-
157
-
158
-
159
-
160
-
161
-
162
-
163
-
164
-
165
-
166
-
167
-
168
-
169
-
170
-
171
-
 172
172 -
 173
173 -
 174
174 -
 175
175 -
 176
176 -
 177
177 -
 178
178 -
 179
179 -
 180
180 -
 181
181 -
 182
182 -
183
-
184
-
185
-
186
-
187
-
188
-
189
-
190
-
191
-
192
-
193
-
194
-
195
-
196
-
197
-
198
-
199
-
200
-
201
-
202
-
203
-
204
-
205
-
206
-
207
-
208
-
209
-
210
-
211
-
212
-
213
-
214
-
215
-
216
-
217
-
218
-
219
-
220
-
221
-
222
-
223
-
224
-
225
-
226
-
227
-
228
-
229
-
230
-
231
-
232
-
233
-
234
-
235
-
236
-
237
-
238
-
239
-
240
-
241
-
242
-
243
-
244
-
245
-
246
-
247
-
248
-
249
-
250
-
251
-
252
-
253
-
254
-
255
-
256
-
257
-
258
-
259
-
260
-
261
-
262
-
263
-
264
-
265
-
266
-
267
-
268
-
269
-
270
-
271
-
272
-
273
-
274
-
275
-
276
-
277
-
278
-
279
-
280
-
281
-
282
-
283
-
284
-
285
-
286
-
287
-
288
-
289
-
290
-
291
-
292
-
293
-
294
-
295
-
296
-
297
-
298
-
299
-
300
-
301
-
302
-
303
-
304
-
305
-
306
-
307
-
308
-
309
-
310
-
311
-
312
-
313
-
314
-
315
-
316
-
317
-
318
-
319
-
320
-
321
-
322
-
323
-
324
-
325
-
326
-
327
-
328
-
329
-
330
-
331
-
332
-
333
-
334
-
335
-
336
-
337
-
338
-
339
-
340
-
341
-
342
-
343
-
344
-
345
-
346
-
347
-
348
-
349
-
350
-
351
-
352
-
353
-
354
-
355
-
356
-
357
-
358
-
359
-
360
-
361
 |
 |