Brother International PEDESIGN 7.0 Users Manual - English - Page 279
Changing the display of the, background image, Changing the grid settings
 |
View all Brother International PEDESIGN 7.0 manuals
Add to My Manuals
Save this manual to your list of manuals |
Page 279 highlights
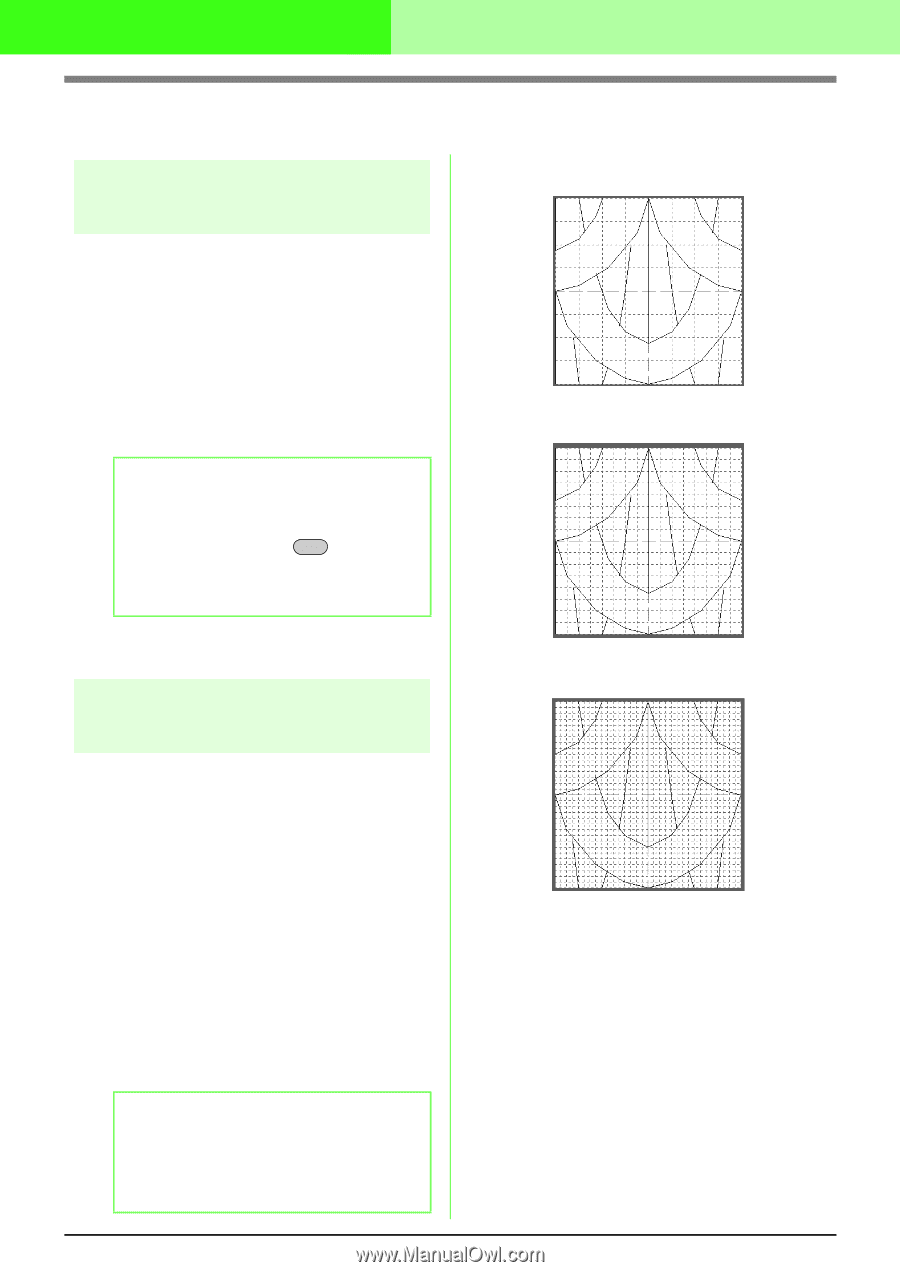
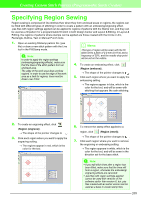
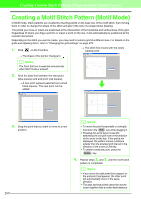
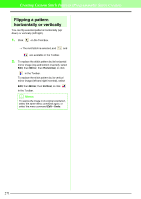
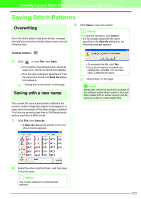
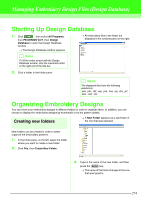
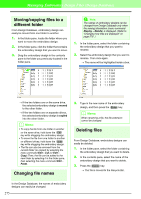
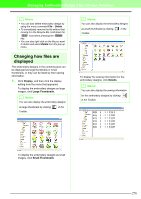
Creating Custom Stitch Patterns (Programmable Stitch Creator) Changing the Settings Changing the display of the background image The template image that remains in the work area can be displayed or hidden, or a faded copy of the image can be displayed. 1. Click Display, then Template, and then select the desired setting. To display the template image, click On (100%). To display a faded copy of the image, click the desired density (75%, 50% or 25%). To hide the template image, click Off. b Memo: • This function is not available if no template image has been imported into the work area. • Press the shortcut key ( F6 ) to switch between displaying the image (On (100%)) to displaying it faded at each density (75%, 50% and 25%) to hiding the image (Off). c "Opening an image in the background" on page 257 Changing the grid settings Example 1: Wide grid Example 2: Medium grid Example 3: Narrow grid The line spacing in the grid displayed in the work area can be adjusted. 1. Click Display, then Grid. → A submenu showing the current grid setting appears. 2. Click the grid setting that you need for the stitch pattern that you are creating or editing. To select a grid interval of 1/8 of a work area's edge, click Wide. To select a grid interval of 1/16 of a work area's edge, click Medium. To select a grid interval of 1/32 of a work area's edge, click Narrow. To hide the grid, click None. b Memo: • You can also change the grid setting while you are working on a stitch pattern. • The setting for the grid setting is retained, until it is changed. 273 The horizontal and vertical lines that you draw in the work area always follow the grid. The points you create by clicking in the work area are inserted at the intersection of the horizontal and vertical lines of the grid, enabling you to draw diagonal lines as well. Regardless of where you click, a point will automatically be inserted at the nearest intersection. Select a different grid size according to the type of stitch that you want to draw. Select a narrower grid for drawing finer details or to give a curved or circular appearance to your stitch lines, and select a wider grid if you want to draw a simpler stitch pattern. Select None to turn off the snap to grid feature, allowing you to create curved patterns.
-
 1
1 -
2
-
3
-
4
-
5
-
6
-
7
-
8
-
9
-
10
-
11
-
12
-
13
-
14
-
15
-
16
-
17
-
18
-
19
-
20
-
21
-
22
-
23
-
24
-
25
-
26
-
27
-
28
-
29
-
30
-
31
-
32
-
33
-
34
-
35
-
36
-
37
-
38
-
39
-
40
-
41
-
42
-
43
-
44
-
45
-
46
-
47
-
48
-
49
-
50
-
51
-
52
-
53
-
54
-
55
-
56
-
57
-
58
-
59
-
60
-
61
-
62
-
63
-
64
-
65
-
66
-
67
-
68
-
69
-
70
-
71
-
72
-
73
-
74
-
75
-
76
-
77
-
78
-
79
-
80
-
81
-
82
-
83
-
84
-
85
-
86
-
87
-
88
-
89
-
90
-
91
-
92
-
93
-
94
-
95
-
96
-
97
-
98
-
99
-
100
-
101
-
102
-
103
-
104
-
105
-
106
-
107
-
108
-
109
-
110
-
111
-
112
-
113
-
114
-
115
-
116
-
117
-
118
-
119
-
120
-
121
-
122
-
123
-
124
-
125
-
126
-
127
-
128
-
129
-
130
-
131
-
132
-
133
-
134
-
135
-
136
-
137
-
138
-
139
-
140
-
141
-
142
-
143
-
144
-
145
-
146
-
147
-
148
-
149
-
150
-
151
-
152
-
153
-
154
-
155
-
156
-
157
-
158
-
159
-
160
-
161
-
162
-
163
-
164
-
165
-
166
-
167
-
168
-
169
-
170
-
171
-
172
-
173
-
174
-
175
-
176
-
177
-
178
-
179
-
180
-
181
-
182
-
183
-
184
-
185
-
186
-
187
-
188
-
189
-
190
-
191
-
192
-
193
-
194
-
195
-
196
-
197
-
198
-
199
-
200
-
201
-
202
-
203
-
204
-
205
-
206
-
207
-
208
-
209
-
210
-
211
-
212
-
213
-
214
-
215
-
216
-
217
-
218
-
219
-
220
-
221
-
222
-
223
-
224
-
225
-
226
-
227
-
228
-
229
-
230
-
231
-
232
-
233
-
234
-
235
-
236
-
237
-
238
-
239
-
240
-
241
-
242
-
243
-
244
-
245
-
246
-
247
-
248
-
249
-
250
-
251
-
252
-
253
-
254
-
255
-
256
-
257
-
258
-
259
-
260
-
261
-
262
-
263
-
264
-
265
-
266
-
267
-
268
-
269
-
270
-
271
-
272
-
273
-
 274
274 -
 275
275 -
 276
276 -
 277
277 -
 278
278 -
 279
279 -
 280
280 -
 281
281 -
 282
282 -
 283
283 -
 284
284 -
285
-
286
-
287
-
288
-
289
-
290
-
291
-
292
-
293
-
294
-
295
-
296
-
297
-
298
-
299
-
300
-
301
-
302
-
303
-
304
-
305
-
306
-
307
-
308
-
309
-
310
-
311
-
312
-
313
-
314
-
315
-
316
-
317
-
318
-
319
-
320
-
321
-
322
-
323
-
324
-
325
-
326
-
327
-
328
-
329
-
330
-
331
-
332
-
333
-
334
-
335
-
336
-
337
-
338
-
339
-
340
-
341
-
342
-
343
-
344
-
345
-
346
-
347
-
348
-
349
-
350
-
351
-
352
-
353
-
354
-
355
-
356
-
357
-
358
-
359
-
360
-
361
 |
 |