Brother International PEDESIGN 7.0 Users Manual - English - Page 255
Deleting points, Editing points
 |
View all Brother International PEDESIGN 7.0 manuals
Add to My Manuals
Save this manual to your list of manuals |
Page 255 highlights
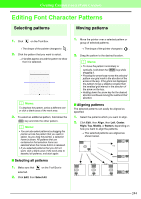
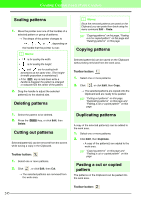
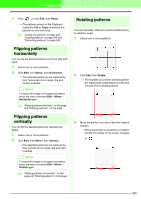
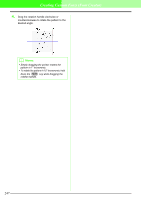
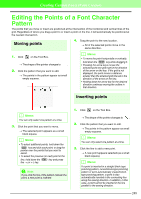
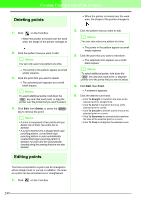
Creating Custom Fonts (Font Creator) Deleting points 1. Click on the Tool Box. → When the pointer is moved over the work area, the shape of the pointer changes to . 2. Click the pattern that you want to edit. b Memo: You can only select one pattern at a time. → The points in the pattern appear as small empty squares. 3. Click the point that you want to delete. → The selected point appears as a small black square. b Memo: To select additional points, hold down the Ctrl key and click each point, or drag the pointer over the points that you want to select. 4. Click Edit, then Delete, or press the Delete key to remove the point. b Memo: • If a line is composed of two points and you delete one of them, the entire line is deleted. • If a point inserted into a straight block-type punching pattern, curved block-type punching pattern or semi-automatically created block-type punching pattern is deleted, the point and line automatically inserted along the sewing direction are also deleted. → When the pointer is moved over the work area, the shape of the pointer changes to . 2. Click the pattern that you want to edit. b Memo: You can only select one pattern at a time. → The points in the pattern appear as small empty squares. 3. Click the point that you want to transform. → The selected point appears as a small black square. b Memo: To select additional points, hold down the Ctrl key and click each point, or drag the pointer over the points that you want to select. 4. Click Edit, then Point. → A submenu appears. 5. Click the desired command. • Click To Straight to transform the lines at the selected point to straight lines. • Click To Curve to transform the lines at the selected point to curves. • Click To Smooth to smooth out the lines at the selected point on a curve. • Click To Symmetry to symmetrically transform the lines at the selected point on a curve. • Click To Cusp to straighten the selected curve. Editing points The lines connected to a point can be changed to either straight lines or curves. In addition, the lines at a point can be smoothed out or straightened. 1. Click on the Tool Box. 249
-
 1
1 -
2
-
3
-
4
-
5
-
6
-
7
-
8
-
9
-
10
-
11
-
12
-
13
-
14
-
15
-
16
-
17
-
18
-
19
-
20
-
21
-
22
-
23
-
24
-
25
-
26
-
27
-
28
-
29
-
30
-
31
-
32
-
33
-
34
-
35
-
36
-
37
-
38
-
39
-
40
-
41
-
42
-
43
-
44
-
45
-
46
-
47
-
48
-
49
-
50
-
51
-
52
-
53
-
54
-
55
-
56
-
57
-
58
-
59
-
60
-
61
-
62
-
63
-
64
-
65
-
66
-
67
-
68
-
69
-
70
-
71
-
72
-
73
-
74
-
75
-
76
-
77
-
78
-
79
-
80
-
81
-
82
-
83
-
84
-
85
-
86
-
87
-
88
-
89
-
90
-
91
-
92
-
93
-
94
-
95
-
96
-
97
-
98
-
99
-
100
-
101
-
102
-
103
-
104
-
105
-
106
-
107
-
108
-
109
-
110
-
111
-
112
-
113
-
114
-
115
-
116
-
117
-
118
-
119
-
120
-
121
-
122
-
123
-
124
-
125
-
126
-
127
-
128
-
129
-
130
-
131
-
132
-
133
-
134
-
135
-
136
-
137
-
138
-
139
-
140
-
141
-
142
-
143
-
144
-
145
-
146
-
147
-
148
-
149
-
150
-
151
-
152
-
153
-
154
-
155
-
156
-
157
-
158
-
159
-
160
-
161
-
162
-
163
-
164
-
165
-
166
-
167
-
168
-
169
-
170
-
171
-
172
-
173
-
174
-
175
-
176
-
177
-
178
-
179
-
180
-
181
-
182
-
183
-
184
-
185
-
186
-
187
-
188
-
189
-
190
-
191
-
192
-
193
-
194
-
195
-
196
-
197
-
198
-
199
-
200
-
201
-
202
-
203
-
204
-
205
-
206
-
207
-
208
-
209
-
210
-
211
-
212
-
213
-
214
-
215
-
216
-
217
-
218
-
219
-
220
-
221
-
222
-
223
-
224
-
225
-
226
-
227
-
228
-
229
-
230
-
231
-
232
-
233
-
234
-
235
-
236
-
237
-
238
-
239
-
240
-
241
-
242
-
243
-
244
-
245
-
246
-
247
-
248
-
249
-
 250
250 -
 251
251 -
 252
252 -
 253
253 -
 254
254 -
 255
255 -
 256
256 -
 257
257 -
 258
258 -
 259
259 -
 260
260 -
261
-
262
-
263
-
264
-
265
-
266
-
267
-
268
-
269
-
270
-
271
-
272
-
273
-
274
-
275
-
276
-
277
-
278
-
279
-
280
-
281
-
282
-
283
-
284
-
285
-
286
-
287
-
288
-
289
-
290
-
291
-
292
-
293
-
294
-
295
-
296
-
297
-
298
-
299
-
300
-
301
-
302
-
303
-
304
-
305
-
306
-
307
-
308
-
309
-
310
-
311
-
312
-
313
-
314
-
315
-
316
-
317
-
318
-
319
-
320
-
321
-
322
-
323
-
324
-
325
-
326
-
327
-
328
-
329
-
330
-
331
-
332
-
333
-
334
-
335
-
336
-
337
-
338
-
339
-
340
-
341
-
342
-
343
-
344
-
345
-
346
-
347
-
348
-
349
-
350
-
351
-
352
-
353
-
354
-
355
-
356
-
357
-
358
-
359
-
360
-
361
 |
 |
