Brother International PEDESIGN 7.0 Users Manual - English - Page 202
Line Image Stage - free
 |
View all Brother International PEDESIGN 7.0 manuals
Add to My Manuals
Save this manual to your list of manuals |
Page 202 highlights
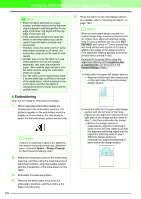
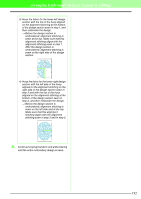
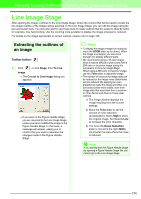
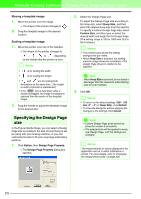
Manually Creating Embroidery Patterns From Images (Design Center) Line Image Stage After opening the image, continue to the Line Image Stage, where the color(s) that will be used to create the line image (outline of the image) will be selected. In the Line Image Stage, you can edit the image using the pen and eraser tools. You may also want to use these tools to create outlines that are easier to draw by hand, for example, free-hand writing. Use the zooming tools available to display the image enlarged or reduced. For details on the image appropriate to extract outlines, please refer to page 196. Extracting the outlines of an image Toolbar button: 1. Click , or click Stage, then To Line Image. → The Cut out to Line Image dialog box appears. → If you were in the Figure Handle Stage, you are returned to the Line Image Stage, unless you have modified the image in the Figure Handle Stage. In that case, a message will appear, asking you to confirm that you want to abandon the changes made in the Figure Handle Stage. b Memo: • To display the image enlarged (or reduced), move the ZOOM slider up (or down). When the image is enlarged, you can scroll through it to display different parts. • We recommend using a 16-color image, since it may be difficult to pick colors from a 256-color or truecolor image during the conversion to the Line Image Stage. When using a 256-color or truecolor image, use the Tone slider to adjust the image. • The number of colors in the image data can be reduced or the image noise (distortions) can be reduced. By applying an even gradation to make the image smoother, you can select colors more easily, even from image data that was taken from a scanner or other device and does not have clear outlines. 1) The image window displays the image resulting from the current settings. 2) Move the Tone slider to set the amount of color reduction (posterization). Set to High to show the original image. Set towards Low to increase the color reduction. 3) The more the Noise Reduction slider is moved to the right (MAX), the smaller the area where the noise is reduced. a Note: If you started with the Figure Handle Stage by opening a Figure Handle Stage file, you cannot go to the Line Image Stage. 196
-
 1
1 -
2
-
3
-
4
-
5
-
6
-
7
-
8
-
9
-
10
-
11
-
12
-
13
-
14
-
15
-
16
-
17
-
18
-
19
-
20
-
21
-
22
-
23
-
24
-
25
-
26
-
27
-
28
-
29
-
30
-
31
-
32
-
33
-
34
-
35
-
36
-
37
-
38
-
39
-
40
-
41
-
42
-
43
-
44
-
45
-
46
-
47
-
48
-
49
-
50
-
51
-
52
-
53
-
54
-
55
-
56
-
57
-
58
-
59
-
60
-
61
-
62
-
63
-
64
-
65
-
66
-
67
-
68
-
69
-
70
-
71
-
72
-
73
-
74
-
75
-
76
-
77
-
78
-
79
-
80
-
81
-
82
-
83
-
84
-
85
-
86
-
87
-
88
-
89
-
90
-
91
-
92
-
93
-
94
-
95
-
96
-
97
-
98
-
99
-
100
-
101
-
102
-
103
-
104
-
105
-
106
-
107
-
108
-
109
-
110
-
111
-
112
-
113
-
114
-
115
-
116
-
117
-
118
-
119
-
120
-
121
-
122
-
123
-
124
-
125
-
126
-
127
-
128
-
129
-
130
-
131
-
132
-
133
-
134
-
135
-
136
-
137
-
138
-
139
-
140
-
141
-
142
-
143
-
144
-
145
-
146
-
147
-
148
-
149
-
150
-
151
-
152
-
153
-
154
-
155
-
156
-
157
-
158
-
159
-
160
-
161
-
162
-
163
-
164
-
165
-
166
-
167
-
168
-
169
-
170
-
171
-
172
-
173
-
174
-
175
-
176
-
177
-
178
-
179
-
180
-
181
-
182
-
183
-
184
-
185
-
186
-
187
-
188
-
189
-
190
-
191
-
192
-
193
-
194
-
195
-
196
-
 197
197 -
 198
198 -
 199
199 -
 200
200 -
 201
201 -
 202
202 -
 203
203 -
 204
204 -
 205
205 -
 206
206 -
 207
207 -
208
-
209
-
210
-
211
-
212
-
213
-
214
-
215
-
216
-
217
-
218
-
219
-
220
-
221
-
222
-
223
-
224
-
225
-
226
-
227
-
228
-
229
-
230
-
231
-
232
-
233
-
234
-
235
-
236
-
237
-
238
-
239
-
240
-
241
-
242
-
243
-
244
-
245
-
246
-
247
-
248
-
249
-
250
-
251
-
252
-
253
-
254
-
255
-
256
-
257
-
258
-
259
-
260
-
261
-
262
-
263
-
264
-
265
-
266
-
267
-
268
-
269
-
270
-
271
-
272
-
273
-
274
-
275
-
276
-
277
-
278
-
279
-
280
-
281
-
282
-
283
-
284
-
285
-
286
-
287
-
288
-
289
-
290
-
291
-
292
-
293
-
294
-
295
-
296
-
297
-
298
-
299
-
300
-
301
-
302
-
303
-
304
-
305
-
306
-
307
-
308
-
309
-
310
-
311
-
312
-
313
-
314
-
315
-
316
-
317
-
318
-
319
-
320
-
321
-
322
-
323
-
324
-
325
-
326
-
327
-
328
-
329
-
330
-
331
-
332
-
333
-
334
-
335
-
336
-
337
-
338
-
339
-
340
-
341
-
342
-
343
-
344
-
345
-
346
-
347
-
348
-
349
-
350
-
351
-
352
-
353
-
354
-
355
-
356
-
357
-
358
-
359
-
360
-
361
 |
 |
