Brother International PEDESIGN 7.0 Users Manual - English - Page 187
Checking the print image, Printing
 |
View all Brother International PEDESIGN 7.0 manuals
Add to My Manuals
Save this manual to your list of manuals |
Page 187 highlights
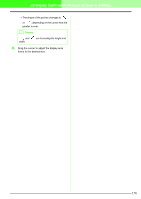
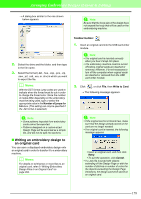
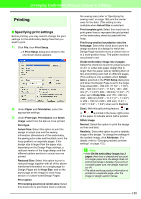
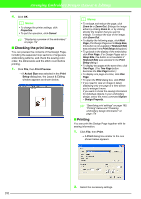
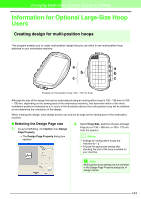
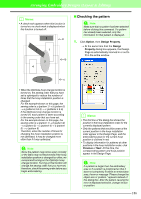
Arranging Embroidery Designs (Layout & Editing) 4. Click OK. b Memo: • To change the printer settings, click Properties. • To quit the operation, click Cancel. c "Displaying a preview of the embroidery" on page 172 I Checking the print image You can preview the contents of the Design Page, including the separate hoop sections of large-size embroidery patterns, and check the sewing color order, the dimensions and the stitch count before printing. 1. Click File, then Print Preview. → If Actual Size was selected in the Print Setup dialog box, the Layout & Editing window appears as shown below. b Memo: • To enlarge and reduce the page, click Zoom In or Zoom Out. Enlarge the image either by clicking Zoom In, or by clicking directly the location that you want to enlarge. To reduce the size of the image, click Zoom Out. • To display the following page, click Next Page. (For Design Pages set to Hoop Size, this button is not available if Reduced Size was selected in the Print Setup dialog box.) • To go back to the display of the embroidery, click Prev Page. (For Design Pages set to Hoop Size, this button is not available if Reduced Size was selected in the Print Setup dialog.) • To display two pages at the same time, click Two Page. (The Two Page button becomes the One Page button.) • To display one page at a time, click One Page. • To open the Print dialog box, click Print. • If you need to view an image in detail, displaying only one page at a time allows you to enlarge it more. If you want to check the sewing information for individual objects in your embroidery design, select the menu command Option - Design Property. c "Specifying print settings" on page 180, "Printing" below and "Checking embroidery design information" on page 174 I Printing You can print the Design Page together with its sewing information. 1. Click File, then Print. → A Print dialog box similar to the one shown below appears. 2. Select the necessary settings. 181
-
 1
1 -
2
-
3
-
4
-
5
-
6
-
7
-
8
-
9
-
10
-
11
-
12
-
13
-
14
-
15
-
16
-
17
-
18
-
19
-
20
-
21
-
22
-
23
-
24
-
25
-
26
-
27
-
28
-
29
-
30
-
31
-
32
-
33
-
34
-
35
-
36
-
37
-
38
-
39
-
40
-
41
-
42
-
43
-
44
-
45
-
46
-
47
-
48
-
49
-
50
-
51
-
52
-
53
-
54
-
55
-
56
-
57
-
58
-
59
-
60
-
61
-
62
-
63
-
64
-
65
-
66
-
67
-
68
-
69
-
70
-
71
-
72
-
73
-
74
-
75
-
76
-
77
-
78
-
79
-
80
-
81
-
82
-
83
-
84
-
85
-
86
-
87
-
88
-
89
-
90
-
91
-
92
-
93
-
94
-
95
-
96
-
97
-
98
-
99
-
100
-
101
-
102
-
103
-
104
-
105
-
106
-
107
-
108
-
109
-
110
-
111
-
112
-
113
-
114
-
115
-
116
-
117
-
118
-
119
-
120
-
121
-
122
-
123
-
124
-
125
-
126
-
127
-
128
-
129
-
130
-
131
-
132
-
133
-
134
-
135
-
136
-
137
-
138
-
139
-
140
-
141
-
142
-
143
-
144
-
145
-
146
-
147
-
148
-
149
-
150
-
151
-
152
-
153
-
154
-
155
-
156
-
157
-
158
-
159
-
160
-
161
-
162
-
163
-
164
-
165
-
166
-
167
-
168
-
169
-
170
-
171
-
172
-
173
-
174
-
175
-
176
-
177
-
178
-
179
-
180
-
181
-
 182
182 -
 183
183 -
 184
184 -
 185
185 -
 186
186 -
 187
187 -
 188
188 -
 189
189 -
 190
190 -
 191
191 -
 192
192 -
193
-
194
-
195
-
196
-
197
-
198
-
199
-
200
-
201
-
202
-
203
-
204
-
205
-
206
-
207
-
208
-
209
-
210
-
211
-
212
-
213
-
214
-
215
-
216
-
217
-
218
-
219
-
220
-
221
-
222
-
223
-
224
-
225
-
226
-
227
-
228
-
229
-
230
-
231
-
232
-
233
-
234
-
235
-
236
-
237
-
238
-
239
-
240
-
241
-
242
-
243
-
244
-
245
-
246
-
247
-
248
-
249
-
250
-
251
-
252
-
253
-
254
-
255
-
256
-
257
-
258
-
259
-
260
-
261
-
262
-
263
-
264
-
265
-
266
-
267
-
268
-
269
-
270
-
271
-
272
-
273
-
274
-
275
-
276
-
277
-
278
-
279
-
280
-
281
-
282
-
283
-
284
-
285
-
286
-
287
-
288
-
289
-
290
-
291
-
292
-
293
-
294
-
295
-
296
-
297
-
298
-
299
-
300
-
301
-
302
-
303
-
304
-
305
-
306
-
307
-
308
-
309
-
310
-
311
-
312
-
313
-
314
-
315
-
316
-
317
-
318
-
319
-
320
-
321
-
322
-
323
-
324
-
325
-
326
-
327
-
328
-
329
-
330
-
331
-
332
-
333
-
334
-
335
-
336
-
337
-
338
-
339
-
340
-
341
-
342
-
343
-
344
-
345
-
346
-
347
-
348
-
349
-
350
-
351
-
352
-
353
-
354
-
355
-
356
-
357
-
358
-
359
-
360
-
361
 |
 |