Brother International PEDESIGN 7.0 Users Manual - English - Page 221
Color, Sew type
 |
View all Brother International PEDESIGN 7.0 manuals
Add to My Manuals
Save this manual to your list of manuals |
Page 221 highlights
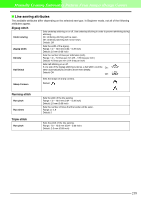
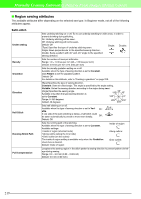
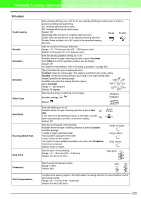
Manually Creating Embroidery Patterns From Images (Design Center) b Memo: To change the color of a portion of the outline, click . c "Color" on page 215 and "Sew type" on page 215 I Color Click this button to set the thread color for lines or regions. b Memo: The Color button appears in the Sewing Attributes bar when the Region sew button ( ) or Line sew button ( turned on. ) has been 1. Click the Color button. → A Line Thread Color dialog box similar to the ones shown below appears. b Memo: • To switch between displaying the thread color number and brand and the thread color name in the list of thread colors, select the View Details check box. • To display the colors arranged according to their tones (from warm colors to cold colors), click Color in the heading for the list of thread colors. Click Color again to reverse the order (from cold colors to warm colors). To return the list to its original display, click Index in the heading. • The thread colors can be arranged according to the information under Index, Color Code or Brand Description. 2. From the Thread Chart selector, select a thread color chart or a user thread chart. c For details on specifying a user thread chart or for information on how machines 215 handle thread colors, refer to "Editing User Thread Color Lists" on page 162. 3. From the list of thread colors, click the desired color. → The new color is displayed on the Region color button or Line color button. b Memo: • The name of the selected color appears at the bottom of the dialog box. • For details on the four buttons under the list, refer to "Special colors" on page 150. 4. Click Close to set the color and to close the dialog box. 5. Click the region or outline where you want to apply the color setting. c "Region sew" on page 214, "Line sew" on page 214 and "Special colors" on page 150 I Sew type Line sew type Region sew type Use these selectors to set the sew type for lines or regions. b Memo: The sew type selector appears in the Sewing Attributes bar when the Region sew button ( ) or Line sew button ( turned on. ) has been 1. Click in a sew type selector. → The available settings appear. Line sew type Region sew type 2. Click the desired sew type. → The new setting appears in the selector. 3. Click the region or outline where you want to apply the sew type setting. c "Region sew" on page 214 and "Line sew" on page 214
-
 1
1 -
2
-
3
-
4
-
5
-
6
-
7
-
8
-
9
-
10
-
11
-
12
-
13
-
14
-
15
-
16
-
17
-
18
-
19
-
20
-
21
-
22
-
23
-
24
-
25
-
26
-
27
-
28
-
29
-
30
-
31
-
32
-
33
-
34
-
35
-
36
-
37
-
38
-
39
-
40
-
41
-
42
-
43
-
44
-
45
-
46
-
47
-
48
-
49
-
50
-
51
-
52
-
53
-
54
-
55
-
56
-
57
-
58
-
59
-
60
-
61
-
62
-
63
-
64
-
65
-
66
-
67
-
68
-
69
-
70
-
71
-
72
-
73
-
74
-
75
-
76
-
77
-
78
-
79
-
80
-
81
-
82
-
83
-
84
-
85
-
86
-
87
-
88
-
89
-
90
-
91
-
92
-
93
-
94
-
95
-
96
-
97
-
98
-
99
-
100
-
101
-
102
-
103
-
104
-
105
-
106
-
107
-
108
-
109
-
110
-
111
-
112
-
113
-
114
-
115
-
116
-
117
-
118
-
119
-
120
-
121
-
122
-
123
-
124
-
125
-
126
-
127
-
128
-
129
-
130
-
131
-
132
-
133
-
134
-
135
-
136
-
137
-
138
-
139
-
140
-
141
-
142
-
143
-
144
-
145
-
146
-
147
-
148
-
149
-
150
-
151
-
152
-
153
-
154
-
155
-
156
-
157
-
158
-
159
-
160
-
161
-
162
-
163
-
164
-
165
-
166
-
167
-
168
-
169
-
170
-
171
-
172
-
173
-
174
-
175
-
176
-
177
-
178
-
179
-
180
-
181
-
182
-
183
-
184
-
185
-
186
-
187
-
188
-
189
-
190
-
191
-
192
-
193
-
194
-
195
-
196
-
197
-
198
-
199
-
200
-
201
-
202
-
203
-
204
-
205
-
206
-
207
-
208
-
209
-
210
-
211
-
212
-
213
-
214
-
215
-
 216
216 -
 217
217 -
 218
218 -
 219
219 -
 220
220 -
 221
221 -
 222
222 -
 223
223 -
 224
224 -
 225
225 -
 226
226 -
227
-
228
-
229
-
230
-
231
-
232
-
233
-
234
-
235
-
236
-
237
-
238
-
239
-
240
-
241
-
242
-
243
-
244
-
245
-
246
-
247
-
248
-
249
-
250
-
251
-
252
-
253
-
254
-
255
-
256
-
257
-
258
-
259
-
260
-
261
-
262
-
263
-
264
-
265
-
266
-
267
-
268
-
269
-
270
-
271
-
272
-
273
-
274
-
275
-
276
-
277
-
278
-
279
-
280
-
281
-
282
-
283
-
284
-
285
-
286
-
287
-
288
-
289
-
290
-
291
-
292
-
293
-
294
-
295
-
296
-
297
-
298
-
299
-
300
-
301
-
302
-
303
-
304
-
305
-
306
-
307
-
308
-
309
-
310
-
311
-
312
-
313
-
314
-
315
-
316
-
317
-
318
-
319
-
320
-
321
-
322
-
323
-
324
-
325
-
326
-
327
-
328
-
329
-
330
-
331
-
332
-
333
-
334
-
335
-
336
-
337
-
338
-
339
-
340
-
341
-
342
-
343
-
344
-
345
-
346
-
347
-
348
-
349
-
350
-
351
-
352
-
353
-
354
-
355
-
356
-
357
-
358
-
359
-
360
-
361
 |
 |