Brother International PEDESIGN 7.0 Users Manual - English - Page 200
Original Image Stage
 |
View all Brother International PEDESIGN 7.0 manuals
Add to My Manuals
Save this manual to your list of manuals |
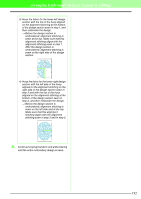
Page 200 highlights
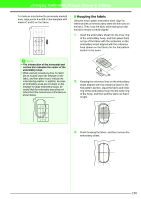
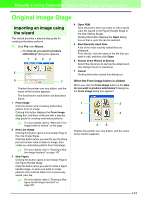
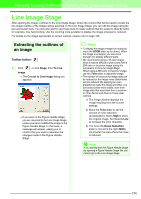
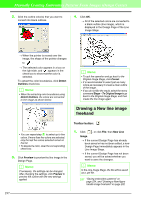
Manually Creating Embroidery Patterns From Images (Design Center) Original Image Stage Importing an image using the wizard This wizard provides a step-by-step guide for creating embroidery patterns. 1. Click File, then Wizard. → The How do you want to produce embroidery? dialog box appears. 1 23 4 5 4 Open PEM Click this button when you want to edit a saved .pem file (saved in the Figure Handle Stage or the Sew Setting Stage). Clicking this button displays the Open dialog box so that a .pem file can be selected. 5 Most Recently Used Files A list of the most recently edited files are displayed. From the list, click the name of the file that you want to edit, and then click Open. 6 Always show Wizard at Startup Select this check box to start up the wizard each time Design Center is started up. 7 Cancel Clicking this button closes this dialog box. 6 7 Position the pointer over any button, and the name of the function appears. The functions for each button are described below. 1 From Image Click this button when creating embroidery pattern from an image. Clicking this button displays the From Image dialog box, and then continues with a step-bystep guide for creating embroidery patterns. c For more details, refer to "When the From Image button is clicked" on this page. 2 New Line Image Clicking this button opens a new Design Page in the Line Image Stage. Click this button when you want to use the black pen and eraser tools to draw an image, then create an embroidery pattern from that image. c For more details, refer to "Drawing a New line image freehand" on page 197. 3 New Figure Clicking this button opens a new Design Page in the Figure Handle Stage. Click this button when you want to draw a figure handle image, or when you want to create patterns from outlines taken from a previously saved .pem file. c For more details, refer to "Drawing a New figure handle image freehand" on page 202. When the From Image button is clicked When you click the From Image button in the How do you want to produce embroidery? dialog box, the From Image dialog box appears. 1 3 2 4 56 Position the pointer over any button, and the name of the function appears. 194
-
 1
1 -
2
-
3
-
4
-
5
-
6
-
7
-
8
-
9
-
10
-
11
-
12
-
13
-
14
-
15
-
16
-
17
-
18
-
19
-
20
-
21
-
22
-
23
-
24
-
25
-
26
-
27
-
28
-
29
-
30
-
31
-
32
-
33
-
34
-
35
-
36
-
37
-
38
-
39
-
40
-
41
-
42
-
43
-
44
-
45
-
46
-
47
-
48
-
49
-
50
-
51
-
52
-
53
-
54
-
55
-
56
-
57
-
58
-
59
-
60
-
61
-
62
-
63
-
64
-
65
-
66
-
67
-
68
-
69
-
70
-
71
-
72
-
73
-
74
-
75
-
76
-
77
-
78
-
79
-
80
-
81
-
82
-
83
-
84
-
85
-
86
-
87
-
88
-
89
-
90
-
91
-
92
-
93
-
94
-
95
-
96
-
97
-
98
-
99
-
100
-
101
-
102
-
103
-
104
-
105
-
106
-
107
-
108
-
109
-
110
-
111
-
112
-
113
-
114
-
115
-
116
-
117
-
118
-
119
-
120
-
121
-
122
-
123
-
124
-
125
-
126
-
127
-
128
-
129
-
130
-
131
-
132
-
133
-
134
-
135
-
136
-
137
-
138
-
139
-
140
-
141
-
142
-
143
-
144
-
145
-
146
-
147
-
148
-
149
-
150
-
151
-
152
-
153
-
154
-
155
-
156
-
157
-
158
-
159
-
160
-
161
-
162
-
163
-
164
-
165
-
166
-
167
-
168
-
169
-
170
-
171
-
172
-
173
-
174
-
175
-
176
-
177
-
178
-
179
-
180
-
181
-
182
-
183
-
184
-
185
-
186
-
187
-
188
-
189
-
190
-
191
-
192
-
193
-
194
-
 195
195 -
 196
196 -
 197
197 -
 198
198 -
 199
199 -
 200
200 -
 201
201 -
 202
202 -
 203
203 -
 204
204 -
 205
205 -
206
-
207
-
208
-
209
-
210
-
211
-
212
-
213
-
214
-
215
-
216
-
217
-
218
-
219
-
220
-
221
-
222
-
223
-
224
-
225
-
226
-
227
-
228
-
229
-
230
-
231
-
232
-
233
-
234
-
235
-
236
-
237
-
238
-
239
-
240
-
241
-
242
-
243
-
244
-
245
-
246
-
247
-
248
-
249
-
250
-
251
-
252
-
253
-
254
-
255
-
256
-
257
-
258
-
259
-
260
-
261
-
262
-
263
-
264
-
265
-
266
-
267
-
268
-
269
-
270
-
271
-
272
-
273
-
274
-
275
-
276
-
277
-
278
-
279
-
280
-
281
-
282
-
283
-
284
-
285
-
286
-
287
-
288
-
289
-
290
-
291
-
292
-
293
-
294
-
295
-
296
-
297
-
298
-
299
-
300
-
301
-
302
-
303
-
304
-
305
-
306
-
307
-
308
-
309
-
310
-
311
-
312
-
313
-
314
-
315
-
316
-
317
-
318
-
319
-
320
-
321
-
322
-
323
-
324
-
325
-
326
-
327
-
328
-
329
-
330
-
331
-
332
-
333
-
334
-
335
-
336
-
337
-
338
-
339
-
340
-
341
-
342
-
343
-
344
-
345
-
346
-
347
-
348
-
349
-
350
-
351
-
352
-
353
-
354
-
355
-
356
-
357
-
358
-
359
-
360
-
361
 |
 |