Brother International PEDESIGN 7.0 Users Manual - English - Page 274
Specifying Region Sewing
 |
View all Brother International PEDESIGN 7.0 manuals
Add to My Manuals
Save this manual to your list of manuals |
Page 274 highlights
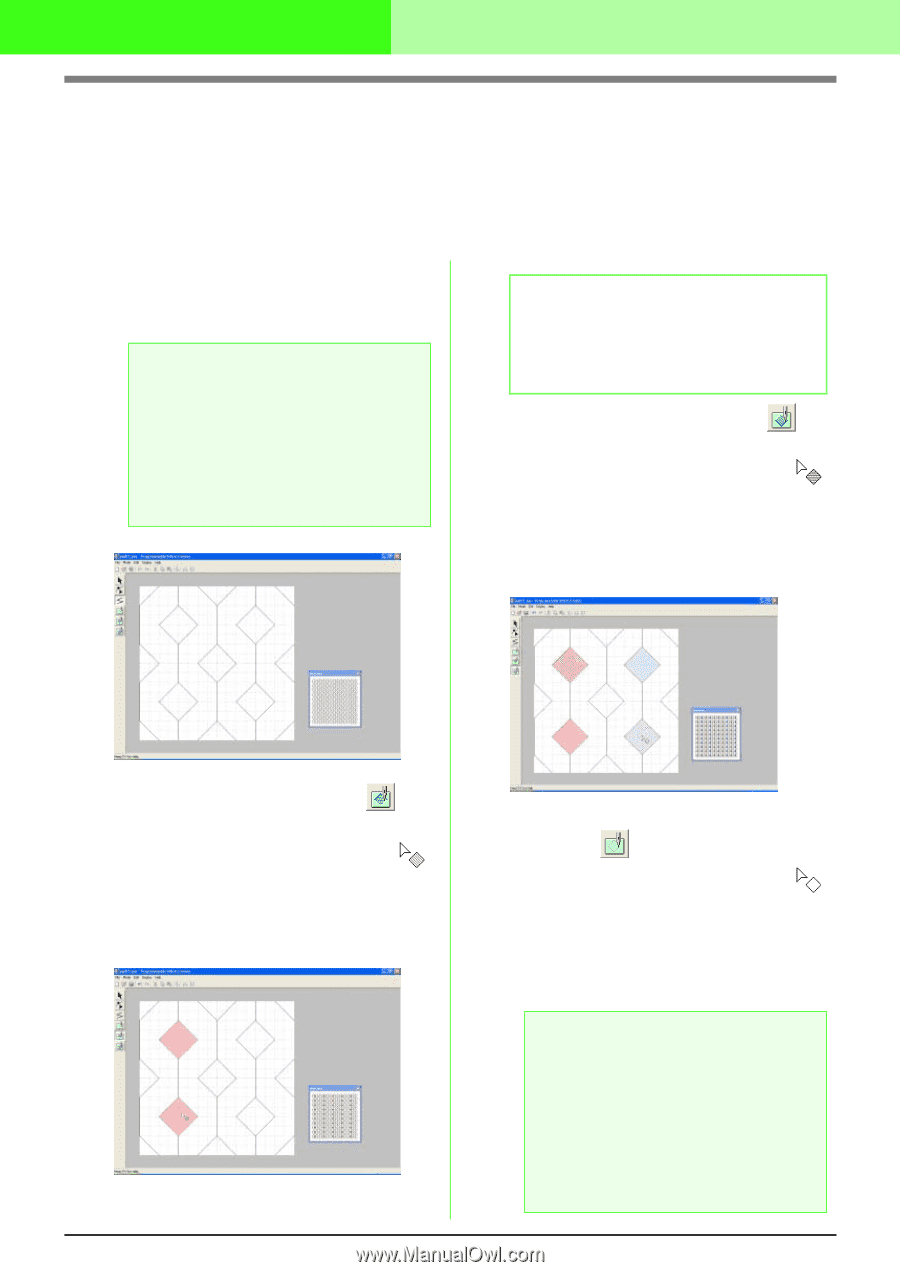
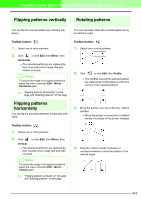
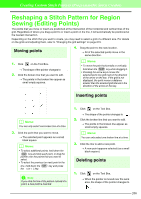
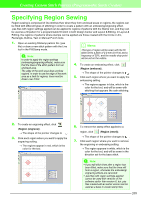
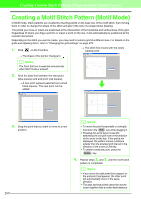
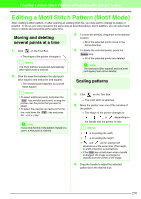
Creating Custom Stitch Patterns (Programmable Stitch Creator) Specifying Region Sewing Region sewing is composed of line stitches that, when they form enclosed areas or regions, the regions can be filled with different types of stitching in order to create a pattern with an embossing/engraving effect. .pas files with region settings applied can be applied to regions of patterns with the Stamp tool, and they can be used as a fill pattern for a programmable fill stitch in both Design Center and Layout & Editing. In Layout & Editing, the regions of patterns where stamps can be applied are those created with the Circle or Arc, Rectangle, Outline, Text or Manual Punch tools. 1. Open an existing fill/stamp pattern file (.pas file) or draw a new stitch pattern with the Line tool in the Fill/Stamp mode. a Note: In order to apply the region settings (embossing/engraving effects), make sure that the lines of the stitch pattern form an enclosed area. The edge of the work area does enclose regions. In order to use the edge of the work area as a limit for regions, lines must be drawn over it first. b Memo: This type of region will be sewn with the fill stitch set to a pitch of 2.0 mm (0.16 in) and a frequency of 30%, and the needle drop point will be set on the outline. 4. To create an embossing effect, click (Region (emboss)). → The shape of the pointer changes to . 5. Click each region where you want to apply the embossing setting. → The regions appear in blue, which is the color for the tool, and will be sewn with stitching that appears like satin stitching. 2. To create an engraving effect, click (Region (engrave)). → The shape of the pointer changes to . 3. Click each region where you want to apply the engraving setting. → The regions appear in red, which is the color for the tool. 6. To remove the stamp effect applied to a region, click (Region (reset)). → The shape of the pointer changes to . 7. Click each region where you want to remove the engraving or embossing setting. → The region appears in white, which is the color for the tool, and will be sewn in the direction set for the base stitch. a Note: • If you edit stitch lines after a region has been filled, make sure that the lines still form a region, otherwise the embossing/ engraving effects are canceled. • .pas files with region settings applied cannot be used with versions of the software earlier than version 6, but .pas files created with an earlier version can be used as a base to create stamp files. 268
-
 1
1 -
2
-
3
-
4
-
5
-
6
-
7
-
8
-
9
-
10
-
11
-
12
-
13
-
14
-
15
-
16
-
17
-
18
-
19
-
20
-
21
-
22
-
23
-
24
-
25
-
26
-
27
-
28
-
29
-
30
-
31
-
32
-
33
-
34
-
35
-
36
-
37
-
38
-
39
-
40
-
41
-
42
-
43
-
44
-
45
-
46
-
47
-
48
-
49
-
50
-
51
-
52
-
53
-
54
-
55
-
56
-
57
-
58
-
59
-
60
-
61
-
62
-
63
-
64
-
65
-
66
-
67
-
68
-
69
-
70
-
71
-
72
-
73
-
74
-
75
-
76
-
77
-
78
-
79
-
80
-
81
-
82
-
83
-
84
-
85
-
86
-
87
-
88
-
89
-
90
-
91
-
92
-
93
-
94
-
95
-
96
-
97
-
98
-
99
-
100
-
101
-
102
-
103
-
104
-
105
-
106
-
107
-
108
-
109
-
110
-
111
-
112
-
113
-
114
-
115
-
116
-
117
-
118
-
119
-
120
-
121
-
122
-
123
-
124
-
125
-
126
-
127
-
128
-
129
-
130
-
131
-
132
-
133
-
134
-
135
-
136
-
137
-
138
-
139
-
140
-
141
-
142
-
143
-
144
-
145
-
146
-
147
-
148
-
149
-
150
-
151
-
152
-
153
-
154
-
155
-
156
-
157
-
158
-
159
-
160
-
161
-
162
-
163
-
164
-
165
-
166
-
167
-
168
-
169
-
170
-
171
-
172
-
173
-
174
-
175
-
176
-
177
-
178
-
179
-
180
-
181
-
182
-
183
-
184
-
185
-
186
-
187
-
188
-
189
-
190
-
191
-
192
-
193
-
194
-
195
-
196
-
197
-
198
-
199
-
200
-
201
-
202
-
203
-
204
-
205
-
206
-
207
-
208
-
209
-
210
-
211
-
212
-
213
-
214
-
215
-
216
-
217
-
218
-
219
-
220
-
221
-
222
-
223
-
224
-
225
-
226
-
227
-
228
-
229
-
230
-
231
-
232
-
233
-
234
-
235
-
236
-
237
-
238
-
239
-
240
-
241
-
242
-
243
-
244
-
245
-
246
-
247
-
248
-
249
-
250
-
251
-
252
-
253
-
254
-
255
-
256
-
257
-
258
-
259
-
260
-
261
-
262
-
263
-
264
-
265
-
266
-
267
-
268
-
 269
269 -
 270
270 -
 271
271 -
 272
272 -
 273
273 -
 274
274 -
 275
275 -
 276
276 -
 277
277 -
 278
278 -
 279
279 -
280
-
281
-
282
-
283
-
284
-
285
-
286
-
287
-
288
-
289
-
290
-
291
-
292
-
293
-
294
-
295
-
296
-
297
-
298
-
299
-
300
-
301
-
302
-
303
-
304
-
305
-
306
-
307
-
308
-
309
-
310
-
311
-
312
-
313
-
314
-
315
-
316
-
317
-
318
-
319
-
320
-
321
-
322
-
323
-
324
-
325
-
326
-
327
-
328
-
329
-
330
-
331
-
332
-
333
-
334
-
335
-
336
-
337
-
338
-
339
-
340
-
341
-
342
-
343
-
344
-
345
-
346
-
347
-
348
-
349
-
350
-
351
-
352
-
353
-
354
-
355
-
356
-
357
-
358
-
359
-
360
-
361
 |
 |