Brother International PEDESIGN 7.0 Users Manual - English - Page 92
Sewing Option
 |
View all Brother International PEDESIGN 7.0 manuals
Add to My Manuals
Save this manual to your list of manuals |
Page 92 highlights
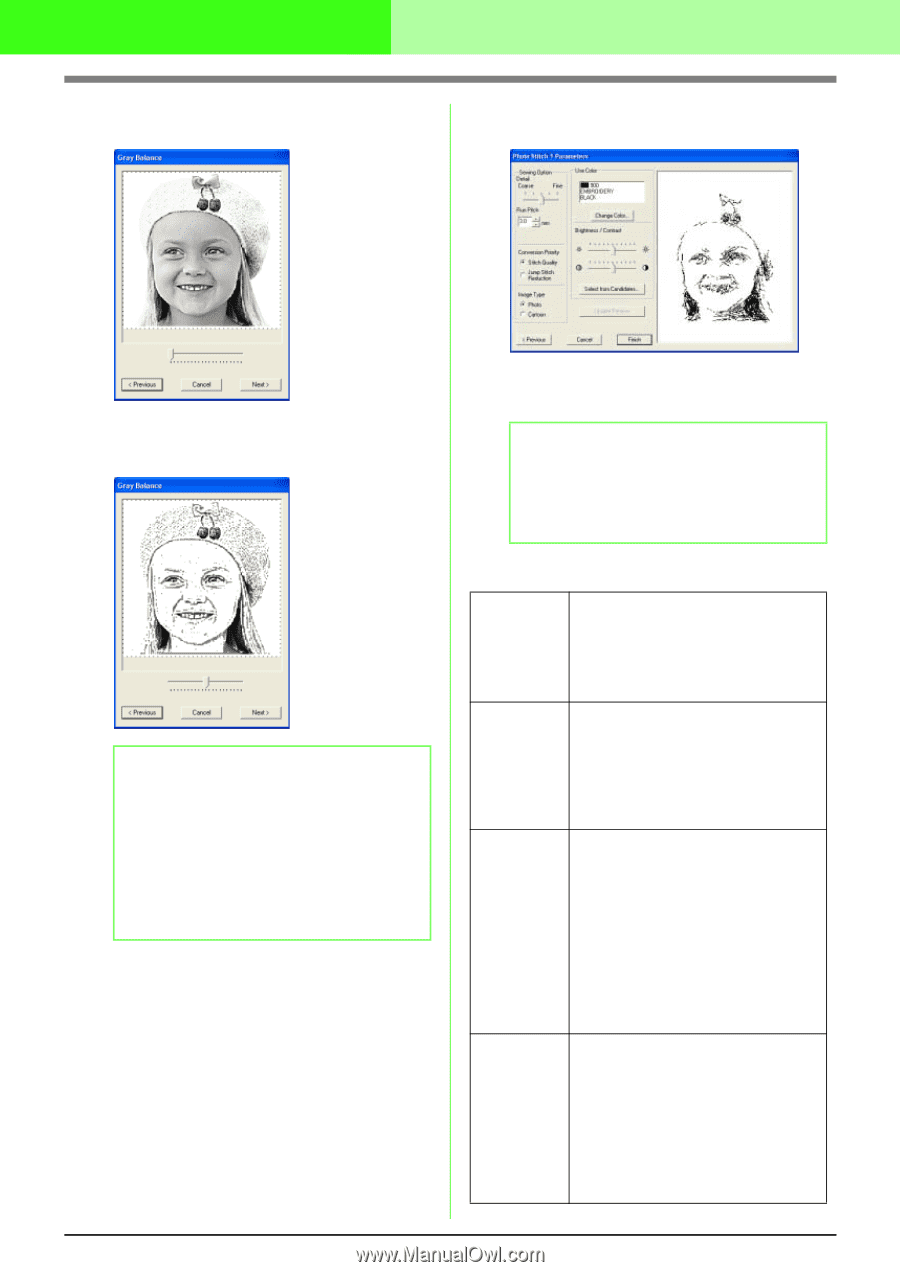
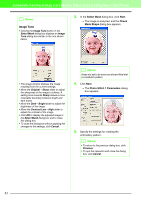
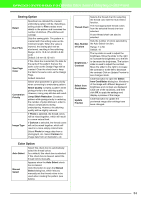
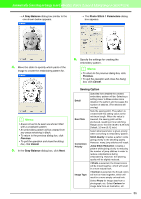
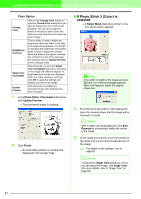
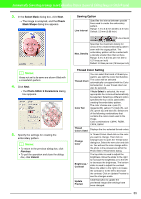
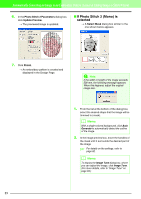
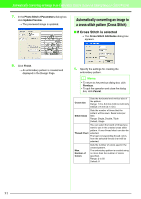
Automatically Converting an Image to an Embroidery Pattern (Layout & Editing/Image to Stitch Wizard) → A Gray Balance dialog box similar to the one shown below appears. → The Photo Stitch 1 Parameters dialog box appears. 4. Move the slider to specify which parts of the image to create the embroidery pattern for. b Memo: • Areas not set to be sewn are shown filled with a crosshatch pattern. • An embroidery pattern will be created from any areas remaining in black. • To return to the previous dialog box, click Previous. • To quit the operation and close the dialog box, click Cancel. 5. In the Gray Balance dialog box, click Next. 6. Specify the settings for creating the embroidery pattern. b Memo: • To return to the previous dialog box, click Previous. • To quit the operation and close the dialog box, click Cancel. Sewing Option Detail Run Pitch Conversion Priority Image Type Specifies how detailed the created embroidery pattern will be. Selecting a setting closer to Fine creates more details in the pattern and increases the number of stitches. (The stitches will overlap) Sets the sewing pitch. The pattern is created with this setting value as the minimum length. When the value is lowered, the sewing pitch will be shortened, resulting in finer stitching. Range: 2.0 to 10.0 mm (0.08 to 0.39 inch) Default: 3.0 mm (0.12 inch) Select what parameter is given priority when converting to embroidery pattern. Stitch Quality: Creates a pattern while giving priority to the stitching quality. However, many jump stitches will result. Jump Stitch Reduction: Creates a pattern while giving priority to reducing the number of jump stitches in order to reduce complications during embroidering. However, the stitching quality will be slightly reduced. If Photo is selected, the thread colors will be mixed together, which will result in a more natural look. If Cartoon is selected, the thread colors will not be mixed together, which will result in a more simply colored look. Select Photo for image data from a photograph, etc. Select Cartoon for image data from an illustration, etc. 86
-
 1
1 -
2
-
3
-
4
-
5
-
6
-
7
-
8
-
9
-
10
-
11
-
12
-
13
-
14
-
15
-
16
-
17
-
18
-
19
-
20
-
21
-
22
-
23
-
24
-
25
-
26
-
27
-
28
-
29
-
30
-
31
-
32
-
33
-
34
-
35
-
36
-
37
-
38
-
39
-
40
-
41
-
42
-
43
-
44
-
45
-
46
-
47
-
48
-
49
-
50
-
51
-
52
-
53
-
54
-
55
-
56
-
57
-
58
-
59
-
60
-
61
-
62
-
63
-
64
-
65
-
66
-
67
-
68
-
69
-
70
-
71
-
72
-
73
-
74
-
75
-
76
-
77
-
78
-
79
-
80
-
81
-
82
-
83
-
84
-
85
-
86
-
 87
87 -
 88
88 -
 89
89 -
 90
90 -
 91
91 -
 92
92 -
 93
93 -
 94
94 -
 95
95 -
 96
96 -
 97
97 -
98
-
99
-
100
-
101
-
102
-
103
-
104
-
105
-
106
-
107
-
108
-
109
-
110
-
111
-
112
-
113
-
114
-
115
-
116
-
117
-
118
-
119
-
120
-
121
-
122
-
123
-
124
-
125
-
126
-
127
-
128
-
129
-
130
-
131
-
132
-
133
-
134
-
135
-
136
-
137
-
138
-
139
-
140
-
141
-
142
-
143
-
144
-
145
-
146
-
147
-
148
-
149
-
150
-
151
-
152
-
153
-
154
-
155
-
156
-
157
-
158
-
159
-
160
-
161
-
162
-
163
-
164
-
165
-
166
-
167
-
168
-
169
-
170
-
171
-
172
-
173
-
174
-
175
-
176
-
177
-
178
-
179
-
180
-
181
-
182
-
183
-
184
-
185
-
186
-
187
-
188
-
189
-
190
-
191
-
192
-
193
-
194
-
195
-
196
-
197
-
198
-
199
-
200
-
201
-
202
-
203
-
204
-
205
-
206
-
207
-
208
-
209
-
210
-
211
-
212
-
213
-
214
-
215
-
216
-
217
-
218
-
219
-
220
-
221
-
222
-
223
-
224
-
225
-
226
-
227
-
228
-
229
-
230
-
231
-
232
-
233
-
234
-
235
-
236
-
237
-
238
-
239
-
240
-
241
-
242
-
243
-
244
-
245
-
246
-
247
-
248
-
249
-
250
-
251
-
252
-
253
-
254
-
255
-
256
-
257
-
258
-
259
-
260
-
261
-
262
-
263
-
264
-
265
-
266
-
267
-
268
-
269
-
270
-
271
-
272
-
273
-
274
-
275
-
276
-
277
-
278
-
279
-
280
-
281
-
282
-
283
-
284
-
285
-
286
-
287
-
288
-
289
-
290
-
291
-
292
-
293
-
294
-
295
-
296
-
297
-
298
-
299
-
300
-
301
-
302
-
303
-
304
-
305
-
306
-
307
-
308
-
309
-
310
-
311
-
312
-
313
-
314
-
315
-
316
-
317
-
318
-
319
-
320
-
321
-
322
-
323
-
324
-
325
-
326
-
327
-
328
-
329
-
330
-
331
-
332
-
333
-
334
-
335
-
336
-
337
-
338
-
339
-
340
-
341
-
342
-
343
-
344
-
345
-
346
-
347
-
348
-
349
-
350
-
351
-
352
-
353
-
354
-
355
-
356
-
357
-
358
-
359
-
360
-
361
 |
 |