Brother International PEDESIGN 7.0 Users Manual - English - Page 146
Entering Monograms
 |
View all Brother International PEDESIGN 7.0 manuals
Add to My Manuals
Save this manual to your list of manuals |
Page 146 highlights
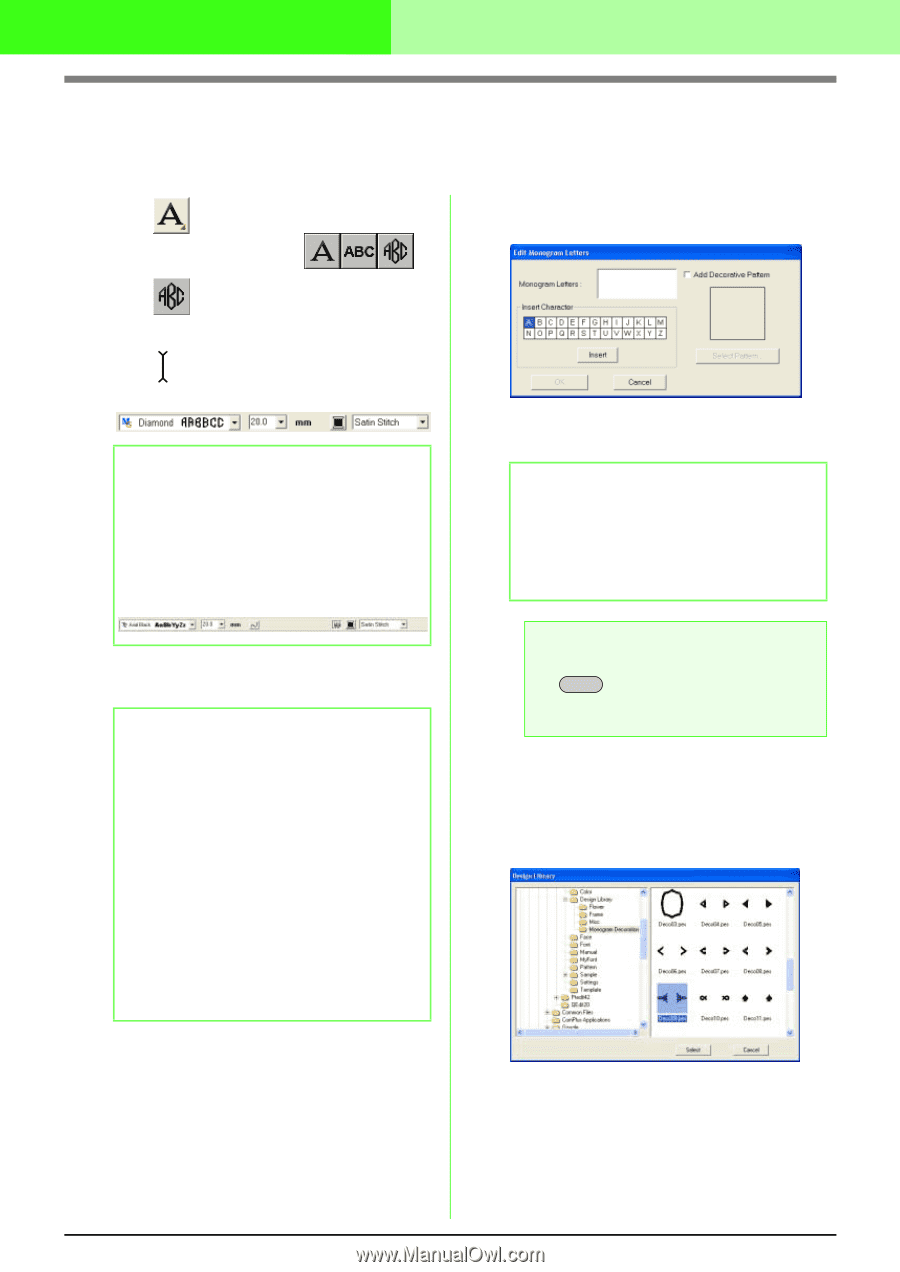
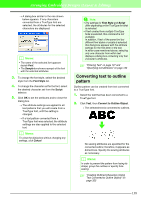
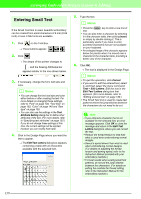
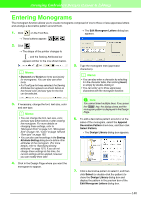
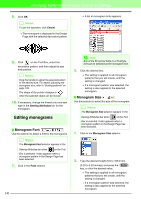
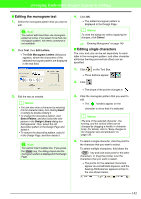
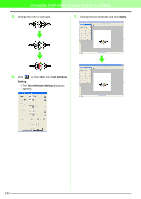
Arranging Embroidery Designs (Layout & Editing) Entering Monograms The monogram function allows you to create monograms composed of one to three or less uppercase letters and arrange a decorative pattern around them. 1. Click on the Tool Box. → The Edit Monogram Letters dialog box appears. → Three buttons appear: . 2. Click . → The shape of the pointer changes to , and the Sewing Attributes bar appears similar to the one shown below. b Memo: • Diamond and Script are fonts exclusively for monograms. You can also use other fonts. • If a TrueType font was selected, the Sewing Attributes bar appears as shown below so the thread color and sew type for the line can be selected. 3. If necessary, change the font, text size, color and sew type. b Memo: • You can change the font, text size, color, and sew type either before or after creating the monogram. For more details on changing these settings, refer to "Monogram Font" on page 141, "Monogram Size" on page 141, "Color" on page 149 and "Sew type" on page 150. • You can also use the settings in the Sewing Attribute Setting dialog box to define other attributes of the monogram. (For more details, refer to "Specifying sewing attributes" on page 151.) If you do not change these settings at this time, the current settings will be applied, however you can modify them later. 5. Type the monogram text (uppercase characters). b Memo: • You can also enter a character by selecting it in the character table, then clicking Insert, or simply by double-clicking it. • You can enter up to three uppercase characters with the monogram function. a Note: You cannot insert multiple lines. If you press the Enter key, the dialog closes and the monogram pattern is displayed in the Design Page. 6. To add a decorative pattern around or at the sides of the monogram, select the Append Decorative Pattern check box, and then click Select Pattern. → The Design Library dialog box appears. 4. Click in the Design Page where you want the monogram to appear. 7. Click a decorative pattern to select it, and then click Select (or double-click the pattern) to close the Design Library dialog box and display the pattern in the preview box of the Edit Monogram Letters dialog box. 140
-
 1
1 -
2
-
3
-
4
-
5
-
6
-
7
-
8
-
9
-
10
-
11
-
12
-
13
-
14
-
15
-
16
-
17
-
18
-
19
-
20
-
21
-
22
-
23
-
24
-
25
-
26
-
27
-
28
-
29
-
30
-
31
-
32
-
33
-
34
-
35
-
36
-
37
-
38
-
39
-
40
-
41
-
42
-
43
-
44
-
45
-
46
-
47
-
48
-
49
-
50
-
51
-
52
-
53
-
54
-
55
-
56
-
57
-
58
-
59
-
60
-
61
-
62
-
63
-
64
-
65
-
66
-
67
-
68
-
69
-
70
-
71
-
72
-
73
-
74
-
75
-
76
-
77
-
78
-
79
-
80
-
81
-
82
-
83
-
84
-
85
-
86
-
87
-
88
-
89
-
90
-
91
-
92
-
93
-
94
-
95
-
96
-
97
-
98
-
99
-
100
-
101
-
102
-
103
-
104
-
105
-
106
-
107
-
108
-
109
-
110
-
111
-
112
-
113
-
114
-
115
-
116
-
117
-
118
-
119
-
120
-
121
-
122
-
123
-
124
-
125
-
126
-
127
-
128
-
129
-
130
-
131
-
132
-
133
-
134
-
135
-
136
-
137
-
138
-
139
-
140
-
 141
141 -
 142
142 -
 143
143 -
 144
144 -
 145
145 -
 146
146 -
 147
147 -
 148
148 -
 149
149 -
 150
150 -
 151
151 -
152
-
153
-
154
-
155
-
156
-
157
-
158
-
159
-
160
-
161
-
162
-
163
-
164
-
165
-
166
-
167
-
168
-
169
-
170
-
171
-
172
-
173
-
174
-
175
-
176
-
177
-
178
-
179
-
180
-
181
-
182
-
183
-
184
-
185
-
186
-
187
-
188
-
189
-
190
-
191
-
192
-
193
-
194
-
195
-
196
-
197
-
198
-
199
-
200
-
201
-
202
-
203
-
204
-
205
-
206
-
207
-
208
-
209
-
210
-
211
-
212
-
213
-
214
-
215
-
216
-
217
-
218
-
219
-
220
-
221
-
222
-
223
-
224
-
225
-
226
-
227
-
228
-
229
-
230
-
231
-
232
-
233
-
234
-
235
-
236
-
237
-
238
-
239
-
240
-
241
-
242
-
243
-
244
-
245
-
246
-
247
-
248
-
249
-
250
-
251
-
252
-
253
-
254
-
255
-
256
-
257
-
258
-
259
-
260
-
261
-
262
-
263
-
264
-
265
-
266
-
267
-
268
-
269
-
270
-
271
-
272
-
273
-
274
-
275
-
276
-
277
-
278
-
279
-
280
-
281
-
282
-
283
-
284
-
285
-
286
-
287
-
288
-
289
-
290
-
291
-
292
-
293
-
294
-
295
-
296
-
297
-
298
-
299
-
300
-
301
-
302
-
303
-
304
-
305
-
306
-
307
-
308
-
309
-
310
-
311
-
312
-
313
-
314
-
315
-
316
-
317
-
318
-
319
-
320
-
321
-
322
-
323
-
324
-
325
-
326
-
327
-
328
-
329
-
330
-
331
-
332
-
333
-
334
-
335
-
336
-
337
-
338
-
339
-
340
-
341
-
342
-
343
-
344
-
345
-
346
-
347
-
348
-
349
-
350
-
351
-
352
-
353
-
354
-
355
-
356
-
357
-
358
-
359
-
360
-
361
 |
 |