Brother International PEDESIGN 7.0 Users Manual - English - Page 173
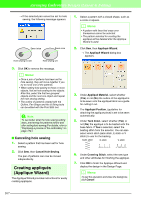
Creating appliqu, Applique Wizard
 |
View all Brother International PEDESIGN 7.0 manuals
Add to My Manuals
Save this manual to your list of manuals |
Page 173 highlights
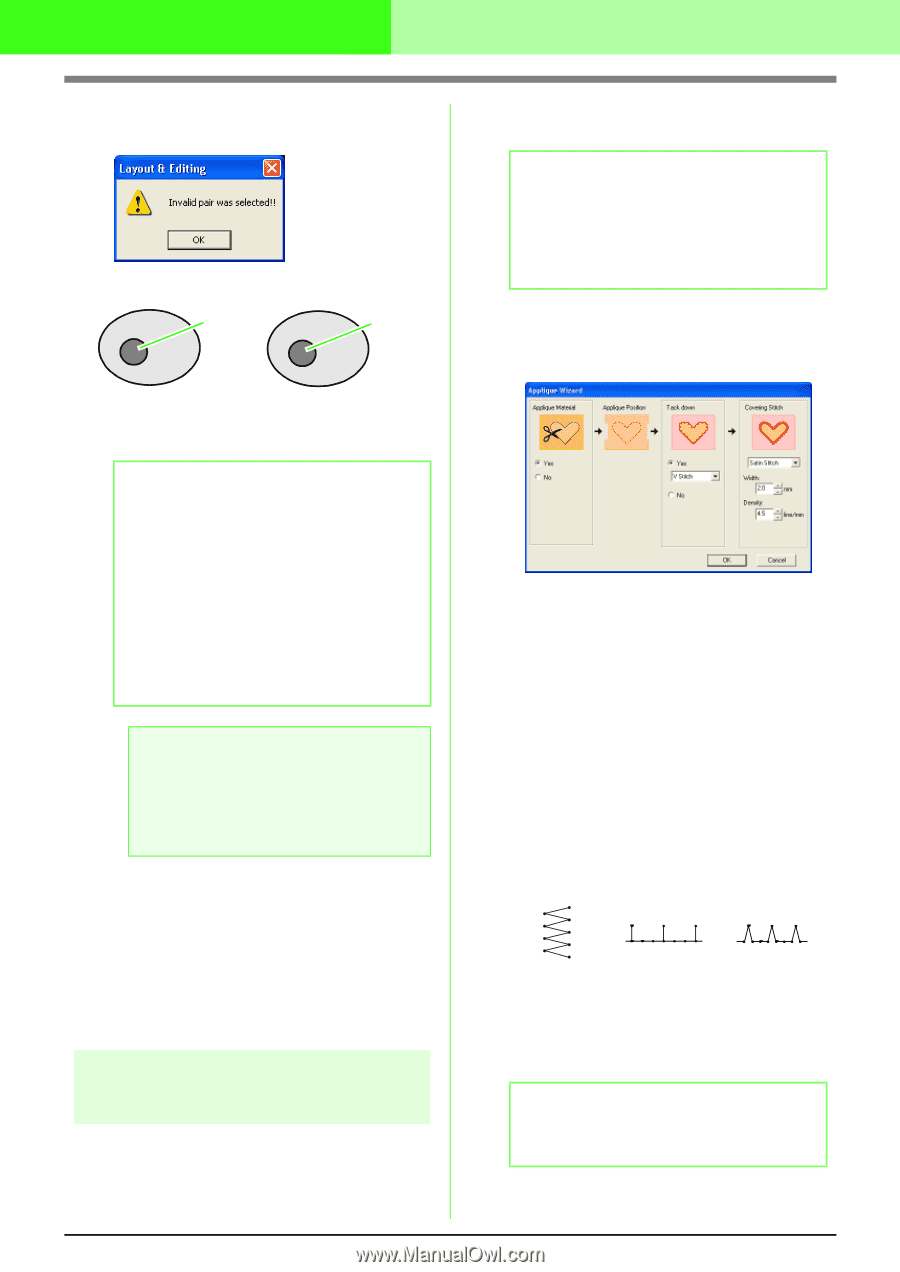
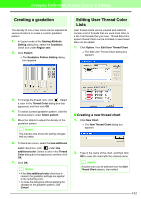
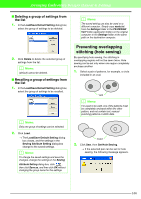
Arranging Embroidery Designs (Layout & Editing) → If the selected pair cannot be set for hole sewing, the following message appears. Sewn twice Sewn once Hole sewing not set Hole sewing set 3. Click OK to remove the message. b Memo: • Once a pair of patterns has been set for hole sewing, they will move together if you try to move one of the patterns. • When setting hole sewing to three or more objects, first set hole sewing to two objects. After this, select the first two grouped objects and the next one object and repeat the hole sewing setting. • The outline of patterns created with the Outline, Fan Shape and Arc & String tools can be edited with the Point Edit tool. a Note: To see better what the hole sewing setting does, previewing the patterns before and after setting hole sewing (For details, refer to "Displaying a preview of the embroidery" on page 172.) I Canceling hole sewing 1. Select a pattern that has been set for hole sewing. 2. Click Sew, then Cancel Hole Sewing. The pair of patterns can now be moved independently. Creating appliqués (Applique Wizard) The Applique Wizard provides instructions for easily creating appliqués. 1. Select a pattern with a closed shape, such as a circle or square. b Memo: • A pattern with lines that cross over themselves cannot be selected. • The pattern selected for creating the appliqué will be deleted after the Applique Wizard is used. 2. Click Sew, then Appliqué Wizard. → The Appliqué Wizard dialog box appears. 3. Under Appliqué Material, select whether (Yes) or not (No) the outline of the appliqué is to be sewn onto the appliqué fabric as a guide for cutting it out. 4. The Appliqué Position, (guideline for attaching the applique piece) is set to be sewn automatically. 5. Under Tack down, select whether (Yes) or not (No) the appliqué is to be basted onto the base fabric. If Yes is selected, select the basting stitch from the selector. You can also select which stitch (satin stitch, E stitch or V stitch) to use for the basting. Satin stitch E stitch V stitch 6. Under Covering Stitch, select the sew type and other attributes for finishing the appliqué. 7. Click OK to finish the Applique Wizard and display the design in the Design Page. b Memo: To quit the operation and close the dialog box, click Cancel. 167
-
 1
1 -
2
-
3
-
4
-
5
-
6
-
7
-
8
-
9
-
10
-
11
-
12
-
13
-
14
-
15
-
16
-
17
-
18
-
19
-
20
-
21
-
22
-
23
-
24
-
25
-
26
-
27
-
28
-
29
-
30
-
31
-
32
-
33
-
34
-
35
-
36
-
37
-
38
-
39
-
40
-
41
-
42
-
43
-
44
-
45
-
46
-
47
-
48
-
49
-
50
-
51
-
52
-
53
-
54
-
55
-
56
-
57
-
58
-
59
-
60
-
61
-
62
-
63
-
64
-
65
-
66
-
67
-
68
-
69
-
70
-
71
-
72
-
73
-
74
-
75
-
76
-
77
-
78
-
79
-
80
-
81
-
82
-
83
-
84
-
85
-
86
-
87
-
88
-
89
-
90
-
91
-
92
-
93
-
94
-
95
-
96
-
97
-
98
-
99
-
100
-
101
-
102
-
103
-
104
-
105
-
106
-
107
-
108
-
109
-
110
-
111
-
112
-
113
-
114
-
115
-
116
-
117
-
118
-
119
-
120
-
121
-
122
-
123
-
124
-
125
-
126
-
127
-
128
-
129
-
130
-
131
-
132
-
133
-
134
-
135
-
136
-
137
-
138
-
139
-
140
-
141
-
142
-
143
-
144
-
145
-
146
-
147
-
148
-
149
-
150
-
151
-
152
-
153
-
154
-
155
-
156
-
157
-
158
-
159
-
160
-
161
-
162
-
163
-
164
-
165
-
166
-
167
-
 168
168 -
 169
169 -
 170
170 -
 171
171 -
 172
172 -
 173
173 -
 174
174 -
 175
175 -
 176
176 -
 177
177 -
 178
178 -
179
-
180
-
181
-
182
-
183
-
184
-
185
-
186
-
187
-
188
-
189
-
190
-
191
-
192
-
193
-
194
-
195
-
196
-
197
-
198
-
199
-
200
-
201
-
202
-
203
-
204
-
205
-
206
-
207
-
208
-
209
-
210
-
211
-
212
-
213
-
214
-
215
-
216
-
217
-
218
-
219
-
220
-
221
-
222
-
223
-
224
-
225
-
226
-
227
-
228
-
229
-
230
-
231
-
232
-
233
-
234
-
235
-
236
-
237
-
238
-
239
-
240
-
241
-
242
-
243
-
244
-
245
-
246
-
247
-
248
-
249
-
250
-
251
-
252
-
253
-
254
-
255
-
256
-
257
-
258
-
259
-
260
-
261
-
262
-
263
-
264
-
265
-
266
-
267
-
268
-
269
-
270
-
271
-
272
-
273
-
274
-
275
-
276
-
277
-
278
-
279
-
280
-
281
-
282
-
283
-
284
-
285
-
286
-
287
-
288
-
289
-
290
-
291
-
292
-
293
-
294
-
295
-
296
-
297
-
298
-
299
-
300
-
301
-
302
-
303
-
304
-
305
-
306
-
307
-
308
-
309
-
310
-
311
-
312
-
313
-
314
-
315
-
316
-
317
-
318
-
319
-
320
-
321
-
322
-
323
-
324
-
325
-
326
-
327
-
328
-
329
-
330
-
331
-
332
-
333
-
334
-
335
-
336
-
337
-
338
-
339
-
340
-
341
-
342
-
343
-
344
-
345
-
346
-
347
-
348
-
349
-
350
-
351
-
352
-
353
-
354
-
355
-
356
-
357
-
358
-
359
-
360
-
361
 |
 |