Brother International PEDESIGN 7.0 Users Manual - English - Page 206
Changing the display of the, background image, Changing the size and position, of the background
 |
View all Brother International PEDESIGN 7.0 manuals
Add to My Manuals
Save this manual to your list of manuals |
Page 206 highlights
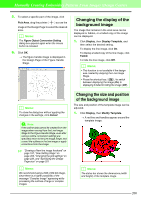
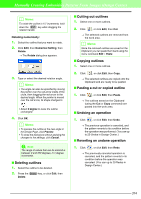
Manually Creating Embroidery Patterns From Images (Design Center) 5. To select a specific part of the image, click Pick Area, drag the pointer ( ) across the image in the Design Page to select the desired area. b Memo: The Figure Object Conversion Setting dialog box appears again when the mouse button is released. 6. Click OK. → The figure handle image is displayed in the Design Page of the Figure Handle Stage. Changing the display of the background image The image that remains in the work area can be displayed or hidden, or a faded copy of the image can be displayed. 1. Click Display, then Display Templete, and then select the desired setting. To display the line image, click On. To display a faded copy of the line image, click Faded. To hide the line image, click Off. b Memo: • This function is not available if the design was created by skipping the Line Image Stage. • Press the shortcut key ( F6 ) to switch between displaying the image (On) to displaying it faded to hiding the image (Off). b Memo: To close the dialog box without applying the changes to the settings, click Cancel. a Note: If the outline data cannot be created from the image when moving from the Line Image Stage to the Figure Handle Stage, even after various outline conversion settings are specified, return to the Line Image Stage, and correct the outlines in the line image or apply corrections from the image. c "Drawing a New line image freehand" on page 197, "Sew Setting Stage" on page 209, "Changing the grid settings" on page 236, and "Specifying the Design Page size" on page 201 b Memo: We recommend using a 500 x 500 dot image, since there is a higher possibility of the message "Complex Image" appearing while processing the outlines of large or complex images. Changing the size and position of the background image The size and position of the template image can be adjusted. 1. Click Display, then Modify Template. → A red line and handles appear around the template image. b Memo: The status bar shows the dimensions (width and height) of the template image. 200
-
 1
1 -
2
-
3
-
4
-
5
-
6
-
7
-
8
-
9
-
10
-
11
-
12
-
13
-
14
-
15
-
16
-
17
-
18
-
19
-
20
-
21
-
22
-
23
-
24
-
25
-
26
-
27
-
28
-
29
-
30
-
31
-
32
-
33
-
34
-
35
-
36
-
37
-
38
-
39
-
40
-
41
-
42
-
43
-
44
-
45
-
46
-
47
-
48
-
49
-
50
-
51
-
52
-
53
-
54
-
55
-
56
-
57
-
58
-
59
-
60
-
61
-
62
-
63
-
64
-
65
-
66
-
67
-
68
-
69
-
70
-
71
-
72
-
73
-
74
-
75
-
76
-
77
-
78
-
79
-
80
-
81
-
82
-
83
-
84
-
85
-
86
-
87
-
88
-
89
-
90
-
91
-
92
-
93
-
94
-
95
-
96
-
97
-
98
-
99
-
100
-
101
-
102
-
103
-
104
-
105
-
106
-
107
-
108
-
109
-
110
-
111
-
112
-
113
-
114
-
115
-
116
-
117
-
118
-
119
-
120
-
121
-
122
-
123
-
124
-
125
-
126
-
127
-
128
-
129
-
130
-
131
-
132
-
133
-
134
-
135
-
136
-
137
-
138
-
139
-
140
-
141
-
142
-
143
-
144
-
145
-
146
-
147
-
148
-
149
-
150
-
151
-
152
-
153
-
154
-
155
-
156
-
157
-
158
-
159
-
160
-
161
-
162
-
163
-
164
-
165
-
166
-
167
-
168
-
169
-
170
-
171
-
172
-
173
-
174
-
175
-
176
-
177
-
178
-
179
-
180
-
181
-
182
-
183
-
184
-
185
-
186
-
187
-
188
-
189
-
190
-
191
-
192
-
193
-
194
-
195
-
196
-
197
-
198
-
199
-
200
-
 201
201 -
 202
202 -
 203
203 -
 204
204 -
 205
205 -
 206
206 -
 207
207 -
 208
208 -
 209
209 -
 210
210 -
 211
211 -
212
-
213
-
214
-
215
-
216
-
217
-
218
-
219
-
220
-
221
-
222
-
223
-
224
-
225
-
226
-
227
-
228
-
229
-
230
-
231
-
232
-
233
-
234
-
235
-
236
-
237
-
238
-
239
-
240
-
241
-
242
-
243
-
244
-
245
-
246
-
247
-
248
-
249
-
250
-
251
-
252
-
253
-
254
-
255
-
256
-
257
-
258
-
259
-
260
-
261
-
262
-
263
-
264
-
265
-
266
-
267
-
268
-
269
-
270
-
271
-
272
-
273
-
274
-
275
-
276
-
277
-
278
-
279
-
280
-
281
-
282
-
283
-
284
-
285
-
286
-
287
-
288
-
289
-
290
-
291
-
292
-
293
-
294
-
295
-
296
-
297
-
298
-
299
-
300
-
301
-
302
-
303
-
304
-
305
-
306
-
307
-
308
-
309
-
310
-
311
-
312
-
313
-
314
-
315
-
316
-
317
-
318
-
319
-
320
-
321
-
322
-
323
-
324
-
325
-
326
-
327
-
328
-
329
-
330
-
331
-
332
-
333
-
334
-
335
-
336
-
337
-
338
-
339
-
340
-
341
-
342
-
343
-
344
-
345
-
346
-
347
-
348
-
349
-
350
-
351
-
352
-
353
-
354
-
355
-
356
-
357
-
358
-
359
-
360
-
361
 |
 |