Brother International PEDESIGN 7.0 Users Manual - English - Page 186
Printing
 |
View all Brother International PEDESIGN 7.0 manuals
Add to My Manuals
Save this manual to your list of manuals |
Page 186 highlights
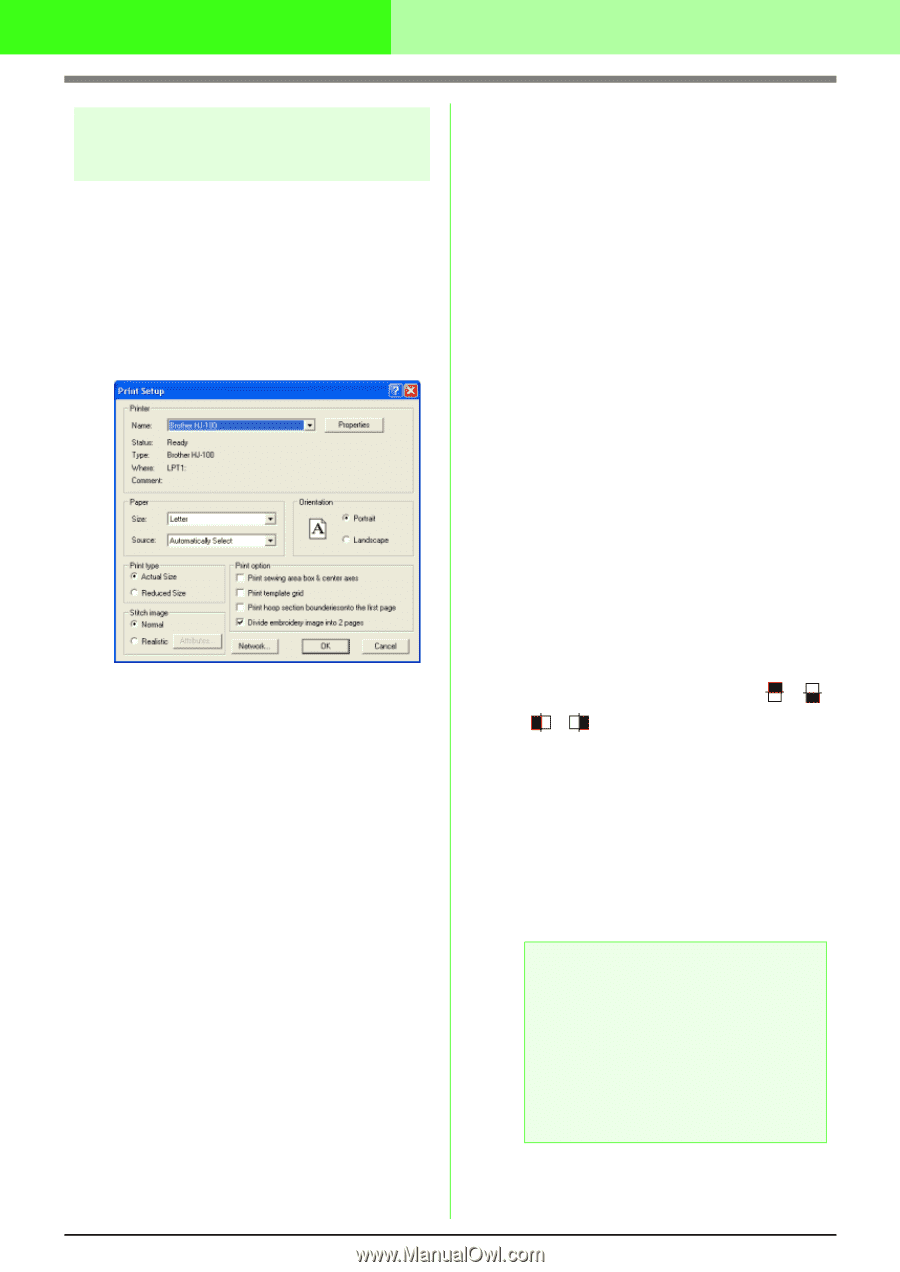
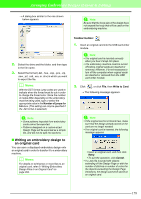
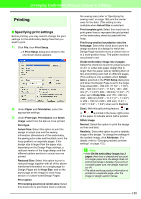
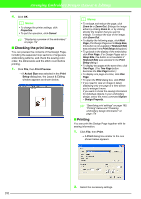
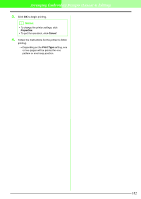
Arranging Embroidery Designs (Layout & Editing) Printing I Specifying print settings Before printing, you may need to change the print settings for the embroidery design files that you want to print. 1. Click File, then Print Setup. → A Print Setup dialog box similar to the one shown below appears. 2. Under Paper and Orientation, select the appropriate settings. 3. Under Print type, Print Option and Stitch image, select how the data is to be printed. Print type Actual Size: Select this option to print the design in actual size and the sewing information (dimensions of the embroidery, the sewing color order and the stitch count, the hoop position) on separate pages. If the design size is larger than the paper size, depending on the Design Page settings, a reduced version of the large design and the different pattern sections in actual size are printed. Reduced Size: Select this option to print a reduced image together with all of the abovementioned information on a single page for Design Pages set to Hoop Size, and on the same page as the image for each hoop section of custom-sized Design Pages. Print option Print sewing area box & center axes: Select this check box to print black lines to indicate the sewing area (refer to "Specifying the sewing area" on page 169) and the center axes for the data. (This setting is only available when Actual Size is selected.) Print template grid: Select this check box to print green lines to represent the grid printed on the embroidery sheet included with the hoop. Print hoop section boundaries onto the first page: Select this check box to print the design sections of a design for which the Design Page has been set to a custom size or to a multi-position hoop. The pattern sections are printed in red. Divide embroidery image into 2 pages: Select this check box to print in actual size and on A4- or Letter-size paper design that is larger than the paper size by dividing them in two and printing each half on different pages. (This setting is only available when Actual size is selected in the Print Setup dialog box and when the Design Page is set to the larger hoop sizes [300 × 200 mm (11 3/4" × 7 3/4"), 200 × 300 mm (7 3/4" × 11 3/4"), 180 × 300 mm (7" × 11 3/4"), 300 × 180 mm (11 3/4" × 7") when set to Hoop Size, and 170 × 290 mm (180 × 300 mm) 6.69" × 11.41" (7" × 11 3/4") or 290 × 190 mm (300 × 200 mm) 11.41" × 7.48" (11 3/4" × 7 3/4") when set to Custom Size].) With this split printing feature, / or / is printed in the lower-right corner of the paper to indicate which half is printed. Stitch image Normal: Select this option to print the design as lines and dots. Realistic: Select this option to print a realistic image of the design. To change the settings of the realistic image, click Attributes. (For details, refer to "Changing realistic preview settings" on page 172.) a Note: • If the Divide embroidery image into 2 pages check box is cleared and you print on a larger paper size, the design does not print in two halves. Likewise, if you print on a smaller paper size, the design might be cut off. • The stitch and hoop position information is printed on a separate page, after the image or design section halves. 180
-
 1
1 -
2
-
3
-
4
-
5
-
6
-
7
-
8
-
9
-
10
-
11
-
12
-
13
-
14
-
15
-
16
-
17
-
18
-
19
-
20
-
21
-
22
-
23
-
24
-
25
-
26
-
27
-
28
-
29
-
30
-
31
-
32
-
33
-
34
-
35
-
36
-
37
-
38
-
39
-
40
-
41
-
42
-
43
-
44
-
45
-
46
-
47
-
48
-
49
-
50
-
51
-
52
-
53
-
54
-
55
-
56
-
57
-
58
-
59
-
60
-
61
-
62
-
63
-
64
-
65
-
66
-
67
-
68
-
69
-
70
-
71
-
72
-
73
-
74
-
75
-
76
-
77
-
78
-
79
-
80
-
81
-
82
-
83
-
84
-
85
-
86
-
87
-
88
-
89
-
90
-
91
-
92
-
93
-
94
-
95
-
96
-
97
-
98
-
99
-
100
-
101
-
102
-
103
-
104
-
105
-
106
-
107
-
108
-
109
-
110
-
111
-
112
-
113
-
114
-
115
-
116
-
117
-
118
-
119
-
120
-
121
-
122
-
123
-
124
-
125
-
126
-
127
-
128
-
129
-
130
-
131
-
132
-
133
-
134
-
135
-
136
-
137
-
138
-
139
-
140
-
141
-
142
-
143
-
144
-
145
-
146
-
147
-
148
-
149
-
150
-
151
-
152
-
153
-
154
-
155
-
156
-
157
-
158
-
159
-
160
-
161
-
162
-
163
-
164
-
165
-
166
-
167
-
168
-
169
-
170
-
171
-
172
-
173
-
174
-
175
-
176
-
177
-
178
-
179
-
180
-
 181
181 -
 182
182 -
 183
183 -
 184
184 -
 185
185 -
 186
186 -
 187
187 -
 188
188 -
 189
189 -
 190
190 -
 191
191 -
192
-
193
-
194
-
195
-
196
-
197
-
198
-
199
-
200
-
201
-
202
-
203
-
204
-
205
-
206
-
207
-
208
-
209
-
210
-
211
-
212
-
213
-
214
-
215
-
216
-
217
-
218
-
219
-
220
-
221
-
222
-
223
-
224
-
225
-
226
-
227
-
228
-
229
-
230
-
231
-
232
-
233
-
234
-
235
-
236
-
237
-
238
-
239
-
240
-
241
-
242
-
243
-
244
-
245
-
246
-
247
-
248
-
249
-
250
-
251
-
252
-
253
-
254
-
255
-
256
-
257
-
258
-
259
-
260
-
261
-
262
-
263
-
264
-
265
-
266
-
267
-
268
-
269
-
270
-
271
-
272
-
273
-
274
-
275
-
276
-
277
-
278
-
279
-
280
-
281
-
282
-
283
-
284
-
285
-
286
-
287
-
288
-
289
-
290
-
291
-
292
-
293
-
294
-
295
-
296
-
297
-
298
-
299
-
300
-
301
-
302
-
303
-
304
-
305
-
306
-
307
-
308
-
309
-
310
-
311
-
312
-
313
-
314
-
315
-
316
-
317
-
318
-
319
-
320
-
321
-
322
-
323
-
324
-
325
-
326
-
327
-
328
-
329
-
330
-
331
-
332
-
333
-
334
-
335
-
336
-
337
-
338
-
339
-
340
-
341
-
342
-
343
-
344
-
345
-
346
-
347
-
348
-
349
-
350
-
351
-
352
-
353
-
354
-
355
-
356
-
357
-
358
-
359
-
360
-
361
 |
 |