Brother International PEDESIGN 7.0 Users Manual - English - Page 239
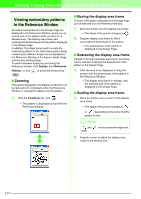
Viewing embroidery patterns, in the Reference Window
 |
View all Brother International PEDESIGN 7.0 manuals
Add to My Manuals
Save this manual to your list of manuals |
Page 239 highlights
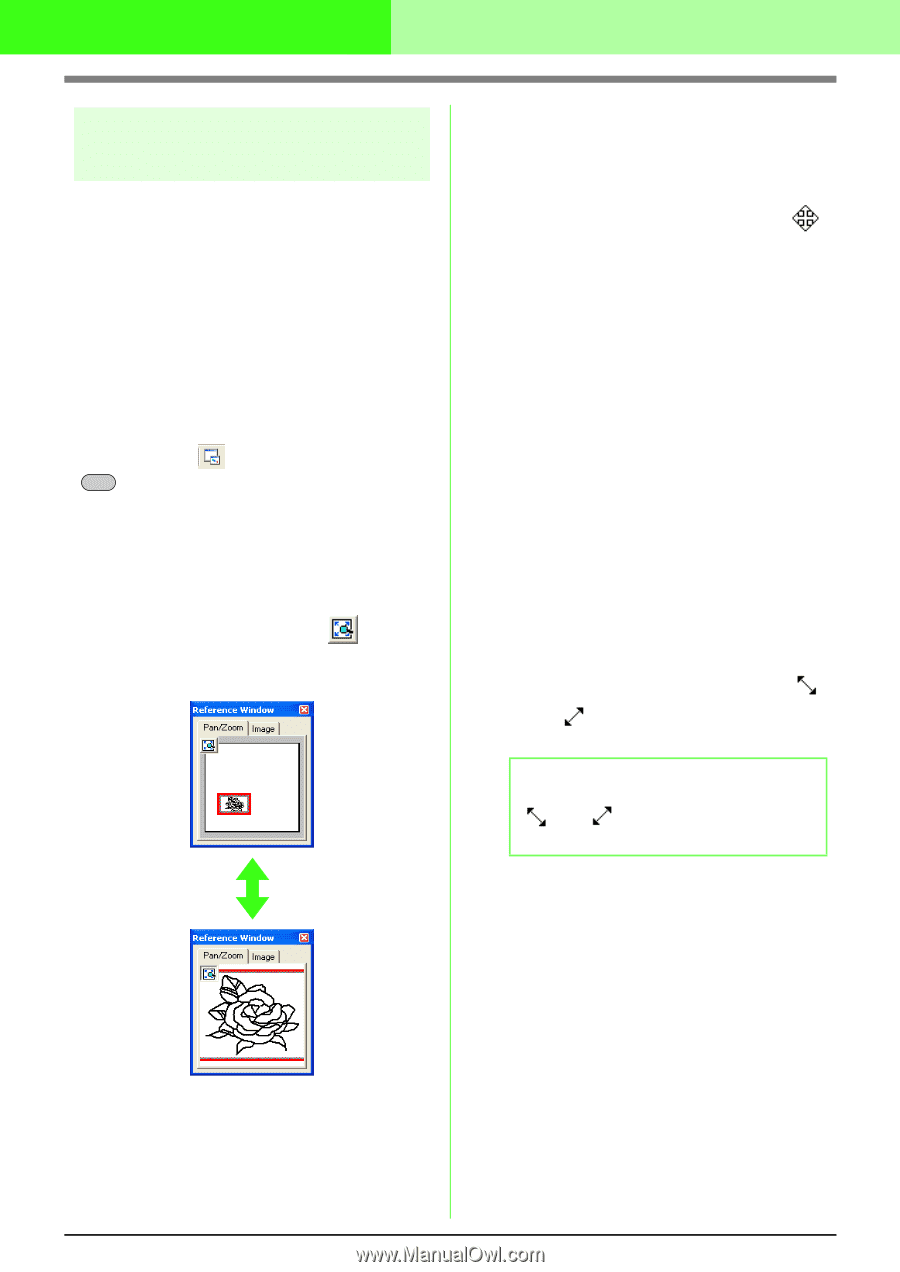
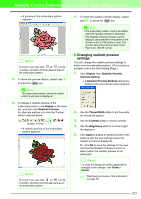
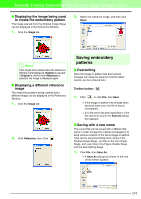
Manually Creating Embroidery Patterns From Images (Design Center) Viewing embroidery patterns in the Reference Window All outlines and patterns in the Design Page are displayed in the Reference Window, giving you an overall view of the pattern while you work on a detailed area. The display area frame (red rectangle) indicates the part of the pattern displayed in the Design Page. In addition, the image being used to create the embroidery pattern or the embroidery pattern being created and a different image can be displayed in the Reference Window in the Figure Handle Stage and the Sew Setting Stage. To switch between displaying and hiding the Reference window, click Display, then Reference Window, or click , or press the shortcut key ( F11 ). I Zooming The pattern displayed in the Reference Window can be reduced to fit completely within the Reference Window or enlarged to display only the pattern. 1. Click the Pan/Zoom tab, click . → The pattern is displayed so that it fills the Reference Window. I Moving the display area frame The part of the pattern displayed in the Design Page can be selected from the Reference Window. 1. Move the pointer over the display area frame. → The shape of the pointer changes to . 2. Drag the display area frame so that it surrounds the desired part of the pattern. → The selected part of the pattern is displayed in the Design Page. I Redrawing the display area frame Instead of moving the display area frame, the frame can be redrawn to display the desired part of the pattern in the Design Page. 1. Click the area to be displayed, or drag the pointer over the desired part of the pattern in the Reference Window. → The display area frame is redrawn, and the selected part of the pattern is displayed in the Design Page. I Scaling the display area frame 1. Move the pointer over a corner of the display area frame. → The shape of the pointer changes to or , depending on the corner that the pointer is over. b Memo: and width. are for scaling the height and 2. Drag the corner to adjust the display area frame to the desired size. 233
-
 1
1 -
2
-
3
-
4
-
5
-
6
-
7
-
8
-
9
-
10
-
11
-
12
-
13
-
14
-
15
-
16
-
17
-
18
-
19
-
20
-
21
-
22
-
23
-
24
-
25
-
26
-
27
-
28
-
29
-
30
-
31
-
32
-
33
-
34
-
35
-
36
-
37
-
38
-
39
-
40
-
41
-
42
-
43
-
44
-
45
-
46
-
47
-
48
-
49
-
50
-
51
-
52
-
53
-
54
-
55
-
56
-
57
-
58
-
59
-
60
-
61
-
62
-
63
-
64
-
65
-
66
-
67
-
68
-
69
-
70
-
71
-
72
-
73
-
74
-
75
-
76
-
77
-
78
-
79
-
80
-
81
-
82
-
83
-
84
-
85
-
86
-
87
-
88
-
89
-
90
-
91
-
92
-
93
-
94
-
95
-
96
-
97
-
98
-
99
-
100
-
101
-
102
-
103
-
104
-
105
-
106
-
107
-
108
-
109
-
110
-
111
-
112
-
113
-
114
-
115
-
116
-
117
-
118
-
119
-
120
-
121
-
122
-
123
-
124
-
125
-
126
-
127
-
128
-
129
-
130
-
131
-
132
-
133
-
134
-
135
-
136
-
137
-
138
-
139
-
140
-
141
-
142
-
143
-
144
-
145
-
146
-
147
-
148
-
149
-
150
-
151
-
152
-
153
-
154
-
155
-
156
-
157
-
158
-
159
-
160
-
161
-
162
-
163
-
164
-
165
-
166
-
167
-
168
-
169
-
170
-
171
-
172
-
173
-
174
-
175
-
176
-
177
-
178
-
179
-
180
-
181
-
182
-
183
-
184
-
185
-
186
-
187
-
188
-
189
-
190
-
191
-
192
-
193
-
194
-
195
-
196
-
197
-
198
-
199
-
200
-
201
-
202
-
203
-
204
-
205
-
206
-
207
-
208
-
209
-
210
-
211
-
212
-
213
-
214
-
215
-
216
-
217
-
218
-
219
-
220
-
221
-
222
-
223
-
224
-
225
-
226
-
227
-
228
-
229
-
230
-
231
-
232
-
233
-
 234
234 -
 235
235 -
 236
236 -
 237
237 -
 238
238 -
 239
239 -
 240
240 -
 241
241 -
 242
242 -
 243
243 -
 244
244 -
245
-
246
-
247
-
248
-
249
-
250
-
251
-
252
-
253
-
254
-
255
-
256
-
257
-
258
-
259
-
260
-
261
-
262
-
263
-
264
-
265
-
266
-
267
-
268
-
269
-
270
-
271
-
272
-
273
-
274
-
275
-
276
-
277
-
278
-
279
-
280
-
281
-
282
-
283
-
284
-
285
-
286
-
287
-
288
-
289
-
290
-
291
-
292
-
293
-
294
-
295
-
296
-
297
-
298
-
299
-
300
-
301
-
302
-
303
-
304
-
305
-
306
-
307
-
308
-
309
-
310
-
311
-
312
-
313
-
314
-
315
-
316
-
317
-
318
-
319
-
320
-
321
-
322
-
323
-
324
-
325
-
326
-
327
-
328
-
329
-
330
-
331
-
332
-
333
-
334
-
335
-
336
-
337
-
338
-
339
-
340
-
341
-
342
-
343
-
344
-
345
-
346
-
347
-
348
-
349
-
350
-
351
-
352
-
353
-
354
-
355
-
356
-
357
-
358
-
359
-
360
-
361
 |
 |