Brother International PEDESIGN 7.0 Users Manual - English - Page 236
Checking and editing the, sewing order
 |
View all Brother International PEDESIGN 7.0 manuals
Add to My Manuals
Save this manual to your list of manuals |
Page 236 highlights
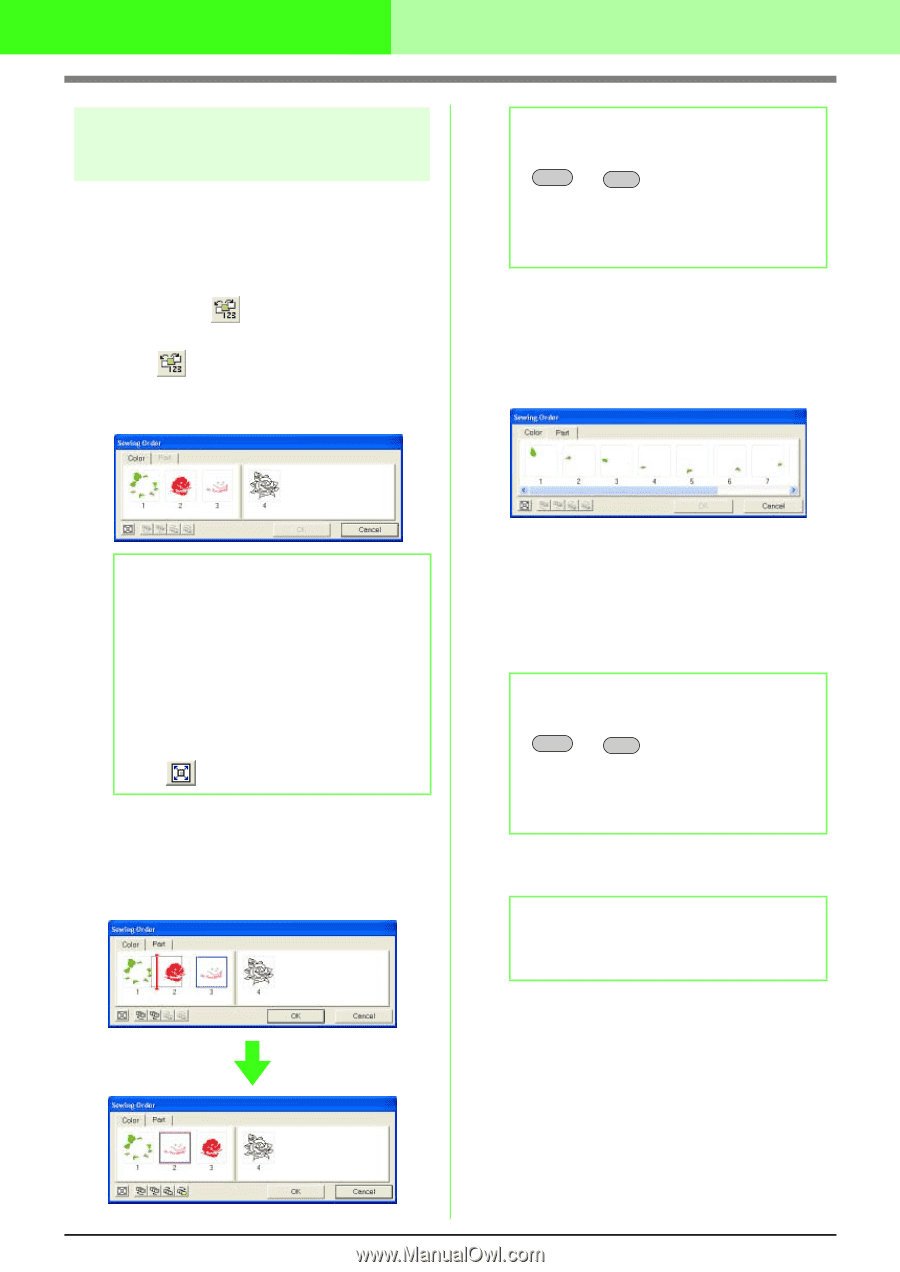
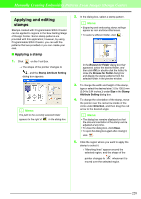
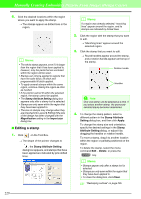
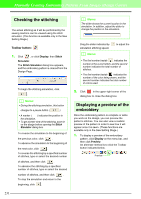
Manually Creating Embroidery Patterns From Images (Design Center) Checking and editing the sewing order The sewing order of pattern colors as well as the sewing order of pattern objects of the same color can be checked and modified as necessary. (This function is available only in the Sew Setting Stage.) Toolbar button: 1. Click , or click Sew, then Sewing Order. → The Color tab of a Sewing Order dialog box similar to the one shown below appears. b Memo: • To select additional frames, hold down the Shift or Ctrl key and select each frame. • In the Design Page, "marching lines" appear around the selected region or along the selected outline. 3. To view the sewing order of multiple patterns of the same color, select the frame that you want to view, and then click the Part tab. → The individual patterns with the same color appear in different frames. b Memo: • The frames containing regions are separated from the frames containing outlines with a thick vertical line. Frames from one side of the line cannot be moved to the other side. • The patterns will be sewn in the order shown, from left to right. All regions are always sewn before the outlines. • To enlarge the pattern for better viewing, click . 2. To change the sewing order of a color, select the frame for the color that you want to move, and then drag the frame to the desired position. → A red line appears, indicating the position where the frame is being moved. 4. To change the sewing order of a pattern, select the frame for the pattern that you want to move, and then drag the frame to the desired position. → A red line appears, indicating the position where the frame is being moved. b Memo: • To select additional frames, hold down the Shift or Ctrl key and select each frame. • In the Design Page, "marching lines" appear around the selected region or along the selected outline. 5. Click OK to apply the changes and to close the dialog box. b Memo: To close the dialog box without applying the changes to the sewing order, click Cancel. c "Displaying a preview of the embroidery" on page 231 230
-
 1
1 -
2
-
3
-
4
-
5
-
6
-
7
-
8
-
9
-
10
-
11
-
12
-
13
-
14
-
15
-
16
-
17
-
18
-
19
-
20
-
21
-
22
-
23
-
24
-
25
-
26
-
27
-
28
-
29
-
30
-
31
-
32
-
33
-
34
-
35
-
36
-
37
-
38
-
39
-
40
-
41
-
42
-
43
-
44
-
45
-
46
-
47
-
48
-
49
-
50
-
51
-
52
-
53
-
54
-
55
-
56
-
57
-
58
-
59
-
60
-
61
-
62
-
63
-
64
-
65
-
66
-
67
-
68
-
69
-
70
-
71
-
72
-
73
-
74
-
75
-
76
-
77
-
78
-
79
-
80
-
81
-
82
-
83
-
84
-
85
-
86
-
87
-
88
-
89
-
90
-
91
-
92
-
93
-
94
-
95
-
96
-
97
-
98
-
99
-
100
-
101
-
102
-
103
-
104
-
105
-
106
-
107
-
108
-
109
-
110
-
111
-
112
-
113
-
114
-
115
-
116
-
117
-
118
-
119
-
120
-
121
-
122
-
123
-
124
-
125
-
126
-
127
-
128
-
129
-
130
-
131
-
132
-
133
-
134
-
135
-
136
-
137
-
138
-
139
-
140
-
141
-
142
-
143
-
144
-
145
-
146
-
147
-
148
-
149
-
150
-
151
-
152
-
153
-
154
-
155
-
156
-
157
-
158
-
159
-
160
-
161
-
162
-
163
-
164
-
165
-
166
-
167
-
168
-
169
-
170
-
171
-
172
-
173
-
174
-
175
-
176
-
177
-
178
-
179
-
180
-
181
-
182
-
183
-
184
-
185
-
186
-
187
-
188
-
189
-
190
-
191
-
192
-
193
-
194
-
195
-
196
-
197
-
198
-
199
-
200
-
201
-
202
-
203
-
204
-
205
-
206
-
207
-
208
-
209
-
210
-
211
-
212
-
213
-
214
-
215
-
216
-
217
-
218
-
219
-
220
-
221
-
222
-
223
-
224
-
225
-
226
-
227
-
228
-
229
-
230
-
 231
231 -
 232
232 -
 233
233 -
 234
234 -
 235
235 -
 236
236 -
 237
237 -
 238
238 -
 239
239 -
 240
240 -
 241
241 -
242
-
243
-
244
-
245
-
246
-
247
-
248
-
249
-
250
-
251
-
252
-
253
-
254
-
255
-
256
-
257
-
258
-
259
-
260
-
261
-
262
-
263
-
264
-
265
-
266
-
267
-
268
-
269
-
270
-
271
-
272
-
273
-
274
-
275
-
276
-
277
-
278
-
279
-
280
-
281
-
282
-
283
-
284
-
285
-
286
-
287
-
288
-
289
-
290
-
291
-
292
-
293
-
294
-
295
-
296
-
297
-
298
-
299
-
300
-
301
-
302
-
303
-
304
-
305
-
306
-
307
-
308
-
309
-
310
-
311
-
312
-
313
-
314
-
315
-
316
-
317
-
318
-
319
-
320
-
321
-
322
-
323
-
324
-
325
-
326
-
327
-
328
-
329
-
330
-
331
-
332
-
333
-
334
-
335
-
336
-
337
-
338
-
339
-
340
-
341
-
342
-
343
-
344
-
345
-
346
-
347
-
348
-
349
-
350
-
351
-
352
-
353
-
354
-
355
-
356
-
357
-
358
-
359
-
360
-
361
 |
 |