Brother International PEDESIGN 7.0 Users Manual - English - Page 83
Creating a portrait image
 |
View all Brother International PEDESIGN 7.0 manuals
Add to My Manuals
Save this manual to your list of manuals |
Page 83 highlights
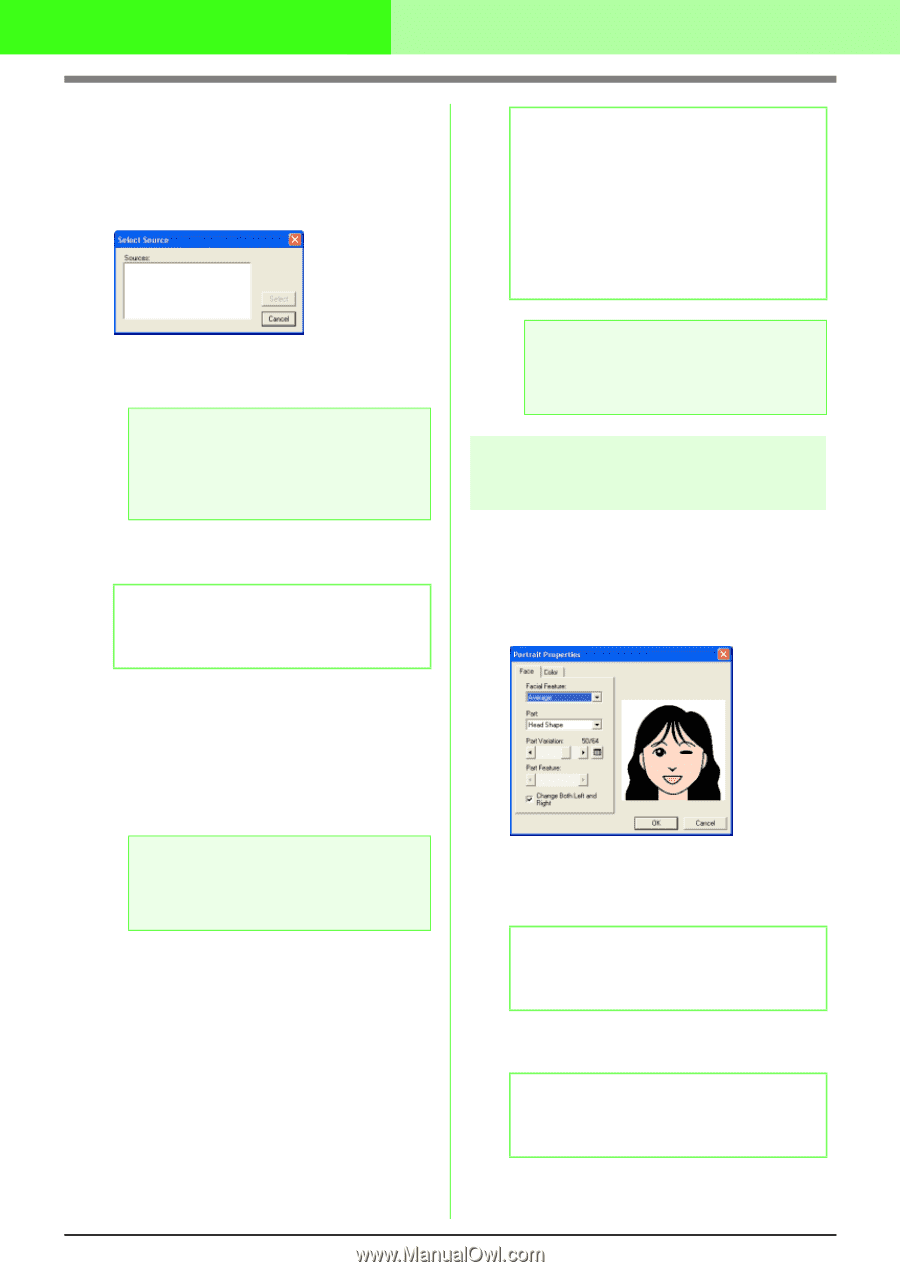
Automatically Converting an Image to an Embroidery Pattern (Layout & Editing/Image to Stitch Wizard) 1. Check that the scanner or other TWAIN device is correctly connected to your computer. 2. Click Image, then Select TWAIN device. → A Select Source dialog box similar to the one shown below appears. b Memo: • If the image currently displayed in the Design Page has not yet been saved, you will be asked whether you want to save it. • To display, hide, or display a faded copy of the image that remains in the work area, click Image, then Display Image, and then click the desired display setting. • To hide the original image, click Off. 3. From the Sources list, click the desired device to select it. a Note: If no TWAIN device is installed, there will be no names displayed in the Sources list. First, install the driver software for the TWAIN device that you want to use. 4. Click Select to choose the selected device and to close the dialog box. b Memo: To quit the operation and close the dialog box, click Cancel. 5. Click Image, then Input, then from TWAIN device. → The driver interface for the device selected in the Select Source dialog box appears. 6. Specify the necessary settings for importing an image, and then import the image. a Note: For information on using the driver interface, refer to the help manual for that interface, or contact the manufacturer of the interface. → When the image transfer between the scanner (or other device) and the driver is completed, the imported image will be pasted into the Design Page at its original size. 77 a Note: Only one image can be added to the work area. If you try to display a different image, it will replace the previous one. Creating a portrait image Combine images of facial features provided with the application to create an original portrait image. 1. Click Image, then Input, then from Portrait. → The Portrait Properties dialog box appears. 2. From the Facial Feature selector, select the overall contour (appearance) of the portrait (for example, narrow, wide, or child-like) b Memo: The preview area shows the setting changes that you make. 3. From the Part selector, select the part of the portrait to be changed. b Memo: The part of the portrait to be changed can also be selected by clicking it in the preview area. 4. Move the Part Variation slider to select the desired part variation.
-
 1
1 -
2
-
3
-
4
-
5
-
6
-
7
-
8
-
9
-
10
-
11
-
12
-
13
-
14
-
15
-
16
-
17
-
18
-
19
-
20
-
21
-
22
-
23
-
24
-
25
-
26
-
27
-
28
-
29
-
30
-
31
-
32
-
33
-
34
-
35
-
36
-
37
-
38
-
39
-
40
-
41
-
42
-
43
-
44
-
45
-
46
-
47
-
48
-
49
-
50
-
51
-
52
-
53
-
54
-
55
-
56
-
57
-
58
-
59
-
60
-
61
-
62
-
63
-
64
-
65
-
66
-
67
-
68
-
69
-
70
-
71
-
72
-
73
-
74
-
75
-
76
-
77
-
 78
78 -
 79
79 -
 80
80 -
 81
81 -
 82
82 -
 83
83 -
 84
84 -
 85
85 -
 86
86 -
 87
87 -
 88
88 -
89
-
90
-
91
-
92
-
93
-
94
-
95
-
96
-
97
-
98
-
99
-
100
-
101
-
102
-
103
-
104
-
105
-
106
-
107
-
108
-
109
-
110
-
111
-
112
-
113
-
114
-
115
-
116
-
117
-
118
-
119
-
120
-
121
-
122
-
123
-
124
-
125
-
126
-
127
-
128
-
129
-
130
-
131
-
132
-
133
-
134
-
135
-
136
-
137
-
138
-
139
-
140
-
141
-
142
-
143
-
144
-
145
-
146
-
147
-
148
-
149
-
150
-
151
-
152
-
153
-
154
-
155
-
156
-
157
-
158
-
159
-
160
-
161
-
162
-
163
-
164
-
165
-
166
-
167
-
168
-
169
-
170
-
171
-
172
-
173
-
174
-
175
-
176
-
177
-
178
-
179
-
180
-
181
-
182
-
183
-
184
-
185
-
186
-
187
-
188
-
189
-
190
-
191
-
192
-
193
-
194
-
195
-
196
-
197
-
198
-
199
-
200
-
201
-
202
-
203
-
204
-
205
-
206
-
207
-
208
-
209
-
210
-
211
-
212
-
213
-
214
-
215
-
216
-
217
-
218
-
219
-
220
-
221
-
222
-
223
-
224
-
225
-
226
-
227
-
228
-
229
-
230
-
231
-
232
-
233
-
234
-
235
-
236
-
237
-
238
-
239
-
240
-
241
-
242
-
243
-
244
-
245
-
246
-
247
-
248
-
249
-
250
-
251
-
252
-
253
-
254
-
255
-
256
-
257
-
258
-
259
-
260
-
261
-
262
-
263
-
264
-
265
-
266
-
267
-
268
-
269
-
270
-
271
-
272
-
273
-
274
-
275
-
276
-
277
-
278
-
279
-
280
-
281
-
282
-
283
-
284
-
285
-
286
-
287
-
288
-
289
-
290
-
291
-
292
-
293
-
294
-
295
-
296
-
297
-
298
-
299
-
300
-
301
-
302
-
303
-
304
-
305
-
306
-
307
-
308
-
309
-
310
-
311
-
312
-
313
-
314
-
315
-
316
-
317
-
318
-
319
-
320
-
321
-
322
-
323
-
324
-
325
-
326
-
327
-
328
-
329
-
330
-
331
-
332
-
333
-
334
-
335
-
336
-
337
-
338
-
339
-
340
-
341
-
342
-
343
-
344
-
345
-
346
-
347
-
348
-
349
-
350
-
351
-
352
-
353
-
354
-
355
-
356
-
357
-
358
-
359
-
360
-
361
 |
 |