Brother International PEDESIGN 7.0 Users Manual - English - Page 212
Drawing a broken line
 |
View all Brother International PEDESIGN 7.0 manuals
Add to My Manuals
Save this manual to your list of manuals |
Page 212 highlights
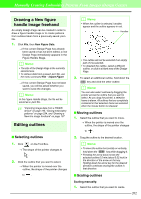
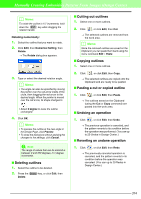
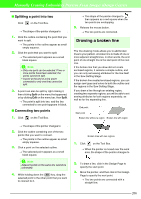
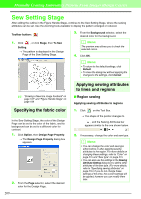
Manually Creating Embroidery Patterns From Images (Design Center) I Splitting a point into two Click on the Tool Box. → The shape of the pointer changes to . 1. Click the outline containing the point that you want to split. → The points in the outline appear as small empty squares. 2. Click the point that you want to split. → The selected point appears as a small black square. a Note: • Only one point can be selected. If two or more points have been selected, the points cannot be split. • A point at the end of a line (point connected to only one line) cannot be split. 3. A point can also be split by right-clicking it, then clicking Split on the menu that appeared, or by clicking Edit on the menu bar, then Split. → The point is split into two, and the line connected to one point appears in black. I Connecting two points 1. Click on the Tool Box. → The shape of the pointer changes to , then appears as a red square when the two points are overlapping. 5. Release the mouse button. → The two points are connected. Drawing a broken line The line drawing mode allows you to add broken lines to your pattern. A broken line is made of one or more adjacent straight lines, in other words, the end point of one straight line is the start point of the next one. If the broken line that you draw did not create enclosed regions, it remains a simple outline, and you can only set sewing attributes for the line itself in the Sew Setting Stage. If the broken line created enclosed regions, you can assign sew types and colors to both the outline and the regions in the Sew Setting Stage. If you draw a line through an existing region, creating two separate regions, you will be able to set sewing attributes for both regions separately, as well as for the separating line. End point Start point Broken line without a region Broken line with region → The shape of the pointer changes to . 2. Click the outline containing one of the two points that you want to connect. → The points in the outline appear as small empty squares. 3. Click a point on the selected outline. → The selected point appears as a small black square. a Note: Adjacent points on the same line cannot be connected. 4. While holding down the Alt key, drag the selected point to the other point that you want to connect to it. Broken lines with two regions 1. Click on the Tool Box. → When the pointer is moved over the work area, the shape of the pointer changes to . 2. To draw a line, click in the Design Page to specify the start point. 3. Move the pointer, and then click in the Design Page to specify the next point. → The two points are connected with a straight line. 206
-
 1
1 -
2
-
3
-
4
-
5
-
6
-
7
-
8
-
9
-
10
-
11
-
12
-
13
-
14
-
15
-
16
-
17
-
18
-
19
-
20
-
21
-
22
-
23
-
24
-
25
-
26
-
27
-
28
-
29
-
30
-
31
-
32
-
33
-
34
-
35
-
36
-
37
-
38
-
39
-
40
-
41
-
42
-
43
-
44
-
45
-
46
-
47
-
48
-
49
-
50
-
51
-
52
-
53
-
54
-
55
-
56
-
57
-
58
-
59
-
60
-
61
-
62
-
63
-
64
-
65
-
66
-
67
-
68
-
69
-
70
-
71
-
72
-
73
-
74
-
75
-
76
-
77
-
78
-
79
-
80
-
81
-
82
-
83
-
84
-
85
-
86
-
87
-
88
-
89
-
90
-
91
-
92
-
93
-
94
-
95
-
96
-
97
-
98
-
99
-
100
-
101
-
102
-
103
-
104
-
105
-
106
-
107
-
108
-
109
-
110
-
111
-
112
-
113
-
114
-
115
-
116
-
117
-
118
-
119
-
120
-
121
-
122
-
123
-
124
-
125
-
126
-
127
-
128
-
129
-
130
-
131
-
132
-
133
-
134
-
135
-
136
-
137
-
138
-
139
-
140
-
141
-
142
-
143
-
144
-
145
-
146
-
147
-
148
-
149
-
150
-
151
-
152
-
153
-
154
-
155
-
156
-
157
-
158
-
159
-
160
-
161
-
162
-
163
-
164
-
165
-
166
-
167
-
168
-
169
-
170
-
171
-
172
-
173
-
174
-
175
-
176
-
177
-
178
-
179
-
180
-
181
-
182
-
183
-
184
-
185
-
186
-
187
-
188
-
189
-
190
-
191
-
192
-
193
-
194
-
195
-
196
-
197
-
198
-
199
-
200
-
201
-
202
-
203
-
204
-
205
-
206
-
 207
207 -
 208
208 -
 209
209 -
 210
210 -
 211
211 -
 212
212 -
 213
213 -
 214
214 -
 215
215 -
 216
216 -
 217
217 -
218
-
219
-
220
-
221
-
222
-
223
-
224
-
225
-
226
-
227
-
228
-
229
-
230
-
231
-
232
-
233
-
234
-
235
-
236
-
237
-
238
-
239
-
240
-
241
-
242
-
243
-
244
-
245
-
246
-
247
-
248
-
249
-
250
-
251
-
252
-
253
-
254
-
255
-
256
-
257
-
258
-
259
-
260
-
261
-
262
-
263
-
264
-
265
-
266
-
267
-
268
-
269
-
270
-
271
-
272
-
273
-
274
-
275
-
276
-
277
-
278
-
279
-
280
-
281
-
282
-
283
-
284
-
285
-
286
-
287
-
288
-
289
-
290
-
291
-
292
-
293
-
294
-
295
-
296
-
297
-
298
-
299
-
300
-
301
-
302
-
303
-
304
-
305
-
306
-
307
-
308
-
309
-
310
-
311
-
312
-
313
-
314
-
315
-
316
-
317
-
318
-
319
-
320
-
321
-
322
-
323
-
324
-
325
-
326
-
327
-
328
-
329
-
330
-
331
-
332
-
333
-
334
-
335
-
336
-
337
-
338
-
339
-
340
-
341
-
342
-
343
-
344
-
345
-
346
-
347
-
348
-
349
-
350
-
351
-
352
-
353
-
354
-
355
-
356
-
357
-
358
-
359
-
360
-
361
 |
 |