Brother International PEDESIGN 7.0 Users Manual - English - Page 125
Drawing a fan shape
 |
View all Brother International PEDESIGN 7.0 manuals
Add to My Manuals
Save this manual to your list of manuals |
Page 125 highlights
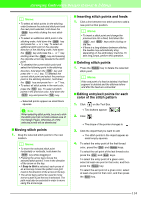
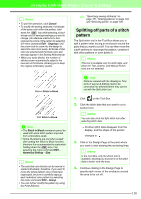
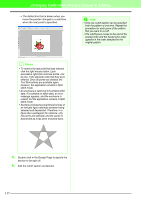
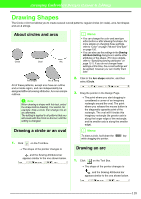
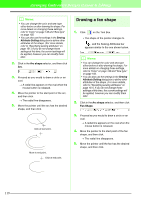
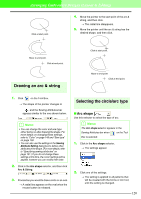
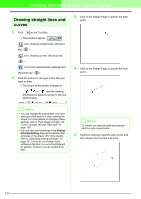
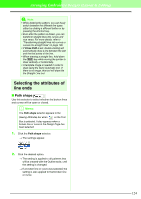
Arranging Embroidery Designs (Layout & Editing) b Memo: • You can change the color and sew type either before or after drawing the shape. For more details on changing these settings, refer to "Color" on page 149 and "Sew type" on page 150. • You can also use the settings in the Sewing Attribute Setting dialog box to define other attributes of the shape. (For more details, refer to "Specifying sewing attributes" on page 151.) If you do not change these settings at this time, the current settings will be applied, however you can modify them later. 2. Click in the Arc shape selector, and then click Arc. 3. Proceed as you would to draw a circle or an oval. → A radial line appears on the oval when the mouse button is released. 4. Move the pointer to the start point of the arc, and then click. → The radial line disappears. 5. Move the pointer until the arc has the desired shape, and then click. Click at start point. Move to end point. Click at end point. Drawing a fan shape 1. Click on the Tool Box. → The shape of the pointer changes to , and the Sewing Attributes bar appears similar to the one shown below. b Memo: • You can change the color and sew type either before or after drawing the shape. For more details on changing these settings, refer to "Color" on page 149 and "Sew type" on page 150. • You can also use the settings in the Sewing Attribute Setting dialog box to define other attributes of the shape. (For more details, refer to "Specifying sewing attributes" on page 151.) If you do not change these settings at this time, the current settings will be applied, however you can modify them later. 2. Click in the Arc shape selector, and then click Fan Shape. 3. Proceed as you would to draw a circle or an oval. → A radial line appears on the oval when the mouse button is released. 4. Move the pointer to the start point of the fan shape, and then click. → The radial line disappears. 5. Move the pointer until the fan has the desired shape, and then click. 119
-
 1
1 -
2
-
3
-
4
-
5
-
6
-
7
-
8
-
9
-
10
-
11
-
12
-
13
-
14
-
15
-
16
-
17
-
18
-
19
-
20
-
21
-
22
-
23
-
24
-
25
-
26
-
27
-
28
-
29
-
30
-
31
-
32
-
33
-
34
-
35
-
36
-
37
-
38
-
39
-
40
-
41
-
42
-
43
-
44
-
45
-
46
-
47
-
48
-
49
-
50
-
51
-
52
-
53
-
54
-
55
-
56
-
57
-
58
-
59
-
60
-
61
-
62
-
63
-
64
-
65
-
66
-
67
-
68
-
69
-
70
-
71
-
72
-
73
-
74
-
75
-
76
-
77
-
78
-
79
-
80
-
81
-
82
-
83
-
84
-
85
-
86
-
87
-
88
-
89
-
90
-
91
-
92
-
93
-
94
-
95
-
96
-
97
-
98
-
99
-
100
-
101
-
102
-
103
-
104
-
105
-
106
-
107
-
108
-
109
-
110
-
111
-
112
-
113
-
114
-
115
-
116
-
117
-
118
-
119
-
 120
120 -
 121
121 -
 122
122 -
 123
123 -
 124
124 -
 125
125 -
 126
126 -
 127
127 -
 128
128 -
 129
129 -
 130
130 -
131
-
132
-
133
-
134
-
135
-
136
-
137
-
138
-
139
-
140
-
141
-
142
-
143
-
144
-
145
-
146
-
147
-
148
-
149
-
150
-
151
-
152
-
153
-
154
-
155
-
156
-
157
-
158
-
159
-
160
-
161
-
162
-
163
-
164
-
165
-
166
-
167
-
168
-
169
-
170
-
171
-
172
-
173
-
174
-
175
-
176
-
177
-
178
-
179
-
180
-
181
-
182
-
183
-
184
-
185
-
186
-
187
-
188
-
189
-
190
-
191
-
192
-
193
-
194
-
195
-
196
-
197
-
198
-
199
-
200
-
201
-
202
-
203
-
204
-
205
-
206
-
207
-
208
-
209
-
210
-
211
-
212
-
213
-
214
-
215
-
216
-
217
-
218
-
219
-
220
-
221
-
222
-
223
-
224
-
225
-
226
-
227
-
228
-
229
-
230
-
231
-
232
-
233
-
234
-
235
-
236
-
237
-
238
-
239
-
240
-
241
-
242
-
243
-
244
-
245
-
246
-
247
-
248
-
249
-
250
-
251
-
252
-
253
-
254
-
255
-
256
-
257
-
258
-
259
-
260
-
261
-
262
-
263
-
264
-
265
-
266
-
267
-
268
-
269
-
270
-
271
-
272
-
273
-
274
-
275
-
276
-
277
-
278
-
279
-
280
-
281
-
282
-
283
-
284
-
285
-
286
-
287
-
288
-
289
-
290
-
291
-
292
-
293
-
294
-
295
-
296
-
297
-
298
-
299
-
300
-
301
-
302
-
303
-
304
-
305
-
306
-
307
-
308
-
309
-
310
-
311
-
312
-
313
-
314
-
315
-
316
-
317
-
318
-
319
-
320
-
321
-
322
-
323
-
324
-
325
-
326
-
327
-
328
-
329
-
330
-
331
-
332
-
333
-
334
-
335
-
336
-
337
-
338
-
339
-
340
-
341
-
342
-
343
-
344
-
345
-
346
-
347
-
348
-
349
-
350
-
351
-
352
-
353
-
354
-
355
-
356
-
357
-
358
-
359
-
360
-
361
 |
 |