Brother International PEDESIGN 7.0 Users Manual - English - Page 275
Creating a Motif Stitch Pattern Motif Mode
 |
View all Brother International PEDESIGN 7.0 manuals
Add to My Manuals
Save this manual to your list of manuals |
Page 275 highlights
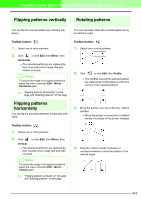
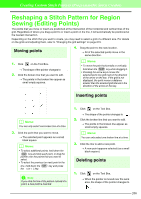
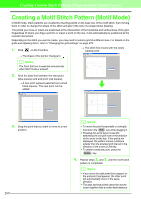
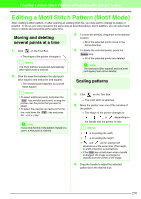
Creating Custom Stitch Patterns (Programmable Stitch Creator) Creating a Motif Stitch Pattern (Motif Mode) In Motif mode, stitch patterns are created by inserting points on the base line of the motif stitch, then moving them in order to change the shape of the stitch and give it the look of a single-stroke drawing. The points you move or insert are positioned at the intersection of the horizontal and vertical lines of the grid. Regardless of where you drag a point to or insert a point on the line, it will automatically be positioned at the nearest intersection. Depending on the stitch you want to create, you may need to select a grid of a different size. For details on the grids and adjusting them, refer to "Changing the grid settings" on page 273. 1. Click on the Tool Box. → The stitch line moves with the newly created point. → The shape of the pointer changes to . b Memo: The Point Edit tool is selected automatically when Motif mode is entered. 2. Click the base line between the start point (blue square) and end point (red square). → A new point appears selected (as a small black square). The new point can be edited. 3. Drag the point that you want to move to a new position. 269 b Memo: • To move the point horizontally or vertically, hold down the Shift key while dragging it. • Pressing the arrow keys moves the selected point one grid mark in the direction of the arrow on the key. If the grid is not displayed, the pattern moves a distance smaller than the smallest grid interval in the direction of the arrow on the key. • To delete a selected point, press the Delete key. 4. Repeat steps 2. and 3. until the motif stitch pattern is completed. b Memo: • If you move the start point (blue square) or the end point (red square), the other point will automatically move in the same direction. • The start and end points cannot be moved closer together than a certain fixed distance.
-
 1
1 -
2
-
3
-
4
-
5
-
6
-
7
-
8
-
9
-
10
-
11
-
12
-
13
-
14
-
15
-
16
-
17
-
18
-
19
-
20
-
21
-
22
-
23
-
24
-
25
-
26
-
27
-
28
-
29
-
30
-
31
-
32
-
33
-
34
-
35
-
36
-
37
-
38
-
39
-
40
-
41
-
42
-
43
-
44
-
45
-
46
-
47
-
48
-
49
-
50
-
51
-
52
-
53
-
54
-
55
-
56
-
57
-
58
-
59
-
60
-
61
-
62
-
63
-
64
-
65
-
66
-
67
-
68
-
69
-
70
-
71
-
72
-
73
-
74
-
75
-
76
-
77
-
78
-
79
-
80
-
81
-
82
-
83
-
84
-
85
-
86
-
87
-
88
-
89
-
90
-
91
-
92
-
93
-
94
-
95
-
96
-
97
-
98
-
99
-
100
-
101
-
102
-
103
-
104
-
105
-
106
-
107
-
108
-
109
-
110
-
111
-
112
-
113
-
114
-
115
-
116
-
117
-
118
-
119
-
120
-
121
-
122
-
123
-
124
-
125
-
126
-
127
-
128
-
129
-
130
-
131
-
132
-
133
-
134
-
135
-
136
-
137
-
138
-
139
-
140
-
141
-
142
-
143
-
144
-
145
-
146
-
147
-
148
-
149
-
150
-
151
-
152
-
153
-
154
-
155
-
156
-
157
-
158
-
159
-
160
-
161
-
162
-
163
-
164
-
165
-
166
-
167
-
168
-
169
-
170
-
171
-
172
-
173
-
174
-
175
-
176
-
177
-
178
-
179
-
180
-
181
-
182
-
183
-
184
-
185
-
186
-
187
-
188
-
189
-
190
-
191
-
192
-
193
-
194
-
195
-
196
-
197
-
198
-
199
-
200
-
201
-
202
-
203
-
204
-
205
-
206
-
207
-
208
-
209
-
210
-
211
-
212
-
213
-
214
-
215
-
216
-
217
-
218
-
219
-
220
-
221
-
222
-
223
-
224
-
225
-
226
-
227
-
228
-
229
-
230
-
231
-
232
-
233
-
234
-
235
-
236
-
237
-
238
-
239
-
240
-
241
-
242
-
243
-
244
-
245
-
246
-
247
-
248
-
249
-
250
-
251
-
252
-
253
-
254
-
255
-
256
-
257
-
258
-
259
-
260
-
261
-
262
-
263
-
264
-
265
-
266
-
267
-
268
-
269
-
 270
270 -
 271
271 -
 272
272 -
 273
273 -
 274
274 -
 275
275 -
 276
276 -
 277
277 -
 278
278 -
 279
279 -
 280
280 -
281
-
282
-
283
-
284
-
285
-
286
-
287
-
288
-
289
-
290
-
291
-
292
-
293
-
294
-
295
-
296
-
297
-
298
-
299
-
300
-
301
-
302
-
303
-
304
-
305
-
306
-
307
-
308
-
309
-
310
-
311
-
312
-
313
-
314
-
315
-
316
-
317
-
318
-
319
-
320
-
321
-
322
-
323
-
324
-
325
-
326
-
327
-
328
-
329
-
330
-
331
-
332
-
333
-
334
-
335
-
336
-
337
-
338
-
339
-
340
-
341
-
342
-
343
-
344
-
345
-
346
-
347
-
348
-
349
-
350
-
351
-
352
-
353
-
354
-
355
-
356
-
357
-
358
-
359
-
360
-
361
 |
 |
