Brother International PEDESIGN 7.0 Users Manual - English - Page 96
Previous, Cancel
 |
View all Brother International PEDESIGN 7.0 manuals
Add to My Manuals
Save this manual to your list of manuals |
Page 96 highlights
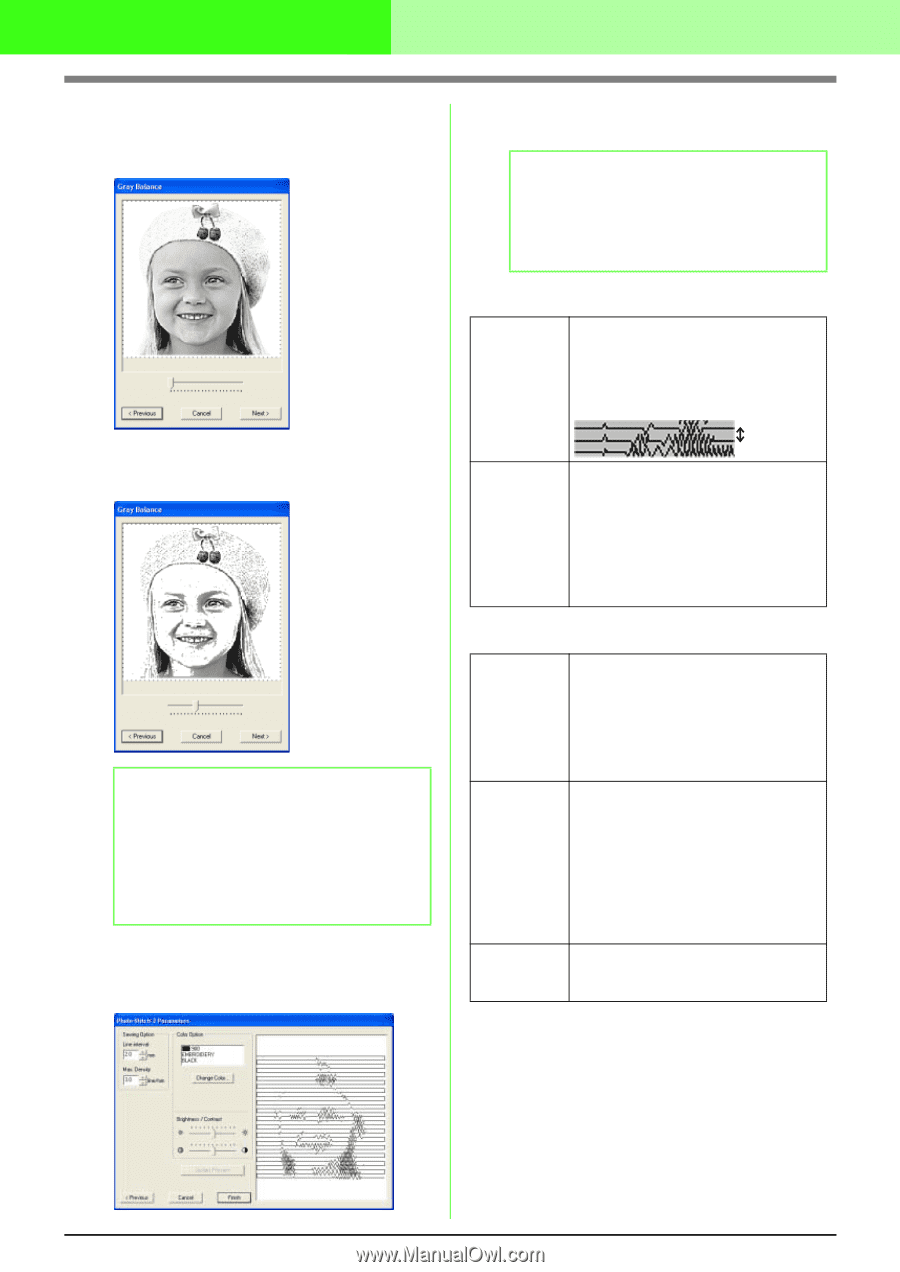
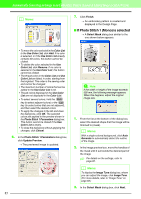
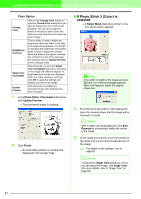
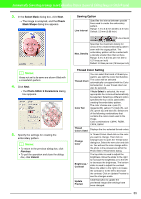
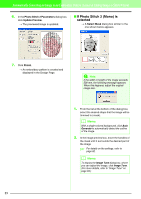
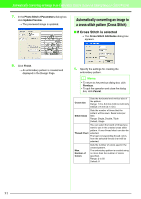
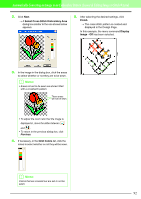
Automatically Converting an Image to an Embroidery Pattern (Layout & Editing/Image to Stitch Wizard) 3. In the Select Mask dialog box, click Next. → A Gray Balance dialog box similar to the one shown below appears. 4. Move the slider to specify which parts of the image to create the embroidery pattern for. b Memo: • An embroidery pattern will be created from any areas remaining in black. • To return to the previous dialog box, click Previous. • To quit the operation and close the dialog box, click Cancel. 5. In the Gray Balance dialog box, click Next. → The Photo Stitch 2 Parameters dialog box appears. 6. Specify the settings for creating the embroidery pattern. b Memo: • To return to the previous dialog box, click Previous. • To quit the operation and close the dialog box, click Cancel. Sewing Option Line interval Specifies the interval between parallel lines used to create the embroidery pattern. Range: 1.2 to 5.0 mm (0.05 to 0.2 inch) Default: 2.0 mm (0.08 inch) Line interval Max. Density Specifies the maximum density for areas of the created embroidery pattern sewn with the zigzag stitch. The embroidery pattern will be created with a density smaller than that set here. Range: 2.5 to 5.0 lines per mm (64 to 127 lines per inch) Default: 3.0 lines per mm (76 lines per inch) Color Option Change Color Click on the Change Color button to open the Thread Color dialog box if you wish to change the color of the photo stitching. You can also change the brand of thread you wish to sew with. Select the color and click ok to make the color change. Brightness / Contrast Update Preview The top slider is used to adjust the brightness. Move the slider to the right to increase the brightness or to the left to decrease the brightness. The bottom slider is used to adjust the contrast. Move the slider to the right to increase the contrast or to the left to decrease the contrast. Click on Update Preview to see the changes made. Click this button to update the previewed image after settings have been changed. 90
-
 1
1 -
2
-
3
-
4
-
5
-
6
-
7
-
8
-
9
-
10
-
11
-
12
-
13
-
14
-
15
-
16
-
17
-
18
-
19
-
20
-
21
-
22
-
23
-
24
-
25
-
26
-
27
-
28
-
29
-
30
-
31
-
32
-
33
-
34
-
35
-
36
-
37
-
38
-
39
-
40
-
41
-
42
-
43
-
44
-
45
-
46
-
47
-
48
-
49
-
50
-
51
-
52
-
53
-
54
-
55
-
56
-
57
-
58
-
59
-
60
-
61
-
62
-
63
-
64
-
65
-
66
-
67
-
68
-
69
-
70
-
71
-
72
-
73
-
74
-
75
-
76
-
77
-
78
-
79
-
80
-
81
-
82
-
83
-
84
-
85
-
86
-
87
-
88
-
89
-
90
-
 91
91 -
 92
92 -
 93
93 -
 94
94 -
 95
95 -
 96
96 -
 97
97 -
 98
98 -
 99
99 -
 100
100 -
 101
101 -
102
-
103
-
104
-
105
-
106
-
107
-
108
-
109
-
110
-
111
-
112
-
113
-
114
-
115
-
116
-
117
-
118
-
119
-
120
-
121
-
122
-
123
-
124
-
125
-
126
-
127
-
128
-
129
-
130
-
131
-
132
-
133
-
134
-
135
-
136
-
137
-
138
-
139
-
140
-
141
-
142
-
143
-
144
-
145
-
146
-
147
-
148
-
149
-
150
-
151
-
152
-
153
-
154
-
155
-
156
-
157
-
158
-
159
-
160
-
161
-
162
-
163
-
164
-
165
-
166
-
167
-
168
-
169
-
170
-
171
-
172
-
173
-
174
-
175
-
176
-
177
-
178
-
179
-
180
-
181
-
182
-
183
-
184
-
185
-
186
-
187
-
188
-
189
-
190
-
191
-
192
-
193
-
194
-
195
-
196
-
197
-
198
-
199
-
200
-
201
-
202
-
203
-
204
-
205
-
206
-
207
-
208
-
209
-
210
-
211
-
212
-
213
-
214
-
215
-
216
-
217
-
218
-
219
-
220
-
221
-
222
-
223
-
224
-
225
-
226
-
227
-
228
-
229
-
230
-
231
-
232
-
233
-
234
-
235
-
236
-
237
-
238
-
239
-
240
-
241
-
242
-
243
-
244
-
245
-
246
-
247
-
248
-
249
-
250
-
251
-
252
-
253
-
254
-
255
-
256
-
257
-
258
-
259
-
260
-
261
-
262
-
263
-
264
-
265
-
266
-
267
-
268
-
269
-
270
-
271
-
272
-
273
-
274
-
275
-
276
-
277
-
278
-
279
-
280
-
281
-
282
-
283
-
284
-
285
-
286
-
287
-
288
-
289
-
290
-
291
-
292
-
293
-
294
-
295
-
296
-
297
-
298
-
299
-
300
-
301
-
302
-
303
-
304
-
305
-
306
-
307
-
308
-
309
-
310
-
311
-
312
-
313
-
314
-
315
-
316
-
317
-
318
-
319
-
320
-
321
-
322
-
323
-
324
-
325
-
326
-
327
-
328
-
329
-
330
-
331
-
332
-
333
-
334
-
335
-
336
-
337
-
338
-
339
-
340
-
341
-
342
-
343
-
344
-
345
-
346
-
347
-
348
-
349
-
350
-
351
-
352
-
353
-
354
-
355
-
356
-
357
-
358
-
359
-
360
-
361
 |
 |