Brother International PEDESIGN 7.0 Users Manual - English - Page 238
Display, Realistic Preview, Attribute Setting, Realistic Preview Attribute, Thread Width, Contrast,
 |
View all Brother International PEDESIGN 7.0 manuals
Add to My Manuals
Save this manual to your list of manuals |
Page 238 highlights
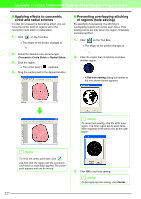
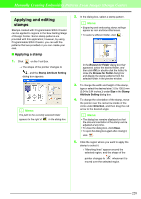
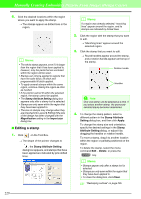
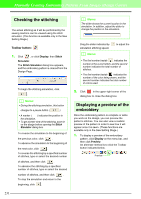
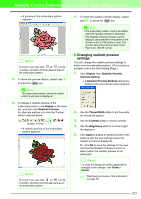
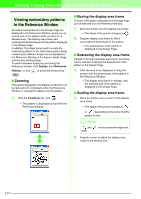
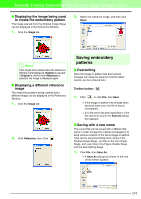
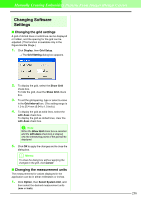
Manually Creating Embroidery Patterns From Images (Design Center) → A preview of the embroidery pattern appears. b Memo: To zoom in (or out), click (or ) on the Tool Box, and then click the desired area of the embroidery pattern. 2. To leave the preview display, repeat step 1., or press the Esc key. a Note: The embroidery pattern cannot be edited while the preview is displayed. 3. To display a realistic preview of the embroidery pattern, click Display on the menu bar, and then click Realistic Preview. An alternate method is to click the Toolbar button indicated below. Realistic Preview → A realistic preview of the embroidery pattern appears. b Memo: To zoom in (or out), click (or ) on the Tool Box, and then click the desired area of the embroidery pattern. 4. To leave the realistic preview display, repeat step 3., or press the Esc key. a Note: • The embroidery pattern cannot be edited while the realistic preview is displayed. • The Realistic Preview function cannot display a clean preview of the pattern if the monitor is set to 256 colors or less. The monitor should be set to at least 16-bit High Color (65536 colors). I Changing realistic preview settings You can change the realistic preview settings to better view the embroidery pattern. (This function is available only in the Sew Setting Stage.) 1. Click Display, then Realistic Preview Attribute Setting. → A Realistic Preview Attribute dialog box similar to the ones shown below appears. 2. Use the Thread Width slider to set how wide the thread will appear. 3. Use the Contrast slider to set the contrast. 4. Use the Brightness slider to set how bright the display is. 5. Click Apply to display a realistic preview of the patterns with the new settings (when the realistic preview is displayed). Or, click OK to save the settings for the next time that the Realistic Preview function is select (when the realistic preview is not displayed). b Memo: To close the dialog box without applying the changes to the settings, click Close or Cancel. c "Displaying a preview of the embroidery" on page 231 232
-
 1
1 -
2
-
3
-
4
-
5
-
6
-
7
-
8
-
9
-
10
-
11
-
12
-
13
-
14
-
15
-
16
-
17
-
18
-
19
-
20
-
21
-
22
-
23
-
24
-
25
-
26
-
27
-
28
-
29
-
30
-
31
-
32
-
33
-
34
-
35
-
36
-
37
-
38
-
39
-
40
-
41
-
42
-
43
-
44
-
45
-
46
-
47
-
48
-
49
-
50
-
51
-
52
-
53
-
54
-
55
-
56
-
57
-
58
-
59
-
60
-
61
-
62
-
63
-
64
-
65
-
66
-
67
-
68
-
69
-
70
-
71
-
72
-
73
-
74
-
75
-
76
-
77
-
78
-
79
-
80
-
81
-
82
-
83
-
84
-
85
-
86
-
87
-
88
-
89
-
90
-
91
-
92
-
93
-
94
-
95
-
96
-
97
-
98
-
99
-
100
-
101
-
102
-
103
-
104
-
105
-
106
-
107
-
108
-
109
-
110
-
111
-
112
-
113
-
114
-
115
-
116
-
117
-
118
-
119
-
120
-
121
-
122
-
123
-
124
-
125
-
126
-
127
-
128
-
129
-
130
-
131
-
132
-
133
-
134
-
135
-
136
-
137
-
138
-
139
-
140
-
141
-
142
-
143
-
144
-
145
-
146
-
147
-
148
-
149
-
150
-
151
-
152
-
153
-
154
-
155
-
156
-
157
-
158
-
159
-
160
-
161
-
162
-
163
-
164
-
165
-
166
-
167
-
168
-
169
-
170
-
171
-
172
-
173
-
174
-
175
-
176
-
177
-
178
-
179
-
180
-
181
-
182
-
183
-
184
-
185
-
186
-
187
-
188
-
189
-
190
-
191
-
192
-
193
-
194
-
195
-
196
-
197
-
198
-
199
-
200
-
201
-
202
-
203
-
204
-
205
-
206
-
207
-
208
-
209
-
210
-
211
-
212
-
213
-
214
-
215
-
216
-
217
-
218
-
219
-
220
-
221
-
222
-
223
-
224
-
225
-
226
-
227
-
228
-
229
-
230
-
231
-
232
-
 233
233 -
 234
234 -
 235
235 -
 236
236 -
 237
237 -
 238
238 -
 239
239 -
 240
240 -
 241
241 -
 242
242 -
 243
243 -
244
-
245
-
246
-
247
-
248
-
249
-
250
-
251
-
252
-
253
-
254
-
255
-
256
-
257
-
258
-
259
-
260
-
261
-
262
-
263
-
264
-
265
-
266
-
267
-
268
-
269
-
270
-
271
-
272
-
273
-
274
-
275
-
276
-
277
-
278
-
279
-
280
-
281
-
282
-
283
-
284
-
285
-
286
-
287
-
288
-
289
-
290
-
291
-
292
-
293
-
294
-
295
-
296
-
297
-
298
-
299
-
300
-
301
-
302
-
303
-
304
-
305
-
306
-
307
-
308
-
309
-
310
-
311
-
312
-
313
-
314
-
315
-
316
-
317
-
318
-
319
-
320
-
321
-
322
-
323
-
324
-
325
-
326
-
327
-
328
-
329
-
330
-
331
-
332
-
333
-
334
-
335
-
336
-
337
-
338
-
339
-
340
-
341
-
342
-
343
-
344
-
345
-
346
-
347
-
348
-
349
-
350
-
351
-
352
-
353
-
354
-
355
-
356
-
357
-
358
-
359
-
360
-
361
 |
 |
