Brother International PEDESIGN 7.0 Users Manual - English - Page 216
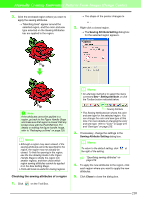
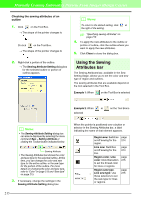
Checking the sewing attributes of a region
 |
View all Brother International PEDESIGN 7.0 manuals
Add to My Manuals
Save this manual to your list of manuals |
Page 216 highlights
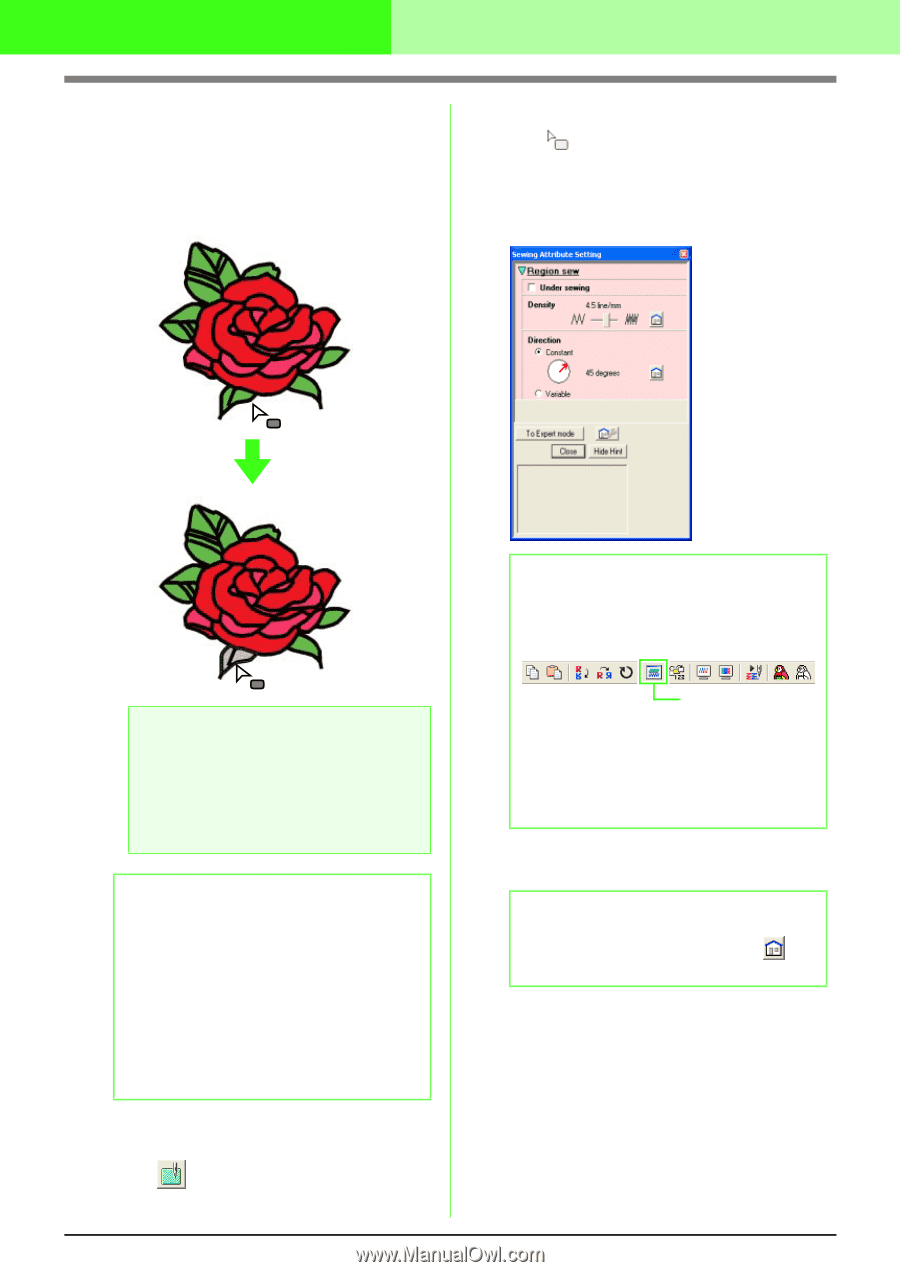
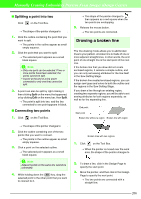
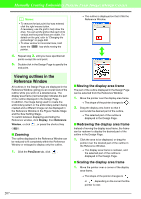
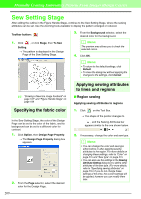
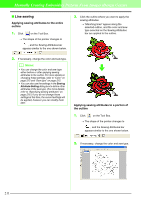
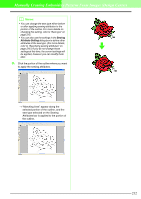
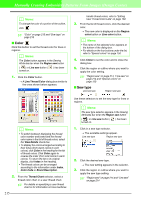
Manually Creating Embroidery Patterns From Images (Design Center) 3. Click the enclosed region where you want to apply the sewing attributes. → "Marching lines" appear around the selected region, and the color and sew type selected on the Sewing Attributes bar are applied to the region. → The shape of the pointer changes to . 2. Right-click a closed region. → The Sewing Attribute Setting dialog box for the selected region appears. b Memo: • An alternate method is to select the menu command Sew - Setting Attribute, or click the Toolbar button indicated below. a Note: If the attributes cannot be applied to a region, go back to the Figure Handle Stage and make sure that region is closed. Edit any broken lines with the Point Edit tool. For details on editing the figure handle image, refer to "Reshaping outlines" on page 205. b Memo: • Although a region may seem closed, if the sewing attributes cannot be specified for the region, the region may not actually be closed. To find the opening in the region, use the line drawing mode in the Figure Handle Stage to divide the region into smaller regions, and then check which region sewing attributes cannot be applied to in the Sew Setting Stage. • Point edit mode is useful for closing regions. Checking the sewing attributes of a region 1. Click on the Tool Box. Sewing Attribute • The Sewing Attributes bar shows the color and sew type for the selected region. You can change the color and sew type at this time. For more details on changing the color and sew type, refer to "Color" on page 215 and "Sew type" on page 215. 3. If necessary, change the settings in the Sewing Attribute Setting dialog box. b Memo: To return to the default setting, click at the right of the setting. c "Specifying sewing attributes" on page 216 4. To apply the new attributes to the region, click each region where you want to apply the new attributes. 5. Click Close to close the dialog box. 210
-
 1
1 -
2
-
3
-
4
-
5
-
6
-
7
-
8
-
9
-
10
-
11
-
12
-
13
-
14
-
15
-
16
-
17
-
18
-
19
-
20
-
21
-
22
-
23
-
24
-
25
-
26
-
27
-
28
-
29
-
30
-
31
-
32
-
33
-
34
-
35
-
36
-
37
-
38
-
39
-
40
-
41
-
42
-
43
-
44
-
45
-
46
-
47
-
48
-
49
-
50
-
51
-
52
-
53
-
54
-
55
-
56
-
57
-
58
-
59
-
60
-
61
-
62
-
63
-
64
-
65
-
66
-
67
-
68
-
69
-
70
-
71
-
72
-
73
-
74
-
75
-
76
-
77
-
78
-
79
-
80
-
81
-
82
-
83
-
84
-
85
-
86
-
87
-
88
-
89
-
90
-
91
-
92
-
93
-
94
-
95
-
96
-
97
-
98
-
99
-
100
-
101
-
102
-
103
-
104
-
105
-
106
-
107
-
108
-
109
-
110
-
111
-
112
-
113
-
114
-
115
-
116
-
117
-
118
-
119
-
120
-
121
-
122
-
123
-
124
-
125
-
126
-
127
-
128
-
129
-
130
-
131
-
132
-
133
-
134
-
135
-
136
-
137
-
138
-
139
-
140
-
141
-
142
-
143
-
144
-
145
-
146
-
147
-
148
-
149
-
150
-
151
-
152
-
153
-
154
-
155
-
156
-
157
-
158
-
159
-
160
-
161
-
162
-
163
-
164
-
165
-
166
-
167
-
168
-
169
-
170
-
171
-
172
-
173
-
174
-
175
-
176
-
177
-
178
-
179
-
180
-
181
-
182
-
183
-
184
-
185
-
186
-
187
-
188
-
189
-
190
-
191
-
192
-
193
-
194
-
195
-
196
-
197
-
198
-
199
-
200
-
201
-
202
-
203
-
204
-
205
-
206
-
207
-
208
-
209
-
210
-
 211
211 -
 212
212 -
 213
213 -
 214
214 -
 215
215 -
 216
216 -
 217
217 -
 218
218 -
 219
219 -
 220
220 -
 221
221 -
222
-
223
-
224
-
225
-
226
-
227
-
228
-
229
-
230
-
231
-
232
-
233
-
234
-
235
-
236
-
237
-
238
-
239
-
240
-
241
-
242
-
243
-
244
-
245
-
246
-
247
-
248
-
249
-
250
-
251
-
252
-
253
-
254
-
255
-
256
-
257
-
258
-
259
-
260
-
261
-
262
-
263
-
264
-
265
-
266
-
267
-
268
-
269
-
270
-
271
-
272
-
273
-
274
-
275
-
276
-
277
-
278
-
279
-
280
-
281
-
282
-
283
-
284
-
285
-
286
-
287
-
288
-
289
-
290
-
291
-
292
-
293
-
294
-
295
-
296
-
297
-
298
-
299
-
300
-
301
-
302
-
303
-
304
-
305
-
306
-
307
-
308
-
309
-
310
-
311
-
312
-
313
-
314
-
315
-
316
-
317
-
318
-
319
-
320
-
321
-
322
-
323
-
324
-
325
-
326
-
327
-
328
-
329
-
330
-
331
-
332
-
333
-
334
-
335
-
336
-
337
-
338
-
339
-
340
-
341
-
342
-
343
-
344
-
345
-
346
-
347
-
348
-
349
-
350
-
351
-
352
-
353
-
354
-
355
-
356
-
357
-
358
-
359
-
360
-
361
 |
 |