Brother International PEDESIGN 7.0 Users Manual - English - Page 155
Color
 |
View all Brother International PEDESIGN 7.0 manuals
Add to My Manuals
Save this manual to your list of manuals |
Page 155 highlights
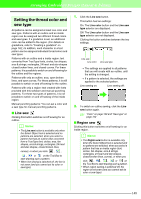
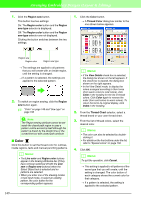
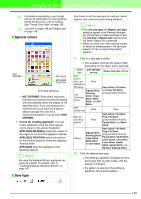
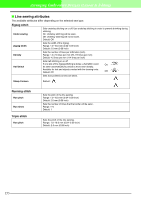
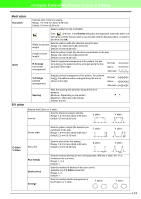
Arranging Embroidery Designs (Layout & Editing) 1. Click the Region sew button. This button has two settings: On: The Region color button and the Region sew type selector is displayed. Off: The Region color button and the Region sew type selector are not displayed. Clicking the button switches between the two settings. 1. Click the Color button. → A Thread Color dialog box similar to the one shown below appears. Region sew Region color Region sew type → The settings are applied to all patterns that you will create with an inside region, until the setting is changed. → If a pattern is selected, the settings are applied to the selected pattern. 2. To switch on region sewing, click the Region sew button again. c "Color" on page 149 and "Sew type" on page 150 a Note: The Region sewing attribute cannot be set inside the closed path region in case a pattern outline across by itself although the pattern is drawn by the straight line or the curved line tool with closed path attribute. I Color Click this button to set the thread color for outlines, inside regions, texts and manual punching patterns. b Memo: • The Line color and Region color buttons appear in the Sewing Attributes bar (if they have not been switched off with the Line sew or Region sew buttons) when the Select Object tool is selected and no patterns are selected. • When you enter one of the drawing modes or text input mode, or select an existing pattern, the color button for the corresponding pattern appears. 149 b Memo: • If the View Details check box is selected, the dialog box shown on the left appears. If the check box is cleared, the dialog box shown on the right appears. • In the View Detail mode, to display the colors arranged according to their tones (from warm colors to cold colors), click Color in the heading for the list of thread colors. Click Color again to reverse the order (from cold colors to warm colors). To return the list to its original display, click Index in the heading. 2. From the Thread Chart selector, select a thread brand or your user thread chart. 3. From the list of thread colors, select the desired color. b Memo: • The color can also be selected by doubleclicking it. • For details on the four buttons under the list, refer to "Special colors" on page 150. 4. Click OK. b Memo: To quit the operation, click Cancel. → This setting is applied to all patterns of the same type that you will create, until the setting is changed. The color button of each category shows the current color for that category. → If a pattern is selected, the setting is applied to the selected pattern.
-
 1
1 -
2
-
3
-
4
-
5
-
6
-
7
-
8
-
9
-
10
-
11
-
12
-
13
-
14
-
15
-
16
-
17
-
18
-
19
-
20
-
21
-
22
-
23
-
24
-
25
-
26
-
27
-
28
-
29
-
30
-
31
-
32
-
33
-
34
-
35
-
36
-
37
-
38
-
39
-
40
-
41
-
42
-
43
-
44
-
45
-
46
-
47
-
48
-
49
-
50
-
51
-
52
-
53
-
54
-
55
-
56
-
57
-
58
-
59
-
60
-
61
-
62
-
63
-
64
-
65
-
66
-
67
-
68
-
69
-
70
-
71
-
72
-
73
-
74
-
75
-
76
-
77
-
78
-
79
-
80
-
81
-
82
-
83
-
84
-
85
-
86
-
87
-
88
-
89
-
90
-
91
-
92
-
93
-
94
-
95
-
96
-
97
-
98
-
99
-
100
-
101
-
102
-
103
-
104
-
105
-
106
-
107
-
108
-
109
-
110
-
111
-
112
-
113
-
114
-
115
-
116
-
117
-
118
-
119
-
120
-
121
-
122
-
123
-
124
-
125
-
126
-
127
-
128
-
129
-
130
-
131
-
132
-
133
-
134
-
135
-
136
-
137
-
138
-
139
-
140
-
141
-
142
-
143
-
144
-
145
-
146
-
147
-
148
-
149
-
 150
150 -
 151
151 -
 152
152 -
 153
153 -
 154
154 -
 155
155 -
 156
156 -
 157
157 -
 158
158 -
 159
159 -
 160
160 -
161
-
162
-
163
-
164
-
165
-
166
-
167
-
168
-
169
-
170
-
171
-
172
-
173
-
174
-
175
-
176
-
177
-
178
-
179
-
180
-
181
-
182
-
183
-
184
-
185
-
186
-
187
-
188
-
189
-
190
-
191
-
192
-
193
-
194
-
195
-
196
-
197
-
198
-
199
-
200
-
201
-
202
-
203
-
204
-
205
-
206
-
207
-
208
-
209
-
210
-
211
-
212
-
213
-
214
-
215
-
216
-
217
-
218
-
219
-
220
-
221
-
222
-
223
-
224
-
225
-
226
-
227
-
228
-
229
-
230
-
231
-
232
-
233
-
234
-
235
-
236
-
237
-
238
-
239
-
240
-
241
-
242
-
243
-
244
-
245
-
246
-
247
-
248
-
249
-
250
-
251
-
252
-
253
-
254
-
255
-
256
-
257
-
258
-
259
-
260
-
261
-
262
-
263
-
264
-
265
-
266
-
267
-
268
-
269
-
270
-
271
-
272
-
273
-
274
-
275
-
276
-
277
-
278
-
279
-
280
-
281
-
282
-
283
-
284
-
285
-
286
-
287
-
288
-
289
-
290
-
291
-
292
-
293
-
294
-
295
-
296
-
297
-
298
-
299
-
300
-
301
-
302
-
303
-
304
-
305
-
306
-
307
-
308
-
309
-
310
-
311
-
312
-
313
-
314
-
315
-
316
-
317
-
318
-
319
-
320
-
321
-
322
-
323
-
324
-
325
-
326
-
327
-
328
-
329
-
330
-
331
-
332
-
333
-
334
-
335
-
336
-
337
-
338
-
339
-
340
-
341
-
342
-
343
-
344
-
345
-
346
-
347
-
348
-
349
-
350
-
351
-
352
-
353
-
354
-
355
-
356
-
357
-
358
-
359
-
360
-
361
 |
 |