Brother International PEDESIGN 7.0 Users Manual - English - Page 215
Sew Setting Stage
 |
View all Brother International PEDESIGN 7.0 manuals
Add to My Manuals
Save this manual to your list of manuals |
Page 215 highlights
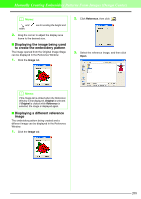
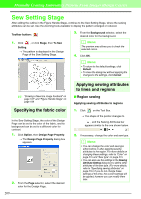
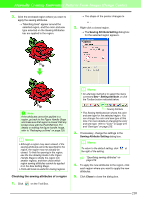
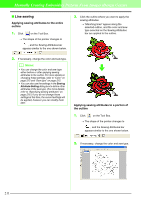
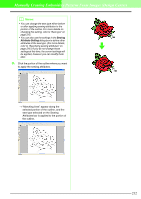
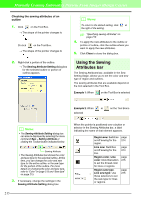
Manually Creating Embroidery Patterns From Images (Design Center) Sew Setting Stage After editing the outline in the Figure Handle Stage, continue to the Sew Setting Stage, where the sewing attributes can be set. Use the zooming tools available to display the pattern enlarged or reduced. Toolbar button: 1. Click , or click Stage, then To Sew Setting. → The pattern is displayed in the Design Page of the Sew Setting Stage. 3. From the Background selector, select the desired color for the background. b Memo: The preview area allows you to check the selected colors. 4. Click OK. b Memo: • To return to the default settings, click Default. • To close the dialog box without applying the changes to the settings, click Cancel. c "Drawing a New line image freehand" on page 197" and "Figure Handle Stage" on page 199 Specifying the fabric color In the Sew Setting Stage, the color of the Design Page can be set to the color of the fabric, and its background can be set to a different color for contrast. 1. Click Option, then Design Page Property. → The Design Page Property dialog box appears. 2. From the Page selector, select the desired color for the Design Page. 209 Applying sewing attributes to lines and regions I Region sewing Applying sewing attributes to regions 1. Click on the Tool Box. → The shape of the pointer changes to , and the Sewing Attributes bar appears similar to the one shown below. 2. If necessary, change the color and sew type. b Memo: • You can change the color and sew type either before or after applying sewing attributes to the region. For more details on changing these settings, refer to "Color" on page 215 and "Sew type" on page 215. • You can also use the settings in the Sewing Attribute Setting dialog box to define other attributes of the sew type. (For more details, refer to "Specifying sewing attributes" on page 216.) If you do not change these settings at this time, the current settings will be applied, however you can modify them later.
-
 1
1 -
2
-
3
-
4
-
5
-
6
-
7
-
8
-
9
-
10
-
11
-
12
-
13
-
14
-
15
-
16
-
17
-
18
-
19
-
20
-
21
-
22
-
23
-
24
-
25
-
26
-
27
-
28
-
29
-
30
-
31
-
32
-
33
-
34
-
35
-
36
-
37
-
38
-
39
-
40
-
41
-
42
-
43
-
44
-
45
-
46
-
47
-
48
-
49
-
50
-
51
-
52
-
53
-
54
-
55
-
56
-
57
-
58
-
59
-
60
-
61
-
62
-
63
-
64
-
65
-
66
-
67
-
68
-
69
-
70
-
71
-
72
-
73
-
74
-
75
-
76
-
77
-
78
-
79
-
80
-
81
-
82
-
83
-
84
-
85
-
86
-
87
-
88
-
89
-
90
-
91
-
92
-
93
-
94
-
95
-
96
-
97
-
98
-
99
-
100
-
101
-
102
-
103
-
104
-
105
-
106
-
107
-
108
-
109
-
110
-
111
-
112
-
113
-
114
-
115
-
116
-
117
-
118
-
119
-
120
-
121
-
122
-
123
-
124
-
125
-
126
-
127
-
128
-
129
-
130
-
131
-
132
-
133
-
134
-
135
-
136
-
137
-
138
-
139
-
140
-
141
-
142
-
143
-
144
-
145
-
146
-
147
-
148
-
149
-
150
-
151
-
152
-
153
-
154
-
155
-
156
-
157
-
158
-
159
-
160
-
161
-
162
-
163
-
164
-
165
-
166
-
167
-
168
-
169
-
170
-
171
-
172
-
173
-
174
-
175
-
176
-
177
-
178
-
179
-
180
-
181
-
182
-
183
-
184
-
185
-
186
-
187
-
188
-
189
-
190
-
191
-
192
-
193
-
194
-
195
-
196
-
197
-
198
-
199
-
200
-
201
-
202
-
203
-
204
-
205
-
206
-
207
-
208
-
209
-
 210
210 -
 211
211 -
 212
212 -
 213
213 -
 214
214 -
 215
215 -
 216
216 -
 217
217 -
 218
218 -
 219
219 -
 220
220 -
221
-
222
-
223
-
224
-
225
-
226
-
227
-
228
-
229
-
230
-
231
-
232
-
233
-
234
-
235
-
236
-
237
-
238
-
239
-
240
-
241
-
242
-
243
-
244
-
245
-
246
-
247
-
248
-
249
-
250
-
251
-
252
-
253
-
254
-
255
-
256
-
257
-
258
-
259
-
260
-
261
-
262
-
263
-
264
-
265
-
266
-
267
-
268
-
269
-
270
-
271
-
272
-
273
-
274
-
275
-
276
-
277
-
278
-
279
-
280
-
281
-
282
-
283
-
284
-
285
-
286
-
287
-
288
-
289
-
290
-
291
-
292
-
293
-
294
-
295
-
296
-
297
-
298
-
299
-
300
-
301
-
302
-
303
-
304
-
305
-
306
-
307
-
308
-
309
-
310
-
311
-
312
-
313
-
314
-
315
-
316
-
317
-
318
-
319
-
320
-
321
-
322
-
323
-
324
-
325
-
326
-
327
-
328
-
329
-
330
-
331
-
332
-
333
-
334
-
335
-
336
-
337
-
338
-
339
-
340
-
341
-
342
-
343
-
344
-
345
-
346
-
347
-
348
-
349
-
350
-
351
-
352
-
353
-
354
-
355
-
356
-
357
-
358
-
359
-
360
-
361
 |
 |