Adobe 65045315 Photoshop Elements Manual - Page 112
Smoothing selection edges with anti-aliasing and feathering
 |
UPC - 883919176512
View all Adobe 65045315 manuals
Add to My Manuals
Save this manual to your list of manuals |
Page 112 highlights
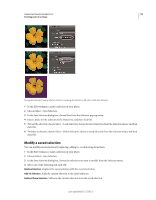
USING PHOTOSHOP ELEMENTS 10 106 Selecting parts of an image Smoothing selection edges with anti-aliasing and feathering Smooth the edges of a selection by anti-aliasing You can smooth the hard edges of a selection by anti-aliasing or feathering. Anti-aliasing smoothes the jagged edges of a selection by softening the color transition between edge pixels and background pixels. Because only the edge pixels change, no detail is lost. Anti-aliasing is useful when cutting, copying, and pasting selections to create composite images. You can select anti-aliasing with the Lasso, Polygonal Lasso, Magnetic Lasso, Elliptical Marquee, and Magic Wand tools. To anti-alias, you must select the Anti-Alias option before making the selection; you cannot add anti-aliasing to an existing selection. 1 In the Edit workspace, select the Lasso, Polygonal Lasso, Magnetic Lasso, Elliptical Marquee, or Magic Wand tool. 2 Select Anti-aliased in the options bar. 3 Make a selection in the image window. Blur the edges of a selection by feathering ❖ You can smooth the hard edges of a selection by feathering. Feathering blurs edges by building a transition between the selection and surrounding pixels. This blurring can cause some loss of detail at the edge of the selection. You can create a feathered selection with the Elliptical Marquee, Rectangular Marquee, Lasso, Polygonal Lasso, or Magnetic Lasso tool. You can also add feathering to an existing selection by using the Select menu. Feathering effects are apparent when you move, cut, copy, or fill the selection. Original image (left), and after making a feathered selection, applying the Inverse command, and filling with white (right) Define a feathered edge for a selection tool 1 In the Edit workspace, do one of the following: • Select any of the lasso or marquee tools from the toolbox, and enter a Feather value in the options bar to define the width of the feathering. The feathering begins at the selection border. • Select the Selection Brush tool, and select a soft-edged brush from the brushes pop-up panel in the options bar. 2 Make a selection in the image window. Define a feathered edge for an existing selection 1 In the Edit workspace, use a selection tool from the toolbox to make a selection. Last updated 1/2/2012
-
 1
1 -
2
-
3
-
4
-
5
-
6
-
7
-
8
-
9
-
10
-
11
-
12
-
13
-
14
-
15
-
16
-
17
-
18
-
19
-
20
-
21
-
22
-
23
-
24
-
25
-
26
-
27
-
28
-
29
-
30
-
31
-
32
-
33
-
34
-
35
-
36
-
37
-
38
-
39
-
40
-
41
-
42
-
43
-
44
-
45
-
46
-
47
-
48
-
49
-
50
-
51
-
52
-
53
-
54
-
55
-
56
-
57
-
58
-
59
-
60
-
61
-
62
-
63
-
64
-
65
-
66
-
67
-
68
-
69
-
70
-
71
-
72
-
73
-
74
-
75
-
76
-
77
-
78
-
79
-
80
-
81
-
82
-
83
-
84
-
85
-
86
-
87
-
88
-
89
-
90
-
91
-
92
-
93
-
94
-
95
-
96
-
97
-
98
-
99
-
100
-
101
-
102
-
103
-
104
-
105
-
106
-
 107
107 -
 108
108 -
 109
109 -
 110
110 -
 111
111 -
 112
112 -
 113
113 -
 114
114 -
 115
115 -
 116
116 -
 117
117 -
118
-
119
-
120
-
121
-
122
-
123
-
124
-
125
-
126
-
127
-
128
-
129
-
130
-
131
-
132
-
133
-
134
-
135
-
136
-
137
-
138
-
139
-
140
-
141
-
142
-
143
-
144
-
145
-
146
-
147
-
148
-
149
-
150
-
151
-
152
-
153
-
154
-
155
-
156
-
157
-
158
-
159
-
160
-
161
-
162
-
163
-
164
-
165
-
166
-
167
-
168
-
169
-
170
-
171
-
172
-
173
-
174
-
175
-
176
-
177
-
178
-
179
-
180
-
181
-
182
-
183
-
184
-
185
-
186
-
187
-
188
-
189
-
190
-
191
-
192
-
193
-
194
-
195
-
196
-
197
-
198
-
199
-
200
-
201
-
202
-
203
-
204
-
205
-
206
-
207
-
208
-
209
-
210
-
211
-
212
-
213
-
214
-
215
-
216
-
217
-
218
-
219
-
220
-
221
-
222
-
223
-
224
-
225
-
226
-
227
-
228
-
229
-
230
-
231
-
232
-
233
-
234
-
235
-
236
-
237
-
238
-
239
-
240
-
241
-
242
-
243
-
244
-
245
-
246
-
247
-
248
-
249
-
250
-
251
-
252
-
253
-
254
-
255
-
256
-
257
-
258
-
259
-
260
-
261
-
262
-
263
-
264
-
265
-
266
-
267
-
268
-
269
-
270
-
271
-
272
-
273
-
274
-
275
-
276
-
277
-
278
-
279
-
280
-
281
-
282
-
283
-
284
-
285
-
286
-
287
-
288
-
289
-
290
-
291
-
292
-
293
-
294
-
295
-
296
-
297
-
298
-
299
-
300
-
301
-
302
-
303
-
304
-
305
-
306
-
307
-
308
-
309
-
310
-
311
-
312
-
313
-
314
-
315
-
316
-
317
-
318
-
319
-
320
-
321
-
322
-
323
-
324
-
325
-
326
-
327
-
328
-
329
-
330
-
331
-
332
-
333
-
334
-
335
-
336
-
337
-
338
-
339
-
340
-
341
 |
 |
