Adobe 65045315 Photoshop Elements Manual - Page 173
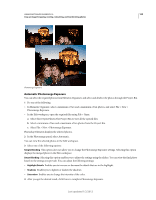
Photomerge Exposure, inside the room.
 |
UPC - 883919176512
View all Adobe 65045315 manuals
Add to My Manuals
Save this manual to your list of manuals |
Page 173 highlights
USING PHOTOSHOP ELEMENTS 10 167 Crop an image Cropping, resizing, retouching, and transforming photos A B C Photomerge Scene Cleaner A. Dragging a photo to the Final window B. Using the Pencil tool to the mark area to be replaced in the Final window C. Result in the Final window Photomerge Exposure For a video about photomerge features, see www.adobe.com/go/lrvid2342_pse9_en. Use Photomerge Exposure to efficiently handle scenes in photos with exposure challenges. You can blend two photos together to get a perfectly exposed photo. For example, if you have a photo with a window in the background and you want a perfect photo with the following properties: • A good exposure of the scenery outside the window. • A good exposure of the darker objects inside the room. In such a scenario, you often end up with either overexposed scenery outside the window or underexposed objects inside the room. To ensure that you get a perfect photo, do the following: • Take two or more photos of the same scene with different exposures. For best results, take the photos at different exposure value, with minimum shakes. For example: • You can take two or more photos with the flash turned on to properly expose the subject (the objects inside the room). • You can then take one photo with the flash turned off to properly expose the background (the scenery outside the window). You can use Exposure Bracketing in your camera to capture the same subject with a number of shots with different exposure settings. • Blend the photos to create a perfectly exposed photo. Photomerge Exposure facilitates blending the two photos together to get a perfectly exposed photo. Photomerge Exposure can be done in the following modes: • Automatic mode • Manual mode To obtain best results while using the Automatic mode, use photos that are shot at different exposure values, using Exposure Bracketing. To obtain best results while using the manual mode, use photos shot with flash turned on and flash turned off. Last updated 1/2/2012
-
 1
1 -
2
-
3
-
4
-
5
-
6
-
7
-
8
-
9
-
10
-
11
-
12
-
13
-
14
-
15
-
16
-
17
-
18
-
19
-
20
-
21
-
22
-
23
-
24
-
25
-
26
-
27
-
28
-
29
-
30
-
31
-
32
-
33
-
34
-
35
-
36
-
37
-
38
-
39
-
40
-
41
-
42
-
43
-
44
-
45
-
46
-
47
-
48
-
49
-
50
-
51
-
52
-
53
-
54
-
55
-
56
-
57
-
58
-
59
-
60
-
61
-
62
-
63
-
64
-
65
-
66
-
67
-
68
-
69
-
70
-
71
-
72
-
73
-
74
-
75
-
76
-
77
-
78
-
79
-
80
-
81
-
82
-
83
-
84
-
85
-
86
-
87
-
88
-
89
-
90
-
91
-
92
-
93
-
94
-
95
-
96
-
97
-
98
-
99
-
100
-
101
-
102
-
103
-
104
-
105
-
106
-
107
-
108
-
109
-
110
-
111
-
112
-
113
-
114
-
115
-
116
-
117
-
118
-
119
-
120
-
121
-
122
-
123
-
124
-
125
-
126
-
127
-
128
-
129
-
130
-
131
-
132
-
133
-
134
-
135
-
136
-
137
-
138
-
139
-
140
-
141
-
142
-
143
-
144
-
145
-
146
-
147
-
148
-
149
-
150
-
151
-
152
-
153
-
154
-
155
-
156
-
157
-
158
-
159
-
160
-
161
-
162
-
163
-
164
-
165
-
166
-
167
-
 168
168 -
 169
169 -
 170
170 -
 171
171 -
 172
172 -
 173
173 -
 174
174 -
 175
175 -
 176
176 -
 177
177 -
 178
178 -
179
-
180
-
181
-
182
-
183
-
184
-
185
-
186
-
187
-
188
-
189
-
190
-
191
-
192
-
193
-
194
-
195
-
196
-
197
-
198
-
199
-
200
-
201
-
202
-
203
-
204
-
205
-
206
-
207
-
208
-
209
-
210
-
211
-
212
-
213
-
214
-
215
-
216
-
217
-
218
-
219
-
220
-
221
-
222
-
223
-
224
-
225
-
226
-
227
-
228
-
229
-
230
-
231
-
232
-
233
-
234
-
235
-
236
-
237
-
238
-
239
-
240
-
241
-
242
-
243
-
244
-
245
-
246
-
247
-
248
-
249
-
250
-
251
-
252
-
253
-
254
-
255
-
256
-
257
-
258
-
259
-
260
-
261
-
262
-
263
-
264
-
265
-
266
-
267
-
268
-
269
-
270
-
271
-
272
-
273
-
274
-
275
-
276
-
277
-
278
-
279
-
280
-
281
-
282
-
283
-
284
-
285
-
286
-
287
-
288
-
289
-
290
-
291
-
292
-
293
-
294
-
295
-
296
-
297
-
298
-
299
-
300
-
301
-
302
-
303
-
304
-
305
-
306
-
307
-
308
-
309
-
310
-
311
-
312
-
313
-
314
-
315
-
316
-
317
-
318
-
319
-
320
-
321
-
322
-
323
-
324
-
325
-
326
-
327
-
328
-
329
-
330
-
331
-
332
-
333
-
334
-
335
-
336
-
337
-
338
-
339
-
340
-
341
 |
 |
